dual manager User manual We thank you for choosing Focal amplifiers for your Car Audio system and for sharing our philosophy: “the Spirit of Sound”. This product offers the latest advances in Focal amplifiers. In order to obtain the best results, we highly recommend you have your new amplifier installed by your local Focal distributor.
. Installation 2.1. System requirements To run the program you will need a PC with the following minimum configuration or specifications: • Supported Windows OS - Windows 98 with Microsoft Installer 2.0 (CD-ROM include last version of Installer) - Windows ME - Windows 2000 - Windows XP • CPU Minimum - 1GHz, recommended 2GHz and higher (this software makes intensive use of mathematics for DSP calculations).
2. Installation 2.3. Launching Dual Manager At the end of the previous step, a new shortcut has been created with a Focal Dual Manager icon on the computer desktop. To launch the program simply double click on the icon. If at this stage the amplifier is not connected or powered the following message will appear: “Amplifier is not connected. Program will be started in demo mode”.
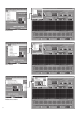
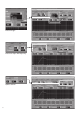
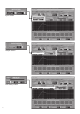
Load menu Save menu Preferences menu 04
3. Title bar and menus On the title bar is displayed a line of text which looks like the following: Focal Dual Manager (Loaded Preset 1: No Name). Restricted user mode. The left hand part is – obviously – the program name. The middle part, between brackets, indicates the last loaded Preset number and name: more information on presets is given in a further paragraph. Finally the right hand information describes the current status of the user mode: “restricted user mode” or “administrator mode”.
3. Title bar and menus 3.3. Save menu When clicking on Save a pull down menu is displayed, enabling the following operations: • Preset 1 to 5 When selecting one of the 5 Presets the current set of parameters, as displayed on the computer screen, will be saved in one of the five dedicated memory areas in the amplifier. Later on when the amplifier works in stand alone mode the Preset can be selected by pressing the corresponding button number on the remote controller.
4. Setting up the system (main screen) 4.1. Overview Below the Menus bar the screen comprises: - different areas corresponding to different processing functions or group of functions. Each of these areas is located in a particular box with a black outline and a title in white capital letters (e.g. TIME DELAY). - a middle area with a dB v. frequency graph, allowing to plot the frequency response resulting from the adjustments made to the processing parameters.
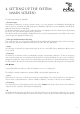
Crossover type Crossover slope and frequency Q-bass section 08
4. Setting up the system (main screen) The following settings are available: • Crossover type This parameter defines the crossover operation mode, out of four possible ones: Band-Pass (both high pass and low pass are activated), Low-Pass (high-pass is disabled), High-Pass (low pass disabled), and Off (both high pass and low pass are defeated). To edit this parameter, just click on the combo box where it is displayed.
Input section Output section Time delay section 10
4. Setting up the system (main screen) 4.5. Input section • Channel This defines the input channel(s) that is to be taken for digital processing and routed to the outputs it can selected between Left/Right (standard stereo source), Left+Right (mono summation of both input channels), Left (mono signal from left input), Right (mono signal from right input).
4. Setting up the system (main screen) To operate the button locate the mouse cursor on it, then drag it towards the left or right until the desired delay value is reached. While moving the cursor the updated value is displayed as a time delay, in ms (left box), and as its equivalent propagation distance, in mm and inches. In the previous example we should stop the cursor when the nearest value to the targeted one is reached, that is 1514mm (4.4ms).
4. Setting up the system (main screen) In Administrator mode, the Equalizer section is even more powerful and provides some additional flexibility: each of the 30 bands can actually be operated as an independent parametric EQ that may be configured individually. This is described in the next part of this paragraph, as mentioned earlier these features are accessible only in Administrator mode.
5. Hints and tips 5.1. Special edition keys When a parameter is edited by selection among a drop-down list of values, some particular keys can be used to navigate through the list: - [È] and [Í] keys: move one value up or down in the list - [PageUp] and [PageDown]: move one page up or down in the list - [Home] and [End]: go to the first or last value in the list - [Á] and [Ë]: (time delay only) increment or decrement 5.2.
5. Hints and tips 5.4. Default values Before Dual Manager has been executed for the first time and Presets have been defined by the user, the amplifier firmware uses default values for the various parameters, as listed below: SECTION PARAMETER DEFAULT VALUE Crossover Slope,dB Frequency, Hz (High Pass) Frequency, Hz (Low Pass) Crossover type Filter type 12 500 5000 Band-Pass Linkwitz-Riley Q-Bass Level, dB Frequency, Hz Q 6 80 1.
5. Hints and tips • Software error messages “Amplifier is not connected. Program will be started in demo mode.” Software will work in Demo mode. “Can not find password. Program will be terminated.” Password data are corrupted. Please, reinstall program again. “Hardware port error during waiting. Program will be terminated.” Please, check hardware and drivers. “Can not find amplifier in normal mode. Program will be terminated.” Hardware in upgrade mode. Exit program. Power off/ on device.
5. Hints and tips • Hardware connection errors Note: In the event of such error messages being displayed, double check hardware, drivers, and restart program. In the worst case please upgrade the firmware. “Sensitivity setting error.” “Sensitivity reading error.” For sensitivity. “Volume setting error.” “Volume reading error.” For volume. “Commutator setting error.” “Commutator reading error.” For commutator. “Mode setting error.” “Mode reading error.” State of On/Off buttons. “Delay setting error.