User manual focal power AMPLIfiers We thank you for choosing Focal amplifiers for your Car Audio system and for sharing our philosophy: “the Spirit of Sound”. This product offers the latest advances in Focal amplifiers. In order to obtain the best results, we highly recommend you have your new amplifier installed by your local Focal distributor.
WARNING • Do not turn on any function which may distract you while driving the vehicle. Functions requiring sustained attention must only be used when the vehicle is at a complete standstill. Make sure to always stop your vehicle in a safe place before operating these functions. There is a risk of causing an accident. • Keep the volume at a low level so as to be able to hear exterior noises while driving the vehicle. There is a risk of causing an accident.
CAUTION Listening for prolonged period at a high volume level, over 100dB, can lead to permanent deterioration of your hearing. Listening at a volume of over 130dB, even for short periods of time, can cause incurable damage and injury to your hearing. Stop operation in the event of a problem. Failure to heed this precaution may result in injuries or damage to the product. If a problem persists, return the product to your Focal distributor for repair.
FOREWORD NOTES Material required for the installation: • 2 conduits of suitable cross-section (1 conduit for the power cable, 1 conduit for the loudspeaker, REMOTE, • RCA signal and REMOTE CONTROL cables). • Multimeter (voltage/amperage) • Soldering iron + solder • Crimping tool • Stripping pliers • Wire cutter • Spanner for battery terminal • Hand drill and assorted drills • Heat shrinks of suitable diameter for the different cables.
installation The below section deals with issues regarding the vehicle which are necessary to take into account for the installation of the amplifier. You’ll save time by planning the system layout and wiring in advance. Ensure that during this preliminary step all the adjustments are accessible once the installation is complete.
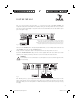
installation I - Set-Up and Cabling Where to install the amplifier? The amplifier power is such that substantial heat is generated when it is operation. This is why the amplifier has to be placed in a well-ventilated area of the car. 2 - Attaching the Amplifier (fig. 2) The surface onto which you want to attach the amplifier (boot of the car, etc.) may not be smooth enough (due to bumps, ribs, etc) to make it easy or even possible to fasten the amplifier.
installation 3 - Cabling WARNING If there is a doubt as to your ability to install the amplifier and to cable the system properly, get a Focal distributor to do it for you. WARNING Before you begin the connection phase of set-up, remove the vehicle battery’s negative (-) terminal. (fig. 1). CAUTION Avoid routing power supply cables close to low-level input cables (RCA), to your car’s radio aerial, or to sensitive units.
installation 3.2 - Route the low-level audio cables (RCA), the loudspeaker cables, the REMOTE cable, and the REMOTE CONTROL cable together (a REMOTE CONTROL is ONLY supplied with product references FP 1.800 and FP 5.500} and insulate them from other high-power car accessories, and in particular insulate them from electric motors (i.e. the windscreen-wiper motor, etc.). Retain the full length of the cables – adjustments can be made later. 3.3 - Route the positive power cables (+).
installation 3.5 - You can now start the connection phase – i.e. connection of the audio signal (RCA), REMOTE, and loudspeaker cables. Connect the RCAs to the amplifier, making sure that the polarities are correct (i.e. INPUT Left = black or white, INPUT Right = red). Connect the other end of the RCAs to the car radio’s RCA* outputs (Left = left ; Right = right).
installation WARNING The cable that links the positive (+) terminal to the battery at the amplifier’s “+ BATT” binding post terminal must ABSOLUTELY be fused (see current ratings listed in the table on page 19) not more than 40cm from the vehicle’s battery. The connections on the fuse-holder must be fully insulated. 3.7.1 - You can now start the fuse-holder (the role of which is to make the system safe) installation phase.
installation - Insert the new fuses in the fuse holder. Make sure that the new fuse rating corresponds to the product specifications. - Put the bottom cover back on and secure it with the screws then screw. - Turn the amplifier back into position with its bottom facing the attachment surface. - Screw in the fixing screws of the amplifier. - Connect the positive terminal of the battery powering the amplifier. 3.
installation fig. 10 3.12 - Focal amplifiers can be interlinked to facilitate upgrades to the Car Audio system. If you want to create a system that uses several amplifiers, it is therefore possible to save time by not having to connect the source audio cable (from the car radio) to the amplifier again. You simply need to use the “LINE OUT” output on the first Focal amplifier you have installed and connect it to the “INPUT” connector on the new amplifier you are installing.
installation
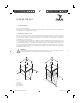
the amplifiers Focal Power 2.150 and Focal Power 2.75 Focal Power 4.75 14 notice amplis focal power gb.
LEGENDS Ajouter Ajouter Connections, features and controls INPUT(S): the RCA sockets are used for input of the line level signal. NOTE: the RCA inputs on the FP 4.75 and FP 5.500 model amplifiers relate to channels 1, 2, 3 and 4. LINE OUT: the RCA sockets enable a second amplifier to be connected into an existing system, without having to install additional RCA cables to connect the front of a vehicle with an additional amplifier. NOTE: the FP 5.500 amplifier system does not include a LINE OUT output.
LEGENDS LO PASS (low pass): the LO PASS potentiometer means that you can set the low pass filter frequency. The value selected is the frequency below which the signal will be amplified. NOTE: the LO PASS potentiometer on the FP 4.75 model amplifier relates to channels 1, 2, 3 and 4. The LO PASS switch located at the top of the control panel relates to channels 1 and 2; whereas the one at the bottom corresponds to channels 3 and 4. NOTE: the LO PASS feature on the FP 5.
LEGENDS Connections and functions specific to the FP 1.800 and FP 5.500 amplifiers. REMOTE CONTROL: NOTE: DO NOT CONFUSE REMOTE AND REMOTE CONTROL. The REMOTE CONTROL output is for connecting the supplied remote control unit. This accessory enables your to remotely adjust the amplifier’s gain. NOTE: the REMOTE CONTROL (remote control) of the FP 5.500 amplifier ONLY works on the SUB output (subwoofer). PHASE: the PHASE potentiometer allows you to adjust the channel phase according to the installation.
Tuning Tips In order to optimise the overlap of frequency ranges reproduced by the subwoofer and the coaxial or 2-way kits, we advise you to adjust the frequency of the HI PASS filter or that of the LO PASS with an RTA (real-time analyser). Another possibility is to refer to the packaging of your kit or its user’s manual. In the case of a Focal kit, the measurements supplied as frequency response take into account the installation of the kit inside a vehicle. Tuning the FP 1.
Technical specifications FP 2.75 FP 2.150 FP 4.75 FP 5.500 FP 1.800 Nominal RMS power measured at 13.8V continuously @ 4Ω 2x75W 2x150W 4x75W 4x75W + 1x200W 1x400W Nominal RMS power measured at 13.8V continuously @ 2Ω 2x100W 2x200W 4x100W 4x100W + 1x300W 1x600W RMS bridged power measured at 13.8V continuously @ 4Ω 1x200W 1x400W 2x200W Nominal RMS power measured at 13.
troubleshooting 1 The LED indicators on the top and on the side of the amplifier are off: - Check that there is a DC voltage of 10.5 to 15.5V at the amplifier power supply connector. - Check that there is a DC voltage of 10.5 to 15.5V at the battery positive terminal and at the remote switch-on cable (REMOTE). Check the quality of the connections at the two cables of the amplifier, the audio source, the battery and fuse holder Repair or replace if necessary.
troubleshooting 8 Noise increasing with accelerating vehicle - This is a ground loop phenomenon. To verify if this noise is caused by an incorrect grounding, switch off the amplifier and the audio source, then remove the amplifier’s RCA cables (ensure that they are shielded and are not touching the chassis once disconnected). Switch the amplifier and the audio source on. - If the problem persists, it is a grounding problem.
SETtingS Gain X-over 1-2 X-over 3-4 Hi-pass Lo-pass Subsonic Bass boost level Bass boost frequency Phase Gain X-over 1-2 X-over 3-4 Hi-pass Lo-pass Subsonic Bass boost level Bass boost frequency Phase 23 notice amplis focal power gb.
SETtingS Gain X-over 1-2 X-over 3-4 Hi-pass Lo-pass Subsonic Bass boost level Bass boost frequency Phase Gain X-over 1-2 X-over 3-4 Hi-pass Lo-pass Subsonic Bass boost level Bass boost frequency Phase 24 notice amplis focal power gb.
Notice AMPLIficateurs focal power Nous vous remercions d’avoir choisi Focal pour l’amplification de votre système Car Audio et de partager avec nous notre philosophie : “the Spirit of Sound”. Ce produit intègre les ultimes perfectionnements Focal en matière d’amplification. Pour obtenir les meilleurs résultats, nous vous recommandons de faire installer votre nouvel amplificateur par votre revendeur Focal.
avertissement •N’activer aucune fonction susceptible de détourner votre attention lors de la conduite du véhicule.0E230/7=A>;7=30?26@:?C=>0@=20C>>2=>;7=0B?787=<:20=2097;H2=>0<>?2302-B87;>:2306@8=088C??<>0A75B82>09@0 H:5;A@82D0>2;882?0=0>7@;7@?303>7BB2?0820H:5;A@8209C=30@=02=9?7;>03??0CHC=>098CA>;H2?0A230/7=A>;7=3D078040C0?;36@20 920B?7H76@2?0@=0CAA;92=>D •Garder le volume à faible niveau de façon à pouvoir entendre les bruits extérieurs durant la période de conduite du véhicule.
Attention L’écoute prolongée à fort niveau, au-delà de 110 dB, peut détériorer durablement l’audition. Des écoutes, même brèves, au-delà de 130 dB, peuvent provoquer des lésions auditives irrémédiables.0 Interrompre toute utilisation en cas de problème.
avant-propos Matériel requis pour effectuer l’installation : K00)0 ;7=0 C9:6@C>230 080 C>;7=I0 80 0 920 A96823 5C@>FBC?82@?3I0JBLL+BI0579@8C>;7=0J1(02>0JBLL+B01LD+JLE2 K0L@8>;5,>?200H78>C<2AC5B:?C<22 K0J2?0=037@92?010:>C;= K04;=A20=032?>;? K04;=A20=09:=@92? K017@B2F/;83 K018:092067?=209206C>>2?;2 K042?A2@320=05C;=02>05,A5230C337?>;23 K0MC;=230>52?57?:>?CA>C682309209;C5,>?230CBB?7B?;:30C@-09;//:?2=>30A968230 K019682098C8;52=>C>;7=092087=<@
installation EC0 32A>;7=0 A;F92337@30 >?C;>20 920 B7;=>30 ?28C>;/30 C@0 H:5;A@820 97=>0 ;80 /C@>0 >2=;?0 A75B>20 B7@?0 88;=3>C88C>;7=0 920 88C5B8;/;AC>2@?D0 >7@30 25B30 2=0 B8C=;/;C=>0 =0 88CHC=A20 8C0 9;3B73;>;7=0 9@0 343>,520 2>0 9@0 A968C<2D0 (33@?2NFH7@3I0 9@?C=>0 A2>>20 :>CB20 B?:BC?C>7;?2I0 6@20 882=3256820 9230 ?:<8C<230 ?23>2?7=>0 CAA233;68230 @=20 /7;30 88;=3>C88C>;7=0>2?5;=:2D Avant de commencer l’installation, merci de suivre scrupuleusement les règles suivantes : 1 - (B?,3082A>@?
installation I - Mise en place et câblage LR0;=3>C882?088C5B8;/;AC>2@?0S B=0?C;37=09208C0B@;33C=A2092088C5B8;/;AC>2@?I0@=20/7?>20A5C82@?023>0B?79@;>2087?309@0/7=A>;7==252=>D047@?0A2>>20 ?C;37=I088C5B8;/;AC>2@?097;>0<>?2057=>:09C=30@=02=9?7;>0B2?52>>C=>0@=2067==20H2=>;8C>;7=D0 2 - Fixation de l’amplificateur 0/;;7=0 0A7//?2I0 Q20 B2@>0 B?:32=>2?0 9230 ;??:<@8C?;>:30 0673328C<23I0 =2?H@?23I0 9:A?7A5252=>3Q20 ?2=9C=>09;//;A;8207@025B08C067==20/;-C>;7=092088C5B8;/;AC>2@?D04C=3
installation 3 - Câblage AVERTISSEMENT B=0 AC30 920 97@>20 3@?0 88CB>;>@920 =0 ;=3>C882?0 88C5B8;/;AC>2@?0 2>0 A9682?0 820 343>,520 920 /CT7=0 C9:6@C>2I0 A7=/;2?0A2>>20>9A520=0@=0?2H2=92@?A;=3>C88C>2@?0J7AC8D ATTENTION 0BH;>2?0 920 /C;?20 BC332?0 8230 A968230 98C8;52=>C>;7=0 B?,30 9230 A968230 982=>?:20 6C30 =;H2C@0 0J1(2I0 920 88C=>2==2I0 9230 :6@;B252=>30 2>0 /C;3A2C@-0 32=3;6823D0 E230 /;830 98C8;52=>C>;7=0 >?C=3B7?>2=>0 @=0 A7@?C=>0 :82H:0B7@HC=>0B?79@;?20@=0BC?C3;>C<209@03;<=C80C@9;7D ATTENTION J:9@;?
installation 3.2 -0JC;?20A525;=2?02=32568208230A968230920579@8C>;7=00J1(2I08230A9682305C@>FBC?82@?3I0820A96820JBLL+BI0 C;=3;06@20820A96820JBLL+B01LD+JLE0O8C0JBLL+B01LD+JLE00A755C=9209:B7?>:22023>0@D7E@BLBD+0 /7@?=;20CH2A08230?:/:?2=A230J408D&--02>0J40*D*--P02=08230;378C=>09230C@>?230CAA2337;?230C@>7576;8230920/7?>20 B@;33C=A2I0BC?>;A@8;,?252=>0823057>2@?30:82A>?;6@2300233@;20<8CA2I0Q2D017=32?H2?0>7@>208C087=<@2@?09230A96823I0 2882032?C0C;@3>:20B8@30>C?9D 3.
installation 3.
installation ATTENTION E20A96820?28;C=>08C067?=20B73;>;H2001209208C06C>>2?;20C@067?=;2?0U10N(++V092088C5B8;/;AC>2@?097;>07L4BJ(+7>BLBD+0 A75B7?>2?0@=0/@3;68200HC82@?092088C5B:?C<20=0?2B:?2?09C=30820>C682C@0B07820=07-0A507@057;=309208C06C>>2?;20 9@0H:5;A@82D0E230A7==2-;7=309@0B7?>2F/@3;682097;H2=>0<>?20:>C=A523D0 3.7.
installation F048CA2?0820=7@H2C@0/@3;68202=038C33@?C=>09208C0BC?/C;>20A7??23B7=9C=A2098C5B:?C<2D0 F0L2>>?20820ACB7>02=0B8CA20B@;30H;332?08230H;3D F0+7@?=2?088C5B8;/;AC>2@?0920/CT7=0=0CH7;?08C0/CA20C??;,?20A7=>?20820A7//?207@08C0BC?7;0920/;-C>;7=0A57;3;2D F0J2H;332?08230H;30920/;-C>;7=092088C5B8;/;AC>2@?D F017==2A>2?08C0A73320B73;>;H2001209208C06C>>2?;20C8;52=>C=>088C5B8;/;AC>2@?D 3.
installation /;
installation
les amplificateurs Focal Power 2.150 et Focal Power 2.75 Focal Power 4.75 5& notice amplis focal power fr.
Légendes Connexions, fonctions et réglages INPUT(S) :08230/;A5230J1(037=>09:9;:230=0882=>?:209@03;<=C806C30=;H2C@D NOTE0X082302=>?:230J1(09230C5B8;/;AC>2@?30J407D6*02>0J40*D*--037=>0?28C>;H230C@-0AC=C@-08I )I 5 2> 7D LINE OUT :0 8230 /;A5230 J1(0 B2?52>>2=>0 920 A7==2A>2?0 @=0 32A7=90 C5B8;/;AC>2@?0 2=0 AC3AC92I0 3C=30 CH7;?0 =0 CA525;=2?0 9230 A968230 J1(0 3@BB8:52=>C;?230 920 88CHC=>0 9@0 H:5;A@820 H2?30 88C5B8;/;AC>2@?0 C99;>;7==28D NOTE :088C5B8;/;AC>2@?0J40*D*--0=20A75B7?>20BC3092037?>;20E7DB0L@+D
Légendes L0 O PASS (passe-bas) :0820B7>2=>;75,>?20?7>C>;/0EL04(CC0B2?52>0920?:<82?08C0HC82@?09@0/;8>?20BC332F6C3D0EC0 HC82@?03:82A>;7==:209:/;=;>08C0/?:6@2=A20;@36@8=08C6@288208203;<=C8032?C0C5B8;/;:D NOTE :08230B7>2=>;75,>?230?7>C>;/30EL04(CC092088C5B8;/;AC>2@?0J407D6*0A7=A2?=2=>08230AC=C@-08I0)I0502>07D0 E20EL04(CC03;>@:02=05C@>09@0BC==2C@0920?:<8C<2023>0?28C>;/0C@-0AC=C@-0802>0)0\0C87?306@20A28@;03;>@:02=06C30 9@0BC==2C@0C<;>03@?08230AC=C@-0502>07D NOTE : Connexions et fonctions spécifiques aux amplif
Légendes GAIN :0820B7>2=>;75,>?20?7>C>;/0M(7D0B2?52>0920?25C@332?0820=;H2C@09@03;<=C806C30=;H2C@02=>?C=>09C=30 88C5B8;/;AC>2@?0=0923>;=C>;7=09@03@6.
Astuces de réglages (/;=0987B>;5;32?0820?2A7@B252=>09230/?:6@2=A230?2>?C=3A?;>230BC?08203@6.
Spécificités FP 2.75 FP 2.150 FP 4.75 FP 5.500 FP 1.
dépannage 1 Le témoin lumineux situé sur la face supérieure de l’amplificateur est éteint : F00>:?;/;2?08C0B?:32=A2098@=0A7@?C=>0A7=>;=@09208-I*0=08*I*0>0C@0=;H2C@09230A7==2A>2@?3098C8;52=>C>;7=0920 88C5B8;/;AC>2@?D F00>:?;/;2?08C0B?:32=A2098@=0A7@?C=>0A7=>;=@09208-I*0=08*I*0>0C@0=;H2C@09208C067?=20B73;>;H209208C06C>>2?;20 2>0 9@0 A96820 98C88@5C<20 =0 9;3>C=A20 0JBLL+B2D0 >:?;/;2?0 8C0 6@C8;>:0 9230 A7==2-;7=30 9230 92@-0 A968230 C@0 =;H2C@092088C5B8;/;AC>2@?I09208C037@?A20C@9;7I09208C06C>>2?;202>09@0B7?>
dépannage 7 L’amplificateur s’arrête après une longue période de fonctionnement F00>:?;/;2?0 8C0 A7@82@?0 9@0 >:57;=0 920 B?7>2A>;7=D0 C;0 A28@;FA;0 23>0 ?7@<2I0 A28C0 3;<=;/;20 6@20 88C5B8;/;AC>2@?0 23>0 B?76C68252=>0 2=0 B?7>2A>;7=0 >52?5;6@2D0 12A;0 ?:H,820 @=0 5C@HC;30 ?2/?7;9;33252=>0 9?0 =0 @=0 5C@HC;30 B73;>;7==252=>092088C5B8;/;AC>2@?D0 F00C;0 820 ?2/?7;9;33252=>0 23>0 67=I0 H:?;/;2?0 88;5B:9C=A20 9230 5C@>FBC?82@?30 C/;=0 920 38C33@?2?0 6@828820 23>0 A75BC>;6820CH2A08230ACBCA;>:3092088C5B8;/;AC>2@
réglages Gain X-over 1-2 X-over 3-4 Hi-pass Lo-pass Subsonic Niveau du bass boost Fréquence du bass boost Phase Gain X-over 1-2 X-over 3-4 Hi-pass Lo-pass Subsonic Niveau du bass boost Fréquence du bass boost Phase 76 notice amplis focal power fr.
réglages Gain X-over 1-2 X-over 3-4 Hi-pass Lo-pass Subsonic Niveau du bass boost Fréquence du bass boost Phase Gain X-over 1-2 X-over 3-4 Hi-pass Lo-pass Subsonic Niveau du bass boost Fréquence du bass boost Phase 7& notice amplis focal power fr.
Garantie france Pour validation de la garantie Focal, merci de nous retourner cette page dans les 10 jours, à l’adresse suivante : Focal-JMlab - BP 374 - 108, rue de l’Avenir - 42353 La Talaudière cedex - FRANCE Modèle : N° de série : Nom du revendeur : Ville : Date de l’achat : Prix de l’achat : Votre nom : Âge : Profession : Votre adresse complète : Votre adresse email : Composition de votre installation (marque, modèle) : Cassette : CD : Système de navigation : Système multimédia : DVD : H
garantie amplis focal power.
international guarantee The Focal guarantee only applies if this page is returned to us within 10 days of purchase, to the following address: Focal-JMlab - BP 374 - 108, rue de l’Avenir - 42353 La Talaudière cedex - FRANCE Model: Serial number: Name of dealer: Town: Date of purchase: Purchase price: Your name: Age: Occupation: Your complete address: Your email address: Details of your installation (brand, model): Cassette: CD: Navigation: Multimedia center: DVD: Loudspeakers: CD-change: Oth
Focal ® is a registered trademark of Focal- JMlab ® - www.focal-fr.com Focal- JMlab ® - BP 374 - 108, rue de l'Avenir - 42353 La Talaudière cedex - France Tel. (+33) 04 77 43 57 00 - Fax (+33) 04 77 43 57 04 - SCOS -051207/5 garantie amplis focal power.