User Guide FFFA001069 www.focusrite.
IMPORTANT SAFETY INSTRUCTIONS 1. Read these instructions. 2. Keep these instructions. 3. Heed all warnings. 4. Follow all instructions. 5. Do not use this apparatus with water. 6. Clean only with dry cloth. 7. Do not block any ventilation openings. Install in accordance with the manufacturer’s instructions. 8. Do not install near any heat sources such as radiators, heat registers, stoves, or other apparatus (including amplifiers) that produce heat. 9.
GB he apparatus shall be connected to a mains socket outlet with a protective T earthing connection. FIN Laite on liitettävä suojamaadoituskoskettimilla va rustettuumpistorasiaan. NOR Apparatet må tikoples jordet stikkontakt. SWE Apparaten skall anslutas till jordat uttag. CAUTION: TO REDUCE THE RISK OF ELECTRIC SHOCK, DO NOT REMOVE COVER (OR BACK). NO USER-SERVICEABLE PARTS INSIDE. REFER SERVICING TO QUALIFIED SERVICE PERSONNEL.
ENVIRONMENTAL DECLARATION Compliance Information Statement: Declaration of Compliance procedure Product Identification: Focusrite iTrack Dock Studio Pack Responsible party: American Music and Sound Address: 325 Executive Drive 4 Suite 300 Southaven MS 38672 Telephone: 800-431-2609 This device complies with part 15 of the FCC Rules.
TABLE OF CONTENTS IMPORTANT SAFETY INSTRUCTIONS . . . . . . . . . . . . . . . . . . . . . . . . . . . . . . . . . . . . . . . . . . . . . . . 2 TABLE OF CONTENTS . . . . . . . . . . . . . . . . . . . . . . . . . . . . . . . . . . . . . . . . . . . . . . . . . . . . . . . . . . . . 5 OVERVIEW . . . . . . . . . . . . . . . . . . . . . . . . . . . . . . . . . . . . . .
OVERVIEW Introduction Thank you for downloading this User Guide for the iTrack Dock Studio Pack; we presume you have just become the proud owner of one. The iTrack Dock is one of the family of Focusrite professional digital audio interfaces incorporating high quality Focusrite analogue pre-amplifiers. You now have a simple, compact and complete solution for recording with a microphone or directly from instruments, by routing high quality audio to and from a compatible iPad® device.
The iTrack Dock uses renowned Focusrite analogue mic pre-amps, with over 105 dB of dynamic range. 48 V phantom power is available to power the CM25B, or other studio quality condenser microphones. The dedicated instrument input allows direct connection of an electric guitar or bass, including those with high-output pickups.
Note that it is not possible to power the Dock from the iPad; the dock will only work if its external PSU is connected and the unit switched on at the rear panel. The iTrack Dock is also able to provide power to a Class Compliant USB MIDI controller connected to the USB MIDI port, subject to current limitations – please consult the manual for your MIDI controller to check its power requirements. Some MIDI controllers will require a separate PSU.
GETTING STARTED Audio Setup in your app iTrack Dock is currently compatible with all Core Audio iPad apps, including the following: Supplied with the Dock: • Tape by Focusrite (our own recording app) • Novation Launchpad (audio outputs only, plus USB MIDI) • Novation Launchkey (audio outputs only, plus USB MIDI) Third-party apps: • GarageBand • Cubasis • Auria • Tracktor • AudioBus Whichever recording app you’re using, its input signals – the signals you’re recording – will be derived from the iTrack Dock o
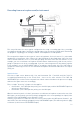
Recording from a microphone and/or instrument This setup illustrates the most typical configuration for using a recording app. Here, you might record guitar through Input 1 and vocals through Input 2 into your preferred app, while monitoring the playback – anything you’ve already recorded - via headphones or loudspeakers. The rear panel has inputs for three types of source: microphones, line level sources (i.e., other audio equipment) or instruments.
Microphone Dos and Don’ts A guide to microphone technique is beyond the scope of this User Guide (though many excellent books on the subject are available), but if you are new to recording with a studio quality microphone, you need to observe a few golden rules. DO use a mic stand. The CM25B has an industry-standard 5/8” threaded insert which allows it to be mounted on most mic stands. An 3/8” adaptor is included to allow it to be fitted to mic stands that have this thread size.
The HP60Bs have a low noise, oxygen-free copper cable, fitted with a ¼” (6.35 mm) 3-pole (TRS) jack plug.This should be connected to the socket at the right hand side of the iTrack Dock (indicated by a Insert headphone symbol symbol). The iTrack Dock’s headphone output is, of course, suitable for use with other models of headphones. The volume in the headphones can be adjusted by the dedicated control (see [6] on page 15).
Using Direct Monitoring You will frequently hear the term “latency” used in connection with digital audio systems. In the case of the simple recording application described above, latency will be the time it takes for your input signals to pass through your iPad and audio recording app. Latency can be a problem for a performer who wishes to record while monitoring their input signals. The iTrack Dock is fitted with a “Direct Monitoring” option, which completely overcomes this problem.
To record a guitar, follow the procedure below: 1. Plug your guitar into the INSTRUMENT socket of INPUT 1 of the iTrack Dock 2. Open the GarageBand song you want to work on. 3. Create a guitar track by tapping the ‘+’ button on the bottom left-hand corner of the screen, select Guitar Amp Track and scroll to select the desired Amp model to be used. 4. Tap the jack plug icon to open the Input Settings controls. 5. Select Left Channel to route the instrument input to the guitar track. 6.
HARDWARE FEATURES Top Panel 2 1 9 3 8 7 5 4 6 The Top Panel includes the input gain and monitoring controls. 1. GAIN 01 and GAIN 02 – adjust the input gain for the input signals connected at INPUT 1 and INPUT 2 respectively. The gain controls have concentric bi-colour LED ‘rings’ to confirm signal level: green indicates an input level of at least -24 dBFS (i.e. ‘signal present’), the ring then turns red (and stays red for one second) when the signal level reaches 0 dBFS. 2.
Back Panel 6 5 7 3 4 2 8 1 1. INPUT 1 – three connectors: MIC - an XLR socket for microphones, LINE – a ¼” (6.35 mm) TRS jack socket for connecting balanced (or unbalanced) line level sources and INSTRUMENT – a ¼” (6.35 mm) TS jack socket for connecting an electric instrument such as a guitar. 2. INPUT 2 – as [1], but only two connectors – MIC and LINE. 3. 48V - phantom power switch for mic inputs - enables +48 V phantom power at the XLR sockets for both inputs.
SPECIFICATIONS Performance Specifications ADC Dynamic Range 105 dB ‘A-weighted’ (all inputs). Converter chipset A/D dynamic range 114 dB DAC Dynamic Range Range 104 dB ‘A-weighted’ (all outputs). Converter chipset D/A dynamic range 114 dB Supported sample rates 44.1 kHz, 48 kHz and 96 kHz Clock source Internal Microphone Inputs (Chs 1 & 2) Frequency Response 20 Hz – 20 kHz +/-0.5 dB (minimum gain) Gain Range -5 dB to +45 dB Max input level +4 dBu min.
Physical and Electrical Characteristics Inputs 1 & 2 Connectors XLR x 2 (Mic); ¼” TRS jack x 2 (Line); ¼” TS jack x 1 (Inst) on rear panel Mic/Line switching Automatic Line/Instrument switching (Ch 1 only) Automatic Phantom power Shared +48 V phantom power switch for Inputs 1 & 2 Outputs Monitor outputs 2 x balanced ¼” TRS jacks on rear panel Stereo headphone output ¼” TRS jack on side panel Main output level control Headphones level control On top panel Other I/O USB 1 x USB MIDI 2.
iTrack Studio HP60B headphones specifications Type Closed Driver diameter 53 mm Impedance 60 ohms SPL 94 dB ±3 dB Frequency response 10 Hz – 30 kHz Max. power rating 1.2 W Cable length 3 m (approx.) Connectors 3.5 mm / 6.35 mm dia. (via adaptor) Weight 280 g (inc. cable) TROUBLESHOOTING For all troubleshooting queries, please visit the Focusrite Answerbase at http://www.focusrite.com/answerbase where you will find additional information about common operational problems.