
Operation Manual


9
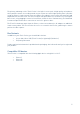
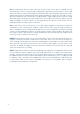
Connecting and powering the iTrack Pocket
Your iTrack Pocket interface is powered by your iPhone. Use the cable supplied to connect them
together. One end of the cable is fitted with a Micro USB connector; plug this into the DEVICE LINK
socket on the rear of the iTrack Pocket. The other end is fitted with a Lightning connector; plug this
into the socket on your iPhone.
The single cable provides the iTrack Pocket with power and also carries all the audio data.
While your iPhone will have no problem in providing the power the iTrack Pocket needs, do recognise
that using the iTrack Pocket represents an additional drain on your iPhone’s battery. It is not a good
idea to start some key recordings when your iPhone’s batteries are already low on charge!
To maximise your iPhone’s battery life when using iTrack Pocket, we recommend that you check the
following:
• Close any other apps that might be running;
• Disable your phone’s GPS functions;
• Enable Airplane Mode; this will also ensure that no one will ruin your take by calling you
while you’re recording, but remember to turn Airplane Mode off again before uploading
your performance to YouTube or elsewhere.
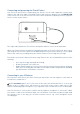
Connecting to your iOS device
The only other connection to your iTrack Pocket you may need is one from a guitar or other musical
instrument or sound source.
The Instrument input is the ¼” jack socket on the side of the unit marked “Mic L”. It can accept
signals of up to +16 dBu in level, which means it can also be used to connect audio sources with
outputs considerably higher than guitars, e.g., keyboards or other sound sources such as drum pads.
Your iTrack Pocket is a stereo device, and has two microphones arranged as a “stereo pair”. When
you connect a cable to the Instrument input, the left-hand mic is disconnected, but the right-hand
one remains active. In this way, you can now record two sources, e.g., vocals and guitar in your
recording app.