User Guide FA0687-03 www.focusrite.
IMPORTANT SAFETY INSTRUCTIONS 1. Read these instructions. 2. Keep these instructions. 3. Heed all warnings. 4. Follow all instructions. 5. Do not use this apparatus with water. 6. Clean only with dry cloth. 7. Do not install near any heat sources such as radiators, heat registers, stoves, or other apparatus (including amplifiers) that produce heat. 8.
ENVIRONMENTAL DECLARATION Compliance Information Statement: Declaration of Compliance procedure Product Identification: Focusrite iTrack Solo Responsible party: American Music and Sound Address: 5304 Derry Avenue #C Agoura Hills, CA 91301 Telephone: 800-994-4984 This device complies with part 15 of the FCC Rules.
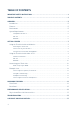
TABLE OF CONTENTS IMPORTANT SAFETY INSTRUCTIONS . . . . . . . . . . . . . . . . . . . . . . . . . . . . . . . . . . . . . . . . . . . . . . . 2 TABLE OF CONTENTS . . . . . . . . . . . . . . . . . . . . . . . . . . . . . . . . . . . . . . . . . . . . . . . . . . . . . . . . . . . . 4 OVERVIEW . . . . . . . . . . . . . . . . . . . . . . . . . . . . . . . . . . . . . .
OVERVIEW Introduction Thank you for purchasing this iTrack Solo, one of the family of Focusrite professional computer audio interfaces incorporating high quality Focusrite analogue pre-amplifiers. You now have a simple and compact solution for routing high quality audio to and from your iPad, iPad 2, iPad (3rd Generation) or computer. This User Guide provides a detailed explanation of the hardware to help you achieve a thorough understanding of the product’s operational features.
System Requirements Compatible iOS devices: iPad, iPad 2, iPad (3rd generation) Mac OS Apple Macintosh with a high-speed USB 2.0-compliant USB port OS: Mac OS X 10.7 or later (Lion or Mountain Lion) Windows Windows compatible computer with a USB 2.
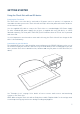
GETTING STARTED Using the iTrack Solo with an iOS device Powering the iTrack Solo The iTrack Solo is an active device, and needs a DC power source to operate. It is important to remember that when you use the iTrack Solo with an iPad, it will not be powered from the iOS device via the interface cable. Use the supplied USB cable to connect the iTrack Solo to a standard Apple USB Power Supply (or other standard USB power supply). One of these is supplied with every iOS device, or can be obtained separately.
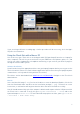
Using the iTrack Solo with GarageBand GarageBand is one of the most popular recording apps for iOS devices. It is a useful compositional tool and used on its own, allows you to create music from the range of virtual instruments it provides. With iTrack Solo, you can add vocals and real-world instruments as well.
If you are using a different recording app, a similar procedure will be necessary; check the App’s Help files for information. Using the iTrack Solo with a Mac or PC You can also use your iTrack Solo as an analogue audio I/O (Input-Output) interface to a laptop (or other computer). This will let you record tracks on your DAW from a microphone, guitar, etc., and also let you connect loudspeaker or headphone monitoring, so you can hear your work in progress through an external audio system.
Windows Double-click the Windows (*.exe) version to start the download. Save the file to a convenient location, and when the download has completed, double-click it. Follow all on-screen instructions; a confirmation will be given when the driver has been installed successfully. Restart your laptop/computer, and then connect the iTrack Solo to a USB port using the supplied cable. Your OS should automatically switch the computer’s default audio outputs to be the USB port to which the iTrack Solo is connected.
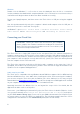
Once the iTrack Solo is set as the preferred Audio Device* in your DAW, Inputs 1 & 2 and Outputs 1 & 2 will appear in your DAW’s Audio I/O preferences. Depending on your DAW, you may need to enable certain inputs or outputs before use. The two examples below show Inputs 1 & 2 and Outputs 1 & 2 enabled in the Ableton Lite Audio Preferences. *Typical name. Terminology may differ slightly between DAWs.
Example of use The iTrack Solo is the ideal interface for an iPad or a DAW application on a laptop or other computer. A typical set of connections is illustrated below: Connecting a microphone / instrument This setup illustrates a typical configuration for recording – either into your iOS device, or by using DAW software on your Mac or PC.
Using Direct Monitoring You will frequently hear the term “latency” used in connection with digital audio systems. In the case of the simple recording application described above, latency will be the time it takes for your input signals to pass through your recording device (laptop or iPad, etc.) and the associated software. Latency can be a problem for a performer who wishes to record while monitoring their input signals.
The line output connectors are standard phono (RCA) sockets. Typical consumer (hi-fi) amplifiers and small powered monitors will have inputs on phono (RCA) sockets or a single 3.5 mm 3-pole jack plug (intended for direct connection to a computer). In either case, use a suitable connecting cable with phono plugs (RCA jacks) at one end.
Back Panel 1 2 3 4 1. Kensington security lock - secure your iTrack Solo to a suitable structure if desired. 2. USB 2.0 port - Type B connector; connect to your laptop or desktop with cable supplied. You will need to connect this port to an Apple USB Power Supply when using the iTrack Solo with an iOS device. 3. DEVICE LINK - proprietary connector; use the cable supplied to connect this port to your iPad. 4. LINE OUTPUTS - 2 x phono (RCA) sockets; +8 dBV max. output level.
PERFORMANCE SPECIFICATIONS Clock source: Internal ADC Dynamic Range 105 dB ‘A-weighted’ (all inputs). Converter chipset A/D dynamic range 114 dB DAC Dynamic Range Range 105 dB ‘A-weighted’ (all outputs). Converter chipset D/A dynamic range 114 dB Supported Sample Rates 44.1 kHz, 48 kHz, 88.2 kHz, 96 kHz / 24 bit – for Mac and PC 44.1 kHz, 48 kHz / 16 bit – operation with iPad. 24 bit audio available on playback only with iPad. Microphone Input 1 Frequency Response 20 Hz – 20 kHz +/- 0.
Physical and Electrical Characteristics Analogue Input 1 Connector Balanced, via female 3-pin XLR on front panel Phantom power 48 V phantom power switch Analogue Input 2 Connector Unbalanced, via ¼” (6.