R1 User Guide FFFA002119-01 www.focusrite.
CONTENTS About this User Guide . . . . . . . . . . . . . . . . . . . . . . . . . . . . . . . . . . . . . . . . . . . . . . . . . . . . . . . . . . . . . . . . . . . 3 Box Contents . . . . . . . . . . . . . . . . . . . . . . . . . . . . . . . . . . . . . . . . . . . . . . . . . . . . . . . . . . . . . . . . . . . . . . . . . . . . 3 INTRODUCTION . . . . . . . . . . . . . . . . . . . . . . . . . . . . . . . . . . . . . . . . . . . . . . . . . . . . . . . . . . . . . . . . . . . . . . . . . . . . . . .
About this User Guide This user guide applies to the RedNet R1. It provides information about installing and using the unit, and how it can be connected into your system. Dante® and Audinate® are registered trademarks of Audinate Pty Ltd.
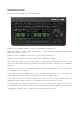
INTRODUCTION Thank you for purchasing the Focusrite RedNet R1. RedNet R1 is a hardware monitor controller and headphone output device. RedNet R1 controls Focusrite audio‑over‑IP devices such as Red 4Pre, Red 8Pre, Red 8Line and Red 16Line monitor sections. RedNet R1 has the capability to control the mic pres of the Red interfaces. RedNet R1 features two main sections: Input Sources and Monitor Outputs.
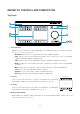
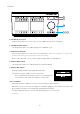
REDNET R1 CONTROLS AND CONNECTIONS Top Panel 4 6 1 5 2 7 3 8 9 10 1 Function Keys Eight keys select the device’s operating mode, recall submenus and access system settings. See page 10 for additional information.
Top Panel . . . 6 5 7 8 9 10 5 Headphone Level Pot Controls the volume level sent to the stereo headphone jack on the rear panel. 6 Headphone Mute Switch Latching switch mutes the audio going to the headphone jack. 7 Output Level Encoder Controls the volume level sent to the selected monitors. Please refer to Appendix 2 on page 22 for additional information regarding the system volume control setting. Also used to adjust preset level values, gain settings and screen brightness.
Preset Switch . . . To store a preset level: • Press the Preset switch • Screen 2 displays current level and the stored values for presets 1 & 2.
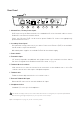
Rear Panel 3 2 1 4 5 6 7 8 1 Network Port / Primary Power Input* RJ45 connector for the Dante network. Use standard Cat 5e or Cat 6 network cable to connect RedNet R1 to an Ethernet network switch. Power over Ethernet (PoE) can be used to power RedNet R1. Connect an appropriately powered Ethernet source. 2 Secondary Power Input* DC input with locking connector for use where Power-over-Ethernet (PoE) is not available. Can be used in conjunction with PoE.
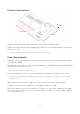
Physical Characteristics 45mm / 1.8” 262mm / 10.3” 133mm / 5.2” RedNet R1 dimensions (excluding controls) are illustrated in the diagram above. RedNet R1 weighs 0.85 kg and is equipped with rubber feet for desktop mounting. Cooling is by natural convection. Note. The maximum operating environmental temperature is 40°C / 104°F. Power Requirements RedNet R1 can be powered from two separate sources: Power-over-Ethernet (PoE) or DC input via external mains supply. Standard PoE requirements are: 37.0–57.
REDNET R1 OPERATION First Use and Firmware Updates Your RedNet R1 may require a firmware update* when it is first installed and switched on. Firmware updates are initiated and handled automatically by the RedNet Control application. *It is important that the firmware update procedure is not interrupted – either by switching off power to the RedNet R1 or the computer on which RedNet Control is running, or by disconnecting either from the network.
Function Keys . . . Spill Expands a source to show its component channels allowing them to be muted/un-muted individually: • Select a source to spill • Screen 1 will display the (up to) 12 channels contained within that source: °° Use the soft-buttons to mute/un-mute channels. °° Muted channels are shown with a red ‘M’ Mode Selects the ‘Monitors’, ‘Mic Pre’ or ‘Settings’ submenus: Monitors – Accesses the current speaker/monitor or headphone selection mode.
Function Keys . . . Settings – Accesses the Global Settings submenu: • Talkback Latch – Toggles the action of the talkback buttons between momentary and latching • Auto Standby – When active, will cause the TFT screens to turn off after 5 mins of inactivity, ie., no metering changes, switch presses or pot movements.
REDNET CONTROL 2 RedNet Control 2 is Focusrite’s customisable software application for controlling and configuring RedNet, Red and ISA range of interfaces. Graphical representation for each device shows: control levels, function settings, signal meters, signal routing and mixing – as well as providing status indicators for power supplies, clock and the primary/secondary network connections.
Source Groups . . . Input Channel Configuration Click the drop-down configuration. below each Source Group button to assign its channel Two options are available: • Presets – Select from the list of predefined channel configurations: -- Mono - 5.1.2 -- Stereo - 5.1.4 -- LCR - 7.1.2 -- 5.1 - 7.1.4 -- 7.1 Presets allow the user to quickly setup the Source Groups (and Monitor Outputs) pages without being required to enter individual cross-points on the ‘Channel Mapping’ page.
Outputs . . . Monitor Outputs The Monitor Outputs page is used to configure the output groups and to assign audio channels. Output Type Selection Click each drop-down -- Mono -- Stereo -- LCR -- 5.1 -- 7.1 to assign its output configuration: - 5.1.2 5.1.4 7.1.2 7.1.
Channel Mapping The Channel Mapping page displays the cross-point grid for each Source Group/Output Destination selection. Individual cross-points can be selected/deselected or level trimmed.
Talkback The Talkback page displays the settings of the cross-point grid for the talkback Output selection and the headphone settings. Talkback Routing The routing table allows the user to route a single Talkback channel to 16 locations; the destination type is shown above the table. Talkback 1–4 can also be sent to Cue mixes 1–8. The Talkback Channels can be renamed. Talkback Setup Talkback Outline and icon will display as Green when connected to a Red device as expected.
Cue Mixes The Cue Mixes page shows the source, routing and level settings for each of the eight mix outputs. Mix output selection is shown above the list of available sources. Use CMD+’click’. to select multiple Output Destinations. Up to 30 sources can be selected as mixer inputs. ID (Identification) Clicking on the ID icon will identify the physical device being controlled by flashing its front panel switch LEDs for a period of 10s.
Tools Menu Clicking on the Tools icon will bring up the System Settings window. Tools are split across two tabs, ‘Device’ and ‘Footswitch’: Device: Preferred Master – On/Off state. Talkback Routing – Select the channel on a Red device to use as the talkback input. Headphone Routing – Select the channel pair on a Red device to use as the headphones input. Summing Behaviour – Automatically adjusts the output level to maintain a constant volume as summed sources are added or removed.
Tools Menu . . . Footswitch: Assignment – Select the action of the footswitch input. Choose either: • The talkback channel(s) to activate, or...
APPENDICES 1.
Appendices . . . 2. I/O Level Information Both the R1 and the Red range device under control are able to adjust the volume of the loudspeakers connected to the Red device’s analogue outputs. Having two control locations on the monitor system could result in there being either insufficient range or high sensitivity of the R1’s Output Level encoder.
PERFORMANCE AND SPECIFICATIONS Headphone Output All measurements taken at +19dBm reference level, maximum gain, RL = 600Ω 0 dBFS Reference Level +19 dBm, ±0.3 dB Frequency Response 20 Hz – 20 kHz ±0.2 dB THD + N -104 dB (<0.0006%) at -1 dBFS Dynamic Range 119 dB ‘A’-weighted (typical), 20 Hz - 20 kHz Output Impedance 5Ω Headphone Impedance 32Ω – 600Ω Digital Performance Supported sample rates 44.1 / 48 / 88.2 / 96 kHz (-4% / -0.1% / +0.1% / +4.
Focusrite Pro Warranty and Service All Focusrite products are built to the highest standards and should provide reliable performance for many years, subject to reasonable care, use, transportation and storage. Very many of the products returned under warranty are found not to exhibit any fault at all. To avoid unnecessary inconvenience to you in terms of returning the product please contact Focusrite support.