UG-Rev 1.
Inhalt Einführung Einführung . . . . . . . . . . . . . . . . . . . . . . . . . . . . . . . . . . . . . . . . . . . . . . . .1 Installations-Anleitung . . . . . . . . . . . . . . . . . . . . . . . . . . . . . . . . . . . . . . .2 - Schritt 1: Sequencer Installation . . . . . . . . . . . . . . . . . . . . . . . . . . . .2 - Schritt 2:Treiber und Software Installation . . . . . . . . . . . . . . . . . . .2 - Frontseitige Anschlüsse und Bedienung . . . . . . . . . . . . . . . . . . . . . .
Installations-Anleitung 8. Wenn Sie das erstemal Saffire verwenden, können Sie aufgefordert werden, die Firmware upzudaten. Stellen Sie sicher, das eine Internetverbindung vorliegt und folgen Sie den BildschirmInstruktionen. Schritt 1: Sequencer Installation 1. Wenn Sie noch keine Recordingsoftware/Sequencer auf Ihrem Computer installiert haben, legen Sie die mitgelieferte CubaseLE CD ein. 2. Die CubaseLE-Installationsroutine sollte automatisch starten. 3.
Monitorsignale (z.B. angeschlossene Abhörlautsprecher) entsprechend der Einstellungen der Software Saffire Control. Ebenso sind DIM (Absenkung um 12 dB) und MUTE (Stummschalten) Taster für diese Signalwege vorhanden. Die Hardware-Zuordnung für jedes AusgangsStereopaar kann mittels des (H) Schalters in der Software neben der entsprechenden Pegelkontrolle umgeschaltet werden. 4.
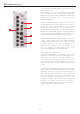
Rückseitige Anschlüsse 1. Acht symmetrische Ausgänge Klinke 6,35 mm, numeriert von 18 von unten nach oben. Diese können auch für 7.1 / 5.1 Surround-Mixing benutzt werden und sind deshalb auch mit Left, Right, Center, LeftSurround, RightSurround, LowFrequencyEffects, LeftCenter und RightCenter entsprechend gekennzeichnet. Für 5.1 ignorieren Sie 7+8 (LeftCenter+RightCenter). 2 2. DC-Steckernetzteil-Eingang Das Saffire kann mit einem externen Steckernetzteil mit Strom versorgt werden.
Recording and monitoring a source using Saffire 3. Lassen Sie das aufzunehmende Signal erschallen und stellen Sie mit dem obersten Regler auf der Font den Pegel ein. Drehen Sie den Regler im Uhrzeigersinn um den Pegel zu erhöhen, allerdings sollte die rote O/L-LED niemals aufleuchten, diese zeigt eine Übersteuerung/Clipping des Digitalwandlers an.
Wenn Sie lediglich das aufzunehmende Signal hören wollen, bewegen Sie den virtuellen Fader ganz nach links. 6. Auf der Front der Hardware kann die Lautstärke angeschlossener Monitore eingestellt werden, wenn im Softwarefenster in der o/ps Sektion 1 und 2 der Hardware (H) Knopf angewählt wurde (leuchtet) (siehe Abb. Seite 5). Ebenso kann die Lautstärke für die Kopfhörer an der Front des Saffire (oberhalb der Kopfhörerbuchsen) geregelt werden.
Saffire Control: Session-Management & erweiterte Softwareeinstellungen des jeweiligen Modus können natürlich gespeichert und somit später wieder aufgerufen werden (Siehe SOFTWARE SETTINGS Seite 15). SaffireControl startet das erste Mal im Soundkarten-Modus, in dem keine Eingangssignale an die Ausgänge durchgeschliffen werden (Siehe Prozessing/Mixing von Stereo-Ausgängen Seite 13). Bei jedem weiteren Start öffnet sich SaffireControl in der Einstellung, die zuletzt benutzt worden ist.
Eingangsstufe Kompression, danach EQ/Amp-Modelling, der erste in der Kette jeweils oben. Ein Mausklick auf den jeweilige Plug-In Taster öffnet eine separates Fenster um die individuellen Einstellungen für den Kanal vorzunehemen (siehe entsprechende Plug-In Sektion Seite 9-11). Ein weiterer Taster ist vorhanden um zwischen EQ oder Amp-Modelling auszuwählen, angezeigt durch LED und Plug-In Symbol.
EQ Regler für das Band aktiv. Im High/Low-Pass-Modus sind nur FREQund Q-Regler aktiv, um die Grenzfrequenz (cut off) zu bestimmen. Zum Beispiel, Low-Shelf für Bassanhebung: auf der linken Seite den mittleren Knopf drücken, GAIN-Regler des ersten (linken) Bandes im Uhrzeigersinn drehen. Um hohe Frequenzanteile aus dem Signalpfad zu nehmen, Low-Pass: untere Taste rechts drücken, FREQ-Regler letztes (rechtes) Band drehen um Grenzfrequenz des Filter (darüber werden alle Frequenzanteile abgesenkt) einzustellen.
Amp Simulation Fünf Drehregler gestatten die Amp-Einstellungen. Der erste ist DRIVE, Drehen im Uhrzeigersinn erhöht den Anteil an Verzerrung. Die nächsten drei sind für die Klangregelung zuständig, LOW, MID und HIGH Frequnzbänder werden bei Drehen im Uhrzeigersinn angehoben. Der letzte stellt den Ausgangspegel des Plug-Ins ein.
Kompression im Uhrzeigersinn), desto stärker wird das Signal komprimiert. Die folgenden Regler sind ATTACK und RELEASE Steuer-Zeiten des Kompressors (gegen den Uhrzeiger = kürzere Zeiten). Die AttackZeit definiert die Reaktionszeit des Kompressors, d.h. wie schnell der Kompressor beginnt das Signal oberhalb des Tresholds im Pegel zu reduzieren.
Zwei Schaltflächen rechts unten im Kompressor-Fenster gestatten das Kopieren und Einfügen von Kompressor-Einstellungen zu und von anderen Saffire Kompressoren, und zwar in Saffire Control oder Anwendungen auf dem Host-Rechner. Spurenabgleich von Sequenzer/Recording Plattform Der erstellte Mix mit diesen Fadern wird das Ausgangssignal, das an jedem Stereo-Ausgang anliegt, Kontrolle hierüber befindet sich im unteren Bereich des Hauptfensters.
Prozessing/Mix von Stereo-Ausgängen letzten (9/10), dieser ist der SPDIF-Ausgang und hat keinen PegelRegler, da der digitale Ausgangspegel fix ist. Dieser Bereich des Hauptfensters ändert sich, wenn der Stereo-Link-Taster in der Eingangs-Sektion aktiv ist (siehe Stereo-Link-Taste Einstellungen Seite 16). In der unteren Hälfte des Hauptfensters können die Signale gemixt und bearbeitet werden, um sie zu den Stereo-Ausgängen (Monitore, Kopfhörer, SPDIF-Ausgang etc.) zu senden.
Reverb-Einstellungen zu modifizieren. Dieser Input-Mix wird nun der INPUT MIX für das Paar von Ausgängen auf dem horizontalen Fader (Crossfader). Wenn Sie nur den Mix abhören wollen, ohne P/BACK MIX (Playback, Spuren vom Recorder) Signale, muss der Fader links stehen. Je weiter der Fader nach rechts gezogen wird, umso mehr Anteile des P/BACK kommen hinzu, in der mittigen Position beide Quellen zu gleichen Anteilen, ganz rechts wird nur P/BACK zu hören sein.
Stereo-Ausgangs um 20 dB (Dim) (gleiches durch Drücken des DimTasters an der Hardware). Hinweis: Ausgänge 9/10 (SPDIF) haben keinen Pegel oder Hardware-Control-Regler, sondern nur Mute und Solo. Hardware-Control-Taster (H) aktiv als Grundeinstellung, sodaß der Monitor-Regler an der Saffire-Box selbst (Hardware) den Pegel bestimmt; zur Deaktivierung drücken sie einfach den Knopf.
Stereo Link Schaltflächen Drücken des Stereo-Link (Stereo Verkettung) Knopfes innerhalb der Eingangsstufe in SaffireControl bewirkt den Wechsel des Hauptfensters wie folgend: [image] - Regler für analog Eingang 2 sind funktionslos, da die Regler von Eingang 1 beide Eingänge gemeinsam regelt - Vereinfachte Eingangs-Mix-Sektion mit einem Regler für Balance 1+2 / 3+4 Stereo-Link Schalter ist aktiv In diesem Modus ist der analoge Eingang 2 deaktiviert, die Einstellungen für das Stereo-Paar (Input 1+2) werden
verkleinert auf ein noch kleineres Format. Der EXP-Taster maximiert/expandiert das Fenster wieder. Drücken des TRACK-Knopfes führt zum Aufnahme-Modus, in dem ein Mix der Eingangskanäle und optional Foldback-Reverb und ein Mix der bereits aufgenommenen Spuren für das Montoring während einer Recording-Session erstellt werden kann.
Midi Funktionen Saffire arbeitet als Midi-Interface mit je einem Aus- und Eingang. Zwei Midi-Betriebsarten stehen zur Verfügung. Der Status des MIDI-Thru Schalters an der Front der Saffire-Box bestimmt den entsprechenden Modus. Modus ist zwingend notwendig wenn der Sequencer läuft, da ansonsten die Noten am Ausgang gedoppelt würden.
19 1 Input L 2 Monitors OP Mix 1 R SPDIF Switch FLIP Level Meter 3 Input L 3 Aux Out 4 R Custom Playback Mix 2 Playback OP Mix 2 RVB Custom Input Mix 2 Dual Mono Reverb Return Custom Playback Mix 1 Playback COMP COMP Custom Input Mix 1 EQ EQ +48V SPDIF Input 1 2 1 5 Input L 3 Playback 2 6 Cue Mix 1 OP Mix 3 RVB Custom Input Mix 3 Reverb Sends 4 Inputs to Sequencer/DAW Custom Playback Mix 3 OUTPUTS R 6 7 Input Playback 7 L R 8 8 Cue Mix 2 OP Mix 4
Problemlösungen LEDs des Saffire leuchten nicht * Hat das Gerät Stromversorgung? Stromversorgung via Firewire (6 Pin) Kabel, ist dies eingesteckt? Wenn 4-Pin Firewire Port: ist das externe Steckernetzteil angeschlossen? Saffire wird nicht erkannt als gültiges Audio Interface von der Recording Software (z.B.
Spezifikationen GEWICHT und DIMSENSIONEN 1.1 kg 6.5 cm x 17 cm x 17 cm ANALOGE EINGÄNGE Mic: 2 x XLR frontseitig Mic Gain: +13 dB bis + 60 dB Line: 2 x sym. Klinke 6,3 mm Line Gain: -10 dB bis +36 dB Instrument: siehe oben, geschaltet auf Instrument Instrument Gain: +13 dB bis +60 dB STROMVERSORGUNG 12 V AC @ 1A SYSTEM ANFORDERUNGEN Macintosh OS: OS X 10.3.3 oder aktueller CPU/Clock: G3/800MHz, G4/700MHz G4/1.
Garantie Bei Zweifeln bezügl. Produktfunktionen lesen Sie bitte die Anleitung, und wenn nötig, kontaktieren Sie Ihren Fachhändler für Ratschläge zu weiterem Vorgehen und Rücksendung zu diesem. Für generelle Hilfestellung senden Sie auch gerne eine email an support@focusrite.com. Alle Focusrite Geräte sind auf höchstem Niveau entwickelt und hergestellt, um eine langjährige betriebssichere Performance zu gewährleisten, abhängig von angemessener Sorgfalt, Gebrauch, Transport und Lagerung.