User Guide www.focusrite.com Version 1.
TABLE OF CONTENTS OVERVIEW . . . . . . . . . . . . . . . . . . . . . . . . . . . . . . . . . . . . . . . . . . . . . . . . . . . . . . . . . . . . . . . . . . . . . 3 Introduction . . . . . . . . . . . . . . . . . . . . . . . . . . . . . . . . . . . . . . . . . . . . . . . . . . . . . . . . . . . . . . . . . 3 Features . . . . . . . . . . . . . . . . . . . . . . . . . . . . . . . . . . . . . . . . . . . . . . . . . . . . . . . . . . . . .
OVERVIEW Introduction Thank you for purchasing this Third Generation Scarlett 4i4, one of the family of Focusrite professional computer audio interfaces incorporating high quality Focusrite analogue preamps. You now have a simple and compact solution for routing high quality audio to and from your computer and you will also be able to download some exciting new software plug-ins once you’ve registered the product.
Box Contents Along with your Scarlett 4i4 you should find: • • • USB cable, Type ‘A’ to Type ‘C’ Getting Started Information (printed on inside of box lid) Important Safety Information System requirements The easiest way to check that your computer’s operating system (OS) is compatible with the Scarlett 4i4 is to use our online OS Checker at https://customer.focusrite.com/downloads/os.
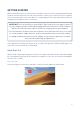
GETTING STARTED With the Third Generation, Scarlett interfaces introduce a new, faster way of getting up and running, using the Scarlett Quick Start tool. All you need to do is connect your Scarlett 4i4 to your computer. Once connected, you will see that the device is recognised by your PC or Mac and the Quick Start tool will guide you through the process from there. IMPORTANT: The Scarlett 4i4 has a single USB 2.0 Type C port (on the rear panel): connect it to your computer using the USB cable provided.
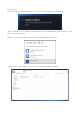
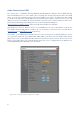
Double-click on the icon to open the Finder window shown below: Double-click on the “Click Here to Get Started.url” icon. This will redirect you to the Focusrite website, where we recommend that you register your device: Click on “Let’s get you started”, and you’ll be presented with a form which will be partly prefilled for you automatically.
Windows only: On connecting your Scarlett 4i4 to your PC, a Scarlett icon will appear on the desktop: (Note that the drive letter may be something other than E:, depending on what other devices you have connected to your PC).
Double-click “Click Here to Get Started”. This will redirect you to the Focusrite website, where we recommend that you register your device: Click on “Let’s get you started”, and you’ll be presented with a form which will be partly prefilled for you automatically. On submitting the form, options will be presented to either go straight to the downloads area to get the software for your Scarlett, or to follow a step-by-step setup guide based on your choices.
All users: Note that a second file - “More Info & FAQs” - is also available during the initial set-up process. This file contains some additional information about the Focusrite Quick Start tool which you may find helpful if you have any issues with the procedure.
Audio Setup in your DAW The Scarlett 4i4 is compatible with any Windows-based DAW that supports ASIO or WDM and any Mac-based DAW that uses Core Audio. After following the Getting Started procedure described above, you can start using the Scarlett 4i4 with the DAW of your choice. To allow you to get started if you do not already have a DAW application installed on your computer, both Pro Tools | First and Ableton Live Lite are included; this will be available to you once you’ve registered your Scarlett 4i4.
Once the Scarlett 4i4 is set as the preferred Audio Device* in your DAW, Inputs 1 to 4 and Outputs 1 to 4 will appear in your DAW’s Audio I/O preferences. Depending on your DAW, you may need to enable certain inputs or outputs before use. The two examples below show Inputs 1 & 2 and Outputs 1 & 2 enabled in the Ableton Lite Audio Preferences. * Typical name. Terminology may differ slightly between DAWs.
Examples of Usage The Scarlett 4i4 is an excellent choice for several different recording and monitoring applications. Some typical configurations are shown below. Connecting a microphone or instrument This setup illustrates the most typical configuration for recording with DAW software on your Mac or PC. In this case, you might record guitar through Input 1 and vocals through Input 2 into your DAW, while monitoring the playback from the DAW via headphones or loudspeakers.
simply plug it in. If it is a “condenser” (or “capacitor”) microphone, you will need to turn on the 48 volt phantom power for it to work. Most modern microphones of other types, e.g., dynamic or ribbon, will not be damaged by the inadvertent application of phantom power, but note that some older mics may be; if you have any doubt, please check the specification of your mic to ensure that it is safe to use.
of monitors. However, please note that only LINE OUTPUTS 1 and 2 are affected in level by the the large front panel MONITOR volume control. Also please note that Outputs 3 and 4 are also used to feed the front panel headphone output. The signals at LINE OUTPUTS 3 and 4 are at (full) fixed level, and thus if you use these for monitoring, you will have to control the volume either from Focusrite Control, or by adjusting the volume at an external amplifier. Self-powered monitors (e.g.
Typical consumer (hi-fi) amplifiers and small powered monitors will have unbalanced inputs, either on phono (RCA) sockets, or via a 3.5 mm 3-pole jack plug intended for direct connection to a computer. In either case, use a suitable connecting cable with phono plugs (RCA jacks) at one end. Professional power amplifiers will generally have balanced inputs; we highly recommend using balanced cables to connect these to the ¼” jack outputs of the Scarlett 4i4.
Connecting Scarlett 4i4 to a DJ mixer The Scarlett 4i4 makes an excellent interface between a laptop running DJ software and the channels of a DJ mixer. In this setup, Outputs 1 and 2 can be connected to Line Inputs 1 and 2 of an external DJ mixer, and Outputs 3 and 4 to Line Inputs 3 and 4. Connecting in this way means that all mixer facilities, such as EQs and crossfading, are easily accessible.
HARDWARE FEATURES Front Panel 3 2 1 4 5 6 1 4 5 6 11 10 7 8 9 The Front Panel includes the input connectors for Mic, Line and Instrument signals, as well as the input gain and monitoring controls. 1. Inputs 1 & 2 – “Combo” type input sockets - connect microphones, instruments (e.g., guitar), or line level signals here. Combo sockets accept both XLR and ¼” (6.35 mm) jacks. Microphones will normally be connected using XLR plugs: instruments and line level signals should be connected via ¼” (6.
7. MONITOR – main monitor volume control, sets the level at rear panel Outputs 1 and 2 8. Headphone level – adjusts the output level at the front panel stereo headphone output. 9. Headphone socket - ¼” TRS output jack – connect your stereo headphones here. 10. USB LED – illuminates when the unit receives USB bus power and is confirmed by the computer as connected and operating correctly. 11. MIDI LED – illuminates when MIDI data is received at the MIDI IN port. Back Panel 17 16 15 14 13 12 12.
CHANNEL LISTINGS The tables below summarise how the Scarlett 4i4’s inputs and outputs will correspond to the input and output channels in your chosen DAW. 4i4 Hardware Inputs Input 44.1/48 kHz 88.2/96 kHz 176.4/192 kHz Ch 1 Input 1 Input 1 Input 1 Ch 2 Input 2 Input 2 Input 2 Ch 3 Input 3 Input 3 Input 3 Ch 4 Input 4 Input 4 Input 4 Ch 5 Loopback 1 Loopback 1 Ch 6 Loopback 2 Loopback 2 Software playback (outputs) Output 44.1/48 kHz 88.2/96 kHz 176.
Line Inputs 1 and 2 Dynamic Range Frequency Response THD+N Maximum Input Level Gain Range Input impedance Instrument Inputs 1 and 2 Dynamic Range Frequency Response 110.5 dB (A-weighted) 20 Hz to 20 kHz ±0.1 dB <0.002% (minimum gain, -1 dBFS input with 22 Hz/22 kHz bandpass filter) +22 dBu (no PAD); +29.5 dBu (PAD selected); measured at minimum gain 56 dB 60 kohms 110 dB (A-weighted) 20 Hz to 20 kHz ±0.1 dB THD+N <0.
Physical and Electrical Characteristics Analogue Inputs 1 & 2 Connectors XLR “Combo” type: Mic/Line/Inst on front panel Mic/Line switching Automatic Line/Instrument switching Selected per channel via Focusrite Control Pad 10 dB attenuation, selected per channel via Focusrite Control Phantom power Shared +48 V phantom power switch for Inputs 1 & 2 (XLR connections only) AIR function Selected per channel via Focusrite Control Analogue Inputs 3 & 4 Connectors ¼” (6.
TROUBLESHOOTING For all troubleshooting queries, please visit the Focusrite Help Centre at support.focusrite.com/ where you will find articles covering numerous troubleshooting examples. COPYRIGHT AND LEGAL NOTICES Your Scarlett 4i4 has a two-year warranty, valid anywhere in the world, against manufacturing defects. Full Terms and Conditions of the Warranty can be found at https://focusrite.com/warranty.