
Installation Instructions


3
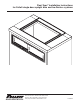
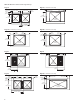
➊
➋
➌
Overview
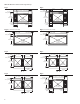
Installation of Flexi-Top kits consist of inserting a combination
of Flexi-Panel(s) to accommodate specific icemaker model,
and application of an inner gasket and an outer gasket.*
*Note: some icemakers will not require the use of a
Flexi-Panel™, and will require only the gasket procedure.
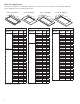
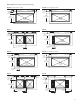
Flexi-Panel and gasket specifications
Refer to the charts on pages 4 and 5 to find the Flexi-Panel
combination for your application and corresponding figure
drawing (pages 6 - 12). Figure drawings will indicate number
of panels used.
For your convenience, the underside of each Flexi-Panel
is etched with a number to correspond to the Flexi-Panel
number(s) noted in the appropriate figure drawing.
General procedure –
Flexi-Panel and gasket application
• Bin top should be clean and free of dirt or residue so that
panels will adhere properly.
• Position Flexi-Panel(s) according to location noted
on appropriate figure drawing. Measure carefully from
edge of bin top and make a mark ➊ to align edge of
Flexi-Panel.
• Peel paper backing from adhesive portion of Flexi-Panel
➋ and apply to bin top ➌. If more than one Flexi-Panel is
needed, repeat 1, 2 & 3.
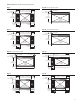
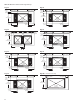
• Apply inner gasket to ice drop opening and Flexi-Panel
edges ➍. Gasket may be spliced as needed, but do not
overlap.
• Position outer gasket according to location noted on
appropriate figure drawing. Measure carefully from
edges of bin top ➎ to be sure icemaker wil be properly
positioned.
• Use silastic sealant or equivalent to seal all gasket
joints ➏.
• Prior to installing icemaker, be sure to thoroughly clean
bin interior and surrounding surfaces.
NOTE: All measurements are taken from edge of bin top.
➍
➎
➏