
Installation Instructions for Remote Condenser


7
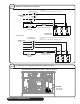
REMOTE CONDENSING UNIT
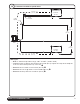
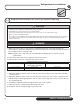
Pressure adjustment
4
Set low-pressure switch - if applicable
4.1
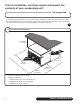
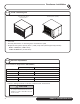
Hail hood
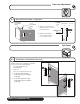
5
Please remove the condenser enclosure
top to access the following parts:
• Left and right brackets (not
interchangeable)
• Hail hood
• 1/4 x 20 x 1/2 hex head screw (10)
1. Locate the left bracket (1)
and install using two supplied
screws (2).
2. Locate the right bracket (3)
and install using two supplied
screws (4).
Install hail hood (Tecumseh units only)
5.1
4
4
3
2
2
1
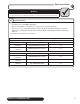
DIFFERENTIAL
ADJUSTMENT
SCREW
CUT-IN
ADJUSTMENT
SCREW
EXAMPLE
Cut In
Dierential
Cut Out
20 - 10 = 10
Cut In
CUT OUT IS
CUT IN
MINUS
DIFFERENTIAL
10
20
20
30
40
10
10
20
40
60
80
100
3.0
2.0
1.0
KG.
LBS.
0
1.0
4.0
5.5
7.0
KG.
LBS.
1) Adjust the top LEFT screw
until the pointer is set to 10
(the dierential).
2) Adjust the top RIGHT
screw until the pointer
is set to 20 (the cut-in).
Dierential