
corp. Computer Accessories User Manual


04/04344 Cataloging
Viewing the Weeding log
Every time a copy is deleted, Cataloging adds an entry to this cumulative log.
View this log when ordering replacement materials or creating budgets and
year-end reports. If you want a new log started at the beginning of a school or
fiscal year, make sure to delete the old one.
Cataloging adds an entry to the log when deleting copies manually in the MARC
Viewer, deleting copies after an export, deleting them via PHD or scanner, or
globally deleting lost or missing copies. Please note that the Weeding log does not
include copies deleted by DX or Utilities.
To access the log, from the computer desktop, open the Follett Applications
folder and doubleclick the Exception Reports icon. You can also access the Follett
Applications menu from the Windows Start | Programs menu or from the Mac
OS Apple menu. The log resides in your CC40\TEMP folder. Its file name is
WEEDING.TXT. (If Cataloging cannot write to the WEEDING.TXT file, it creates
another one, WEEDING1.TXT, and enters the information there.)
Note: If you installed Catalog Plus to your individual workstations, and not to a
server, each Cataloging workstation will have its own Weeding log. In this
case, you'll need to combine the information in the logs.
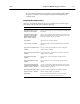
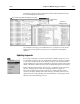
The log is in a fixed-length ASCII format. That is, every field in the record is a
fixed length. The first record in the log is a header line, containing the names of
the fields included in the file. These fields and their widths are:
Date deleted 12
Member ID 12 (Union Catalog Plus only)
Barcode 16
Title 42
Author 27
Standard number 18
Call number 18
Acquisition date 12
Price 12
Files in this format can be imported into a number of applications. For instance, if
you import the file into a spreadsheet program, you can delete any fields you
don't want, and then sort and filter the data to create custom lists and reports.
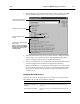
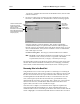
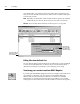
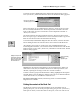
For example, to import your Weeding log into MS Excel, launch Excel and open
your Weeding log. When you open any text file, Excel automatically launches a
threestep Import Wizard:
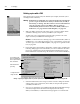
1. Set the Original data type to Fixed width.
2. Set the field widths using the list (above).
(The number of hyphens in the second row indicates the field width.)
3. Keep the default column data format of General.