
User Manual


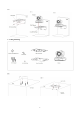


Table Of Contents

3
1. Camera Installation
1.1. Camera Introduction
Figure 1.1 Product Interfaces
1. Camera Lens
5. Screw Hole for Tripod
9. USB 2.0 Interface
2. Remote Control Receiving
Indicator
6. RS232 Control Interface(Input)
10. DC12V Input Power Supply
Socket
3. Camera Base
7. RS232 Control Interface(Output)
4. Tripod Screw Hole
8. RS485 Input (left +, right-)
1.2 Power-on Initial Configuration
1) Power-on: Connect DC12V power supply adapter with power supply socket
2) Initial Configuration: The remote control receiving indicator flashes after power on, the pan-tilt turns left to the
lowest left to the lowest, and then turns to the HOME position (both the horizontal and vertical positions are in the
middle), while the movement first shrinks and then stretches. When remote control receiving indicator stops
flashing, the self-checking is completed.
Notes:
1) After power on and self-checking, the camera will automatically return to the preset 0 position if it’s pre-set.
2) The default address for the IR remote control is 1#. If the menu restored to factory defaults, the remote control
default address will restore to 1#.