
User Manual


Ethan
9 1/4" Flush Mount Light
052-1165-8
READ AND SAVE THESE INSTALLATION INSTRUCTIONS
TOOLS AND MATERIALS REQUIRED
Flat--head screwdriver.
Adjustable wrench .
Stepladder.
Wire cutters.
Wiring supplies, as required by the electrical code.
Safety Precaution: All electrical connections must be in compliance with local codes and ordinances, or the National Electrical Code. If you
are not familiar with proper methods for installing electrical wiring, have the fixture installed by a licensed electrician.
WARNING: In Québec, this product must be installed by a qualified electrician.
GENERAL
1. For best results, read these instructions carefully and review the diagrams thoroughly before installation.
2. This fixture is designed to be mounted to a 4 x 4 x 2 1/8" (10 x 10 x 5.4 cm) metal outlet box, which must be supported directly by the
building structure.
3. Before beginning the installation, disconnect the power by turning off the circuit breaker or removing the fuse at the fuse box. Turning
off the light switch is no
t sufficient to prevent electric shock.
NOTE: T
he important safeguards and instructions that appear in this manual are not intended to cover all possible conditions and
situations that may occur. Use common sense, caution, and care when installing and operating this fixture.
UNPACKING THE FIXTURE
The package should contain the following parts:
Mounting hardware package.
Shade.
Fixture assembly.
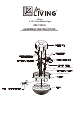
INSTALLATION INSTRUCTIONS (See Fig. 1)
This For LivingTM product carries a one (1) year warranty against defects in workmanship and materials. Trileaf Distribution agrees to replace
the defective product free of charge within the stated warranty period, when returned by the original purchaser with proof of purchase. This
product is not guaranteed against wear or breakage due to misuse and/or abuse.
1. In order to prevent possible injury from electric shock, disconnect the power at the main fuse box or circuit breaker box before installing
the fixture.
2. Remove all parts and packaging from the carton.
3. Tighten the mounting screws several full turns into the mounting holes in the mounting bracket (to be fully tightened later).
4. Fasten mounting bracket to the ceiling outlet box using two outlet box screws.
5. Strip 3/4" (19 mm) of insulation from wire ends. Twist stripped ends together with pliers, black to black (power) and white to white (neutral).
6. Attach wire connectors. Tape wire connectors and wires together.
7. Attach grounding wire from the supply circuit to the mounting bracket using the green screw provided.
8. Place the ceiling plate over the outlet box. Allow mounting screws to protrude through the holes. Tighten decorative nuts to secure ceiling
plate.
9. Install light bulbs.
10. Place the glass shade firmly with the cap against the bottom of ceiling plate. Turn the screws on the side of ceiling fixture (pan) to tighten.
ELECTRICAL CONNECTIONS
Cut any excess wire, leaving 6” (15 cm) for electrical connections. Split the wires into two separate leads. Connect the half of the SPT cord
that has the ribbed surface to the white wire from the supply circuit. Connect the smooth half of the SPT cord, which contains markings, to
the black wire from the supply circui
t. Connect the bare copper wire to the grounding conductor from the supply circuit. Use cUL-listed wire
connectors that are suitable for the size, type, and number of conductors. Be careful to avoid leaving loose strands of wire or loose
connections. Secure the wire connectors using cUL-listed electrical tape.
Made in China
Imported by
Trileaf Distribution Trifeuil Toronto, Canada M4S 2B8
.
.
.
.
.
.
.
.