Owner's handbook Audio system 100% Ford. 100% Entertainment.
The information contained in this publication was correct at the time of going to print. In the interest of development the right is reserved to change specifications, design or equipment at any time without notice and without incurring any obligations. This publication, or part thereof, may not be reproduced nor translated without our approval. Errors and omissions excepted. © Ford Motor Company 2006 All rights reserved.
Table of Contents Audio introduction........3 Loudness control............................20 Important audio information............3 Radio reception.................................4 Audio unit menus........21 Automatic volume control (AVC)..............................................21 Audio distortion reduction (CLIP)..............................................21 Digital signal processing (DSP)......21 Rear seat controls (RICP)...............21 Preset scan tuning..........................
Table of Contents Track selection.................................31 Compact disc playback.................32 Compact disc selection.................33 Fast forward/reverse.....................34 Shuffle/random...............................34 Compact disc track compression................................35 Compact disc track scanning.......35 Ejecting compact discs..................36 Unloading the compact disc changer.........................................37 MP3 file playback............................
Audio introduction Irregular shaped CDs and CDs with a scratch protection film or self adhesive labels attached should not be used. The audio unit may be damaged if unsuitable items like credit cards or coins are pushed inside the CD aperture. Please contact your Dealer for further information. IMPORTANT AUDIO INFORMATION WARNINGS Copyright laws vary from country to country; please check the laws in your country if you want to record from copyright source material.
Audio introduction • • • You cannot play a CD-R/CD-RW that is not finalised. (This process is necessary for a recorded CD-R/CD-RW disc to be played on the audio CD player.) RADIO RECEPTION With the Sony CD unit, you can play MP3 files recorded on CDROMs, CD-Rs, and CDRWs. A CD-R/CD-RW to which a session can be added can be played. Sony CD/6CD Advanced digital filter adjustment (ADFA) Note: Consult your dealer before switching off the filter.
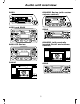
Audio unit overview 2050 6000CD Series (with rocker volume control) 4050 and 5000 E66130 5500 E66138 6000CD (with centrally located On/off and volume control) E66125 6000 CD Series E66127 E66131 5000C 6500 E66133 E66129 5
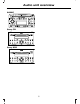
Audio unit overview 6006E E66134 Sony CD E66135 Sony 6CD E66137 6
Audio system security REMOVABLE FRONT PANEL ENTERING A SECURITY CODE Note: During removal, avoid touching the contacts on the back of the panel and do not use excessive force to refit it. If ‘CODE - - - -’ or ‘CODE 0000’ appears in the display for more than 5 seconds when you switch on the audio unit, you must enter the Keycode. • • Where available slide the panel release button to the left (on 6006E units press the panel release button) and remove the panel.
Audio system security INCORRECT SECURITY CODE • You must wait until the display changes to "CODE" this indicates that the waiting period has finished and the correct code can be entered. • The waiting period doubles each time an incorrect code is entered. (1 minute, 2 minutes, 4 minutes, etc) On all units except 2050 Up to TEN Keycode entry attempts are allowed with various consequences if you get it wrong. The number of attempts is shown in the display.
Audio system security 5. Use the left/right arrow buttons to move across the display, and use the volume control or the up/down arrow buttons on Sony CD/6CD, to select or change the individual characters. A total of 15 or 16 characters can be stored. 6. When all the characters have been selected, press MENU to store the number. The unit then returns to normal operation. On some units, the number appears in the display whenever power is restored.
Audio unit clock and date displays In this case, either select another radio station which transmits a time signal or set the clock manually. SETTING THE CLOCK AND DATE ON THE AUDIO UNIT Note: If any of these features are not available in your unit, the relevant menu options will not be displayed. All units, except the 2050, the 5000C, the 6000CD with centrally located on/off and volume control, and Sony CD/6CD, have a built in facility that will receive RDS data for a current time and date display.
Audio unit clock and date displays Changing the time Note: If you do not press the CLOCK button within 30 seconds of changing a date or time value, the display will exit and save the new values automatically. • • Tip: Press and hold the CLOCK button for more than two seconds to automatically select the hour value for winter or summer time adjustment. • 12/24 hour format • • • • Press the MENU button repeatedly until a 12/24 hour clock display appears.
Audio unit operation • ON/OFF CONTROL • Press the on/off control to turn your unit on or off. This will also operate the unit for up to one hour with the ignition turned off. The radio will switch off automatically after one hour. • • 2050 Note: CODE will briefly flash in the display when the unit is turned on. This is a normal system function the security code is not required to be entered. Where the adjustment is featured on a single button, press the button once for bass or twice for treble.
Audio unit operation • • • • Where the adjustment is featured on a single button, press the button once for fade or twice for balance. Where there are separate buttons, press the required button once. Use the volume control to make the necessary adjustment. Or, on Sony CD/6CD, use the up/down arrow buttons for fade adjustment, and left/right arrow for balance adjustment. PHONE MUTE CONTROL • • Where available, press the PHONE button to mute your audio unit. Press PHONE again to unmute.
Audio unit operation Sony CD/6CD Menu features - First level features During radio During tape reception playback During CD playback Second level functions During CD During all functions changer playback RSE* Clock Date 12/24 hour AVC RSE* Clock Date 12/24 hour Scroll RSE* Clock Date 12/24 hour AVC Traffic local or distant AF AVC Repeat VID CLIP ON/OFF Aux ON/OFF News ON/OFF Bluetooth enable/ disable ADFA ON/OFF Repeat Comp Comp Shuffle Shuffle Note: The sequence in which features appear may vary
Audio unit operation 5000C/6000CD Menu features - First level features During radio During tape reception playback Manual tuning Scan tuning Clock Date 12/24 hour AVC Track number Clock Date 12/24 hour AVC During CD playback Second level functions During CD During all functions changer playback Scan Scan Traffic local or distant Shuffle Repeat Comp Clock Date Shuffle Repeat Comp Clock Date AF VID CLIP News Bluetooth enable/ disable 12/24 hour 12/24 hour AVC AVC Note: The sequence in which feature
Audio unit operation • • Press AUDIO repeatedly to select the required item. Use the volume control to make the necessary adjustment. The display indicates the level selected. WAVEBAND BUTTON This control allows you to switch between the LW, MW and AM waveband, where available and the FM waveband. Sound style FLAT JAZZ VOCAL POP CLASSIC ROCK Original. Jazz music. Speech. Pop music. Classical music. Rock music.
Audio unit operation • • • 2050 Press and hold the waveband button. On 2050 short press the AST button. The sound mutes and on some units a beep is heard and an ‘AST’ or ‘AUTOSTORE’ display appears while the unit searches through the frequencies. When the search is complete, sound is restored and the strongest signals are stored on the AutoStore presets. The 2050 unit selects stero or mono mode automatically according to signal strength.
Audio unit operation If the traffic signal weakens, ‘TP’ or ‘TP LOST’ will flash in the display and on some units a beep will be heard. Press the SEEK button or, the left/right arrow buttons to find another station. Some units will automatically retune to another traffic station. All other units except Sony CD/6CD and 2050 If a non-traffic station is selected or recalled using a preset button, the audio unit will remain on that station unless: • • • • • • TA is turned off, then on again.
Audio unit operation Ending traffic announcements 2050 • The audio unit will return to normal operation at the end of each traffic announcement. To end the announcement prematurely, press TA during the announcement. • Note: If you press TA at any other time it will switch all announcements off. • STATION TUNING CONTROL Long press one of the left or right arrow buttons for more than 2 seconds to reach manual tuning.
Audio unit operation All units except 2050 • • • Press the MENU button repeatedly until a SCAN display appears. Use the SEEK button to scan up or down the selected waveband. ‘Scn’ or ‘SCAN’ flash in the display and each station is played for a few seconds. Depending on the audio unit, press SEEK or MENU again to continue listening to a station. LOUDNESS CONTROL 6500 • • • Press the MENU button repeatedly until a loudness display appears.
Audio unit menus • AUTOMATIC VOLUME CONTROL (AVC) AVC automatically adjusts the volume level to compensate for engine noise and road speed noise. When available: • • • • • Press the MENU button repeatedly until an AVC display appears. Use the SEEK button, or the left/right arrow buttons, to adjust the AVC setting. Or, on Sony CD/6CD, press the MENU button briefly and use the up/down arrow buttons to select an AVC display. Press the MENU button to confirm your selection.
Audio unit menus • • • With ‘AF-ON’ or ‘AF-AUTO’ selected, the unit continually evaluates signal strength and, if a better signal becomes available, the unit will switch to that alternative. It mutes while it checks a list of alternative frequencies and, if necessary, it will search once across the selected waveband for a genuine alternative frequency. Press and hold the MENU button until the display changes. Press the MENU button repeatedly until an RICP display appears.
Audio unit menus All other units except 2050 • • • RADIO DATA SYSTEM (RDS) Press and hold the MENU button until the display changes. Press the MENU button repeatedly until an ‘AF’ display appears. Use the SEEK or left/right arrow buttons to select the setting required. Most radio stations on the FM waveband transmit additional code in their broadcast signal that allows receivers equipped with the necessary decoder to present more information to the listener. This is known as the Radio Data System (RDS).
Audio unit menus During news broadcasts, the display alternates between the station name and ‘NEWS’. News interrupts are broadcast at the same preset volume level as traffic announcements. PRIORITY PROGRAMME TYPE (PTY) Many programmes in the FM waveband are categorised by the type of material they broadcast. This classification takes the form of an identification number coded into the broadcast signal. Sony CD/6CD • • • Press and hold the MENU button until the display changes.
Audio unit menus Classification Description AFFAIRS ALARM CHILDREN CLASSICS COUNTRY CULTURE DOCUMENT DRAMA EASY EDUCATE FINANCE FOLK M INFO JAZZ LEISURE LIGHT M M.O.R.
Audio unit menus Using PTY Note: Some radio stations can also transmit emergency information under the undocumented category of ALARM but this programme type cannot be selected manually. While the audio unit is searching for another PTY station, a PTY search display appears. When a programme is found, the new station name flashes in the display and radio reception is restored from the station selected. Selecting PTY • Press the PTY button or the MENU button repeatedly until a PTY display appears.
Cassette tape player 2050 CASSETTE TAPE PLAYBACK The direction of fast winding depends on the direction of play indicated by the left or right arrow in the display. Note: Always remove cassettes from the unit when your not using them. • All units automatically switch to tape operation as soon as a cassette is inserted. On some units during radio reception when a tape is already inserted, press the TAPE control buttons to start tape playback.
Cassette tape player 5500 • • On other units you may have to eject the cassette and turn it over. Press the left arrow button twice. Press the right arrow button to end fast rewind and restart the tape. ENDING PLAYBACK On all units except 2050 All other units except 2050 • • • Press the left arrow button fully in. Press and release the right arrow button to end rewind and restart the tape. 2050 2050 To restore radio reception or end tape playback the tape must be ejected.
Cassette tape player 5000 with a rocker volume control 4050, 5000 and 5000C • • Press AM/FM to restore radio reception, or the CD button to restore CD playback when a changer is fitted. Press the left/right arrow buttons partially in to restart tape playback. • • Press the MENU button repeatedly until an ‘AMS’ display appears. Use the SEEK button to turn this function on or off.
Compact disc player Do not try to insert a CD into the unit when ‘WAIT’ is displayed. Do not insert two CDs in a figure of eight fashion with edges overlapping. LOADING COMPACT DISCS 6500 and 6000CD WARNING If the power to 6006 units has been disconnected, then reconnected, the unit will automatically check for the presence of discs in the magazine. This will take approximately 45 seconds. During this time all functions except Keycode entry will be locked out. Insert a CD in the slot.
Compact disc player To load more than one CD: • • • • • • • Press and hold the LOAD button. ‘INSERT ALL’ and then ‘PLEASE WAIT’ appear in the display. When this changes to ‘PLEASE LOAD’, insert a CD, label side up, into the audio unit. ‘LOADING’ appears with a disc location icon, followed by ‘PLEASE LOAD’ again, and this repeats until a maximum of six discs have been loaded. Playback starts from the last disc inserted.
Compact disc player Except Sony CD/6CD • • • Radio reception is automatically cut off when you play a CD but, on certain models, CD playback may be interrupted from time to time if the traffic announcement or news broadcast features are switched on. Press the right or up arrow buttons once to move to the next track or press it repeatedly to access later tracks. Press the left or down arrow buttons once to replay the current track.
Compact disc player You can, however, switch to a disc of your choice by pressing the preset button, which has the number corresponding to the disc you want to play. ‘CHANGING CD’ is displayed and an icon shows the disc selected. Note: On the 6000MP3 unit, you should press the CD button three times to activate the CD changer. If the CD button is pressed when no discs are loaded, the display will show ‘NO DISCS’.
Compact disc player If a selected disc is damaged or upside down, the warning ‘CD ERROR’ flashes and the disc number is displayed. The unit then selects the next available disc. Sony 6CD If a changer is fitted, but the magazine is missing or incorrectly inserted, ‘NO MAGAZINE’ will appear in the display when the changer is selected and radio reception will be resumed.
Compact disc player • • • ‘SHUFFLE’ options are ‘OFF’, ‘FOL’ which shuffles tracks in the current folder, and ‘ALL’ which plays all tracks on the disc in random order. ‘REPEAT’ options are ‘ALL’ which plays the entire disc and ‘FOL’ which plays all the tracks in current folder, then repeats tracks from the same folder. ‘REPEAT’ and ‘SHUFFLE’ functions are cancelled when a disc is ejected. COMPACT DISC TRACK SCANNING The SCAN function allows you to preview each track for a few seconds.
Compact disc player • • • Sony 6CD Press the MENU button repeatedly until a ‘SCAN’ display appears. Use the SEEK button to scan up or down the tracks selected. Press SEEK again to continue listening to a track. • • • EJECTING COMPACT DISCS Sony CD • • • • Press the eject button briefly, to eject the disc. ‘PLEASE WAIT’, ‘EJECTING’ and ‘PLEASE REMOVE’ appear in the display while a disc is being ejected.
Compact disc player ‘EJECT’ and ‘REMOVE’ appear in the display and the disc is held ready for removal. If it is not removed, the disc will be pulled back into the audio unit and CD playback will restart. MP3 FILE PLAYBACK 6000MP3 When a compact disc is loaded into the 6000MP3 unit, the display will show ‘READING’ while the unit scans the disc. The time this takes will depend entirely on the number of tracks, files, folders and sessions on the disc.
Compact disc player When one of these buttons is pressed and released, the first track in the next or previous folder will be selected and played. The SEEK button (described above) can be used to move between tracks in the folder. Note: When you use this method, only the folder and track numbers are displayed, i.e. F1 T4 followed by F1 T5, etc. To locate the track you want, you will need to know what folder it is in, and what track number it has.
Compact disc player • For Joliet or Romeo in the expansion format, please consider these restrictions when configuring your CD writing software. Multi session • This is a recording method that enables adding of data using the Track-At-Once method. Conventional CDs begin at a CD control area called the Lead-in and end at an area called Lead-out. A Multi Session CD is a CD having multiple sessions, with each segment from Lead-in to Lead-out regarded as a single session.
Compact disc player • Playback tip: To specify a desired playback order, before the folder or file name, input the order by number (e.g., “01,” “02”), then record contents onto a disc. (The order differs depending on the writing software.) • • When skipping a portion of ID3 tag ver.2 (at the beginning of the track), sound is not output. Skip time changes depending ID3 tag ver.2 capacity. Example: At 64 kbytes, it is about 2 seconds (with RealJukebox).
Compact disc player • • MP3 default displays Press the up/down arrow buttons to select another folder. Press the left/right arrow buttons to select another track (file) within the folder. You can also change the default display (normally file name) to another option of your choice: • MP3 DISPLAY OPTIONS • 6000MP3 When an MP3 disc is playing, certain information encoded in each track can be displayed on the unit.
Compact disc player Sony CD unit • When an MP3 disc is playing, certain information encoded in each track can be displayed. Such information will normally include: • • • • The file name The folder name ID3 information which might be the album or artist’s name CD text display options When an audio disc with CD text is playing, limited information encoded in each track can be displayed. Such information will normally include: The unit will normally show the file name that is playing.
Compact disc player Sony CD • • • Note: This will not eject the CD; the disc will merely pause at the point where radio reception was restored. CD playback can be resumed by pressing the CD/AUX button again. Press the MENU button and use the up/down arrow buttons to select a ‘REPEAT’ display. Use the left/right arrow buttons to select ‘REPEAT TRACK’ or ‘REPEAT OFF’. When an MP3 CD is playing, playback options are ‘REPEAT TRACK’, ‘REP FOLDER’ and ‘REPEAT OFF’.
Compact disc player Except Sony 6CD • • • To eject all discs, press and hold EJ until ‘EJECT’ or ‘EJECT ALL’ is displayed. The display will alternate between ‘EJECT’ and ‘REMOVE’. When ‘REMOVE’ is displayed, take the disc out of the unit. This routine repeats until all discs have been removed.
Auxiliary input (AUX IN) socket Where available, this socket is located in the vehicle glove box and permits an auxiliary device, like a portable MiniDisc or MP3 player, to be linked into the vehicle audio system, so that output can be played through the vehicle speakers. To listen to an auxiliary device, plug it into the glove box socket using a 3.5 mm conventional ‘headphone type’ electrical connector.
Rear passenger controls With ‘RSE Off/Rear Audio Off’ selected at the main audio unit REAR SEAT CONTROLS • Pressing the ON/OFF button on the rear control panel will not affect the system. ‘DISABLED’ appears briefly in the display and the rear control panel will not operate. Waveband selector • E66142 Where available, the way the Rear Seat Audio System control panel operates will depend on which RSE menu option is selected.
Rear passenger controls Station preset/CD/MP3 folder selector • • • • • Press this button repeatedly to select radio stations stored on the preset buttons, MP3 folders or discs from the magazine of a CD changer, when fitted. If the rear control panel is tuned to radio reception, press the up/down arrow buttons repeatedly to search through and select stations stored on the preset buttons for the waveband selected. The display shows which preset is selected and the waveband, e.g. 1FM1, 2FM1, 3FM1, etc.
Rear passenger controls • • • Press the MENU button and use the up/down arrow buttons until an RSE display appears. Press the left/right arrow buttons to select from ‘ RSE Ctrl On’. Press the MENU button to confirm your selection. ONE HOUR MODE If the ignition is turned off or in the ACC position when the radio is turned off, pressing the ON/OFF button will switch on the system, but it switches off automatically, after one hour.
Rear passenger controls • However, if the headphone sockets are used, audio output remains unaffected through the front compartment speakers and, in this way, front and rear seat passengers can listen to two different audio sources. • • For example, with ‘RSE On’ selected, front seat passengers can insert a CD into the audio unit, and then press the AM/FM button to listen to radio reception through the front compartment audio system speakers.
Audio system care AUDIO UNIT Cassette care The tape head in the cassette player needs to be cleaned regularly with a recommended ‘wet’ cleaning tape to maintain the best sound quality. Use high quality cassettes to improve sound performance and take good care of them. Avoid those that: • • • are old, worn out, or spliced. are damaged or have a peeling label. have a total playback time exceeding 100 minutes. These use thinner tape that increases the chance of tangling.
Audio troubleshooting Audio unit display Rectification E2E, E2D, E3, E5, E7, E11, Internal fault, see your Ford Dealer. E15, CD ERROR E12, E23, E24, E25, E26, Clean the disc and try again. E27, E28, E29, E2B, E2C, BAD CD E4 Disc upside down or dirty. Clean the disc and try again. CD HOT, HIGH TEMP, E2, Ambient temperature too hot – unit will not work E14 until it has cooled down. E16, E81, E84, E85 Eject fault, see your Ford Dealer. CHECK CD Disc loading or playback fault.
52
Index A C Alternative frequencies..................22 Cassette tape pause......................28 2050......................................................23 All other units except 2050................23 Sony CD/6CD.......................................22 2050......................................................28 4000......................................................28 4050, 5000 and 5000C.....................29 Audio control....................................
Index E Headphones....................................48 Ejecting a cassette tape................29 I Volume control.....................................48 2050, 5000C and 5500.....................29 All other units except 5000C and 5500...................................................29 Important audio information............3 Disc labels...............................................4 Sony CD/6CD.........................................3 Ejecting compact discs..................
Index O Setting the clock and date on the audio unit........................................10 2050.......................................................10 5000C and 6000CD with centrally located on/off and volume control................................................10 Sony CD/6CD........................................11 On/off control...................................12 2050.......................................................12 One hour mode...............................48 P Shuffle/random..
Index V Vehicle identification (VID)................8 On all units except 2050.......................8 Volume control.................................12 W Waveband button............................
6S5J-19C104-DA (CG3508en)