
Operation Manual


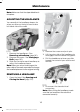

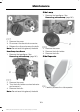
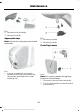

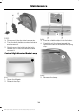


Table Of Contents
- Copyright ©
- Introduction
- At a Glance
- Child Safety
- Safety Belts
- Supplementary Restraints System
- Keys and Remote Controls
- MyKey™
- Locks
- Security
- Steering Wheel
- Wipers and Washers
- Lighting
- Windows and Mirrors
- Instrument Cluster
- Information Displays
- Climate Control
- Seats
- Auxiliary Power Points
- Storage Compartments
- Starting and Stopping the Engine
- Unique Driving Characteristics
- Fuel and Refueling
- Transmission
- Brakes
- Stability Control
- Parking Aids
- Cruise Control
- Driving Aids
- Load Carrying
- Towing
- Driving Hints
- Roadside Emergencies
- Fuses
- Maintenance
- General Information
- Opening and Closing the Hood
- Under Hood Overview
- Under Hood Overview
- Under Hood Overview
- Engine Oil Dipstick
- Engine Oil Dipstick
- Engine Oil Dipstick
- Engine Oil Check
- Engine Coolant Check
- Brake and Clutch Fluid Check
- Washer Fluid Check
- Changing the 12V Battery
- Checking the Wiper Blades
- Changing the Wiper Blades
- Adjusting the Headlamps
- Removing a Headlamp
- Changing a Bulb
- Bulb Specification Chart
- Technical Specifications
- Vehicle Care
- Wheels and Tires
- Capacities and Specifications
- Audio System
- Navigation
- SYNC™
- Appendices
Note: Make sure that the wiper blade locks
into place.
ADJUSTING THE HEADLAMPS
You can adjust the headlamp beams for
when you drive on the right-hand side or
left-hand side of the road.
1. Remove the headlamps. See
Removing a Headlamp (page 161).
2. Remove the covers. See Changing a
Bulb (page 162).
3. Slide the control on each headlamp to
adjust the headlamp beam.
Note: When you return to driving on the
other side of the road, remember to change
the headlamp beams to the original setting.
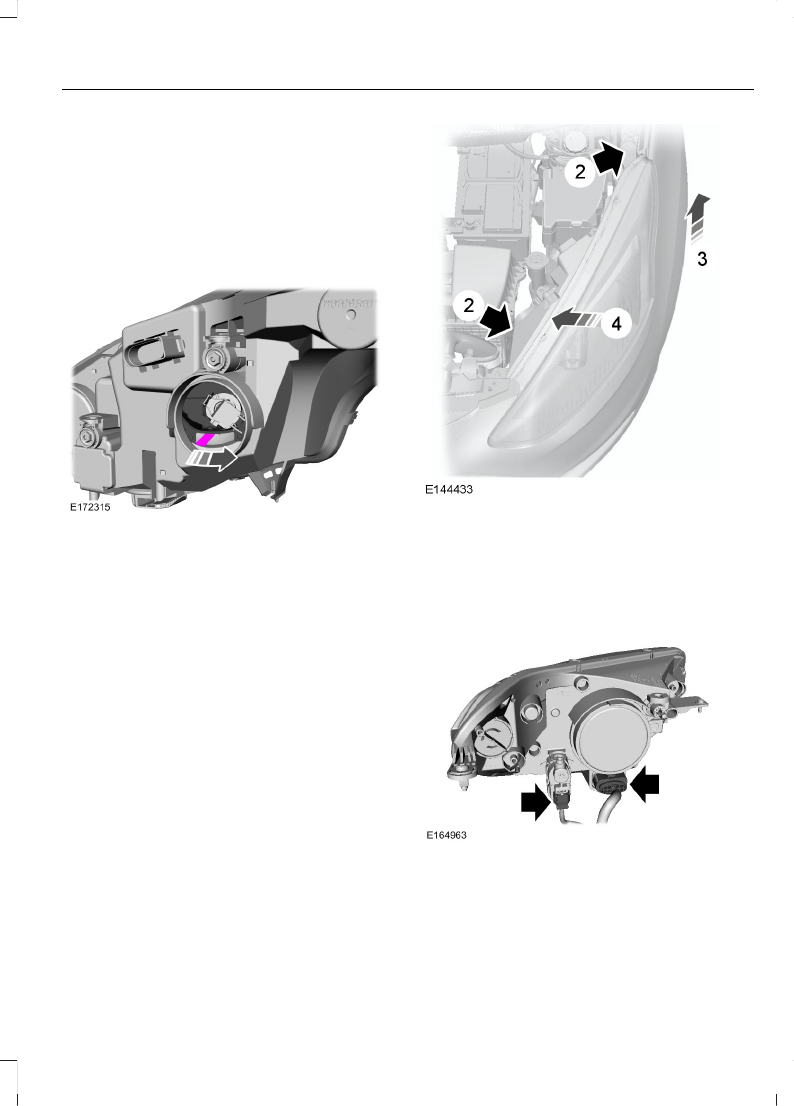
REMOVING A HEADLAMP
1. Open the hood. See Opening and
Closing the Hood (page 152).
2. Remove the screws and push pins.
3. Lift the outer side of the headlamp to
disengage it from the lower fixing point.
4. Pull the headlamp as far as possible
toward the center of your vehicle and
remove.
5. Disconnect the two electrical
connectors.
Note: When fitting the headlamp, make
sure that you reconnect the electrical
connector correctly.
161
B-MAX (CB2) Vehicles Built From: 25-06-2012, Vehicles Built Up To: 31-12-2013
Maintenance