
Operation Manual


WARNING
Do not install alloy wheels using
wheel nuts designed for use with
steel wheels.
Note: The wheel nuts of alloy wheels and
spoked steel wheels can also be used for
the steel spare wheel for a short time
(maximum two weeks).
Note: Make sure the wheel and hub contact
surfaces are free from foreign matter.
Note: Make sure that the cones on the
wheel nuts are against the wheel.
1. Install the wheel.
2. Install the wheel nuts finger tight.
3. Install the locking wheel nut key.
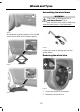
1
2
3
4
5
E75442
4. Partially tighten the wheel nuts in the
sequence shown.
5. Lower the vehicle and remove the jack.
6. Fully tighten the wheel nuts in the
sequence shown. See Technical
Specifications (page 227).
7. Install the wheel trim using the ball of
your hand.
WARNING
Have the wheel nuts checked for
tightness and the tyre pressure
checked as soon as possible.
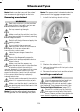
TEMPORARY MOBILITY KIT
Your vehicle may not have a spare tyre. In
this case it will have an emergency tyre
repair kit that can be used to repair one
flat tyre.
The tyre repair kit is located in the spare
wheel well.
General information
WARNINGS
Depending on the type and extent of
tyre damage, some tyres can only be
partially sealed or not sealed at all.
Loss of tyre pressure can affect vehicle
handling, leading to loss of vehicle control.
Do not use the tyre repair kit if the
tyre has already been damaged as a
result of being driven under inflated.
Do not use the tyre repair kit on run
flat tyres.
Do not try to seal damage other than
that located within the visible tread
of the tyre.
Do not try to seal damage to the
tyre’s sidewall.
The tyre repair kit seals most tyre
punctures [with a diameter of up to six
millimetres (1/4 inch)] to temporarily
restore mobility.
Observe the following rules when using the
kit:
221
Wheels and Tyres