
Operation Manual


CAUTION
Screwing the bottle onto the bottle
holder will pierce the seal of the
bottle. Do not unscrew the bottle from
the holder as the sealant will escape.
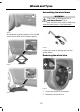
E94973
B
J
I
F
E
C
K
A
G
H
D
Protective capA
Pressure relief valveB
HoseC
Orange capD
Bottle holderE
Pressure gaugeF
Power plug with cableG
Compressor switchH
LabelI
Bottle lidJ
Sealant bottleK
1. Open the lid of the tyre repair kit.
2. Peel off the label I showing the
maximum permissible speed of
80 km/h (50 mph) from the casing and
attach it to the instrument panel in the
driver’s field of view. Make sure the
label does not obscure anything
important.
3. Take the hose C and the power plug
with cable G out of the kit.
4. Unscrew the orange cap D and the
bottle lid J.
5. Screw the sealant bottle K clockwise
into the bottle holder E fully tight.
6. Remove the valve cap from the
damaged tyre.
7. Detach the protective cap A from the
hose C and screw the hose C firmly
onto the valve of the damaged tyre.
8. Make sure that the compressor switch
H is in position 0.
9. Insert the power plug G into the cigar
lighter socket or auxiliary power socket.
See Cigar Lighter (page 116). See
Auxiliary Power Points (page 116).
10. Start the engine.
11. Move the compressor switch H to
position 1.
12. Inflate the tyre for no longer than
seven minutes to an inflation pressure
of minimum 1.8 bar (26 psi) and a
maximum of 3.5 bar (51 psi). Move
the compressor switch H to position
0 and check the current tyre pressure
with pressure gauge F.
223
Wheels and Tyres