
Instructions / Assembly

- 4 -
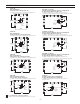
Framing should be done based on the rough opening
noted on Pg 2 for each size base.
Framing studs should be plumb and square to
sub-floor that will be under the base.
The existing floor must be clean, smooth, and level.
Do not install shower base on open floor joists.
Cut hole in sub-floor as shown to accommodate
drain (not included/see Pg 2 specifications).
This should only be done once you have the base.
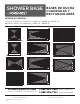
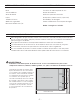
Trial fit base in prepared alcove.
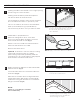
With base sitting flat on floor, check with
level on top of base. Base should be level from
front-to-back and side-to-side (Fig 1).
If base is not level, install wood shims between
base feet and sub-floor as needed.
Remove base from alcove.
Optional: If sub-floor is not level, a floor leveling
compound (smooth mortar) or a similar
quick-setting compound specifically made for
leveling floors is an excellent way to fully support
and level base instead of wood shims.
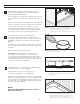
Apply construction adhesive to all feet and install
base into alcove (Fig 2).
Level base with shims into construction adhesive
under feet (Fig 3).
After base is leveled, if alcove is larger than base,
shim between base and studs to create tight fit.
Predrill hole using 1/8 drill bit. Then screw base
flange to all studs (Fig 4).
NOTE:
Failure to screw flange to all studs
will void warranty.
FIG 1 Check to assure base is level by placing
a level in a horizontal position on top of
the threshold (front rim) of the base,
sides and back.
FIG 4 If necessary, shim between base and
studs for tight fit. Screw flange to all
studs after it has been predrilled to
avoid cracking the acrylic.
FIG 2 Apply construction adhesive to all feet.
FIG 3
Apply shims under feet into adhesive
as needed to level the base.
A
SHIMS
1
2
3
INSTALLATION PROCEDURE