
User Manual
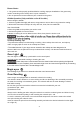
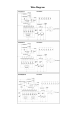
Table Of Contents

22
Gas Supply Connection
All connections to the gas piping must be wrench-tightened. Do not overtighten or allow pipes to
turn when tightening.
When all connections have been made, check that all range controls are in the “OFF” position and
turn on the main gas supply valve.
If a flexible metal connector is being used, verify it is not kinked, then attach the gas supply line to
the regulator on the range. Open the valve and check for leaks by placing a liquid detergent
solution onto all gas connections. Bubbles around connections indicate a gas leak. If a leak
appears, close the shut-off valve and adjust connections.
Leak testing of the appliance shall be conducted according to the manufacture’s instructions .Use
some soap water (50% water and 50% soap) or a leak detector at all joints and connections to
check for leaks in the system. Do not use a flame to check for gas leaks.
The appliance must be isolated from the building’s gas supply piping system by closing its
individual manual shut-off valve during any pressure testing of the gas supply piping system at test
pressure equal to or less than 0.5 psi (3.5kPa).
Before you start cooking, please take the following steps.
• Remove the exterior and interior packing.
• Remove the protective film on steel and aluminum parts.
• Clean the range thoroughly with hot water and a mild detergent. Rinse and dry with a soft cloth to
remove any residual oil and grease left over from the manufacturing process.
• Check that surface burner components are assembled correctly.
• Furnish the interior of the oven by inserting the shelves and tray.
Cooktop Operation
The burner design combines all burner
parts in one assembly. The burner cap must
be seated flatly on the burner. Refer
to the illustration below.
Getting Started