
Use and Care Manual

STEP 7: Air Shutter Oven Burner (no necessary)
The air shutter for the oven burner may need adjustment, especially if the unit has been converted
for use with LP. The approximate flame height at the oven burner is one inch (distinctive
inner blue flame).
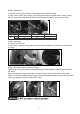
To determine if the oven burner flame is acceptable:
a. With the kick plate removed, set the oven to bake at 350° F and observe the flame. If the flame
yellow in color, increase the air shutter opening size. If the flame is blue and lifting away from the
burner, reduce the air shutter opening size.
b. Turn off the oven and allow it to cool before adjusting the air shutter. To adjust, loosen the lock
screw, reposition the air shutter and tighten the lock screw. Retest the burner by repeating the
steps above. When the burner flame is a distinct blue colour and burning steadily, the air shutter is
adjusted correctly.
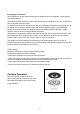
STEP 8: Installation of New Rating Label
Record the model and serial number on the LP / Propane Rating serial plate provided in this kit.
The information can be obtained from the existing Rating / Serial plate. Place the new plate as
close as possible to the existing Rating / Serial plate on the range.
Before moving the range, protect any finished flooring and secure oven door(s) closed to prevent
damage.
The oven door(s) can be removed to lighten the load or to fit the unit through a doorway. Only
remove if necessary. Do not remove the griddle or any other component. Door removal should only
be done by a certified installer or service technician.
Placement
Do not lift or carry the oven door by the door handle. The range has rear casters which allow for
easy movement by lifting the front of the unit.
Use an appliance dolly to move the range near the opening. Remove and recycle packing
materials. Do not discard the anti-tip bracket supplied with the range.
Leveling
Raise the range to the desired height by adjusting the legs. The legs can be adjusted by
rotating the hexagonal leg clockwise to raise and counter clockwise to lower.
Anti-Tip Bracket
To prevent the range from tipping forward, the anti-tip bracket must be installed. Refer to the
illustration on page 5.
Preparation
22