User manual Washing Machine WA 8465
Contents Safety information Environment concerns Technical information Product description Control panel Programmes Before first use Using the appliance 2 3 4 4 5 8 10 10 Loading the laundry 10 Filling the detergent and additives 11 Setting and starting a programme 12 At the end of the programme 13 Helpful hints and tips 13 Care and cleaning 14 Troubleshooting 17 Installation 19 Subject to change without notice Safety information Before the installation and use, read this manual carefully: • For your
filters is correct. An incorrect installation causes water leakages. Installation • The appliance is heavy, be careful when you move it. • Do not transport your appliance without the transit bolts, you can damage internal components and cause leakages or malfunctions. • Do not install and connect a damaged appliance. • Make sure to remove all packaging and transport bolts. • Make sure that the mains plug is disconnected from the mains socket during installation.
• Always start a washing programme with the maximum load of laundry. • If necessary, use a stain remover when you set a programme with a low temperature.
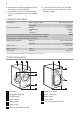
Accessories 1 2 4 3 1 Spanner To remove the transit bolts. 2 Plastic caps To close the holes on the rear side of the cabinet after the removal of the transit bolts. 3 Anti-flood inlet hose To prevent possible leakage 4 Plastic hose guide To connect the drain hose on the edge of a sink.
Programme knob 2 Turn this knob to set a programme. The related programme indicator comes on. Display 3 A B C D The display shows: A • The maximum temperature of the programme. B • The default spin speed of the programme. • 'No Spin'1) and 'Rinse Hold' symbols. C • The display symbols.2) Symbols Description Washing phase Rinse phases Spin phase Child lock You cannot open the appliance door when the symbol is on. You can open the door only when the symbol goes off.
Time save button 6 Press the button 6 to decrease the programme duration. • Press one time to set 'Shortened duration' for items with daily soil. • Press two times to set 'Extra Quick' for items with almost no soil. Some programmes accept only one of the two functions. Extra rinse button 7 Press button 7 to add rinsing phases to a programme. Use this function for persons allergic to detergents and in areas where the water is soft. Stain button 8 Press button 8 to add the stain phase to a programme.
Programmes Programme Temperature Type of load max. weight of load Cycle description Functions Koch / Bunt Blanc / Couleurs 95° - Cold White and coloured cotton with normal soil. max. 8 kg Wash Rinses Long spin SPIN REDUCTION RINSE HOLD STAIN1) EXTRA RINSE TIME SAVE2) Koch / Bunt + Vorwäsche Blanc / Couleurs + Prélavage 95° - Cold White and coloured cotton with heavy soil. max.
Programme Temperature Type of load max. weight of load Cycle description Functions 20 Min. - 3 Kg 30° Cotton and synthetic items with light soil or worn only one time. Wash Rinses Short spin SPIN REDUCTION Super Eco6) Cold Mixed fabrics (cotton and synthetic items). max. 3 kg Wash Rinses Long spin SPIN REDUCTION RINSE HOLD EXTRA RINSE Energiesparen Economique7) 60° - 40° STANDARD PROGRAMMES for the Energy Label consumption values White and fast coloured cotton with normal soil. max.
Programme1) Energy consumption (KWh)2) Water consumption (litre)2) Cottons 60 °C 1.60 72 Cottons 40 °C 1.00 72 Synthetics 40 °C 0.60 50 Delicates 40 °C 0.70 60 Wool/ Handwash 30 °C 0.35 57 1) Refer to the display for the programme time. 2) The consumption information shown in this chart is indicative. It can vary depending on the quantity and the type of laundry, on the temperature of the water supply and on the ambient temperature.
Make sure that no laundry stays between the seal and the door. There is a risk of water leakage or damage to the laundry. Filling the detergent and additives The detergent compartment for the prewash phase and the soak programme. Add the detergent for prewash and soak before the start of the programme. The detergent compartment for the washing phase. If you use a liquid detergent, put it immediately before you start the programme. Liquid additives compartment (fabric conditioner, starch).
6. Carefully close the detergent dispenser. Make sure that the flap does not cause a blockage when you close the drawer. 5. Measure out the detergent and the fabric conditioner. With the flap in the position DOWN: – Do not use gelatinous or thick liquid detergents. – Do not put more liquid detergent than the limit showed in the flap. – Do not set the prewash phase. – Do not set the delay start function. Setting and starting a programme 1. Turn the programme knob.
If the temperature and level of the water in the drum are too high, the door lock symbol stays on and you cannot open the door. To open the door do the steps that follow: 1. Deactivate the appliance. 2. Wait for some minutes. 3. Make sure that no water is in the drum. Important! If you deactivate the appliance, it is necessary to set the programme again. At the end of the programme • • • • The appliance stops automatically. The acoustic signals operate. comes on.
Detergents and additives • Only use detergents and additives specially made for washing machines. • Do not mix different types of detergents. • To help the environment, do not use more than the correct quantity of detergent. • Obey the instructions that you find on the on packaging of these products. • Use the correct products for the type and colour of the fabric, the programme temperature and the level of soil. • If you use liquid detergents, do not set the prewash phase.
Door seal 4. Clean all the parts with water. 5. Clean the dispenser recess with a brush. Regularly examine the seal and remove all objects from the inner part. Drum Regularly examine the drum to prevent limescale and rust particles. Only use special products to remove rust particles from the drum. To do this: • Clean the drum with special product for stainless steel. • Start a short programme for cotton at the maximum temperature with a small quantity of detergent. Detergent dispenser 1.
3. Put a container below the recess of the drain pump to collect the water that flows out. 9. Clean the filter under the water tap and put it back in the pump into the special guides. 10. Make sure that you tighten correctly the filter to prevent leakages. 11. Put the flap back and close the drain pump door. 2 4. Press the two levers and pull forward the drainage duct to let the water flow out. 5. When the container is full of water, put the drainage duct back again and empty the container.
1. Put 2 litres of water in the main wash compartment of the detergent dispenser. 2. Start the programme to drain the water. 6. Install again the inlet hose. Make sure that the couplings are tight to prevent leakages. 45° 20° 7. Open the water tap. Frost precautions If the appliance is installed in an area where the temperature can be less than 0 °C, remove the remaining water from the inlet hose and the drain pump. 1. Disconnect the mains plug from the mains socket. 2. Close the water tap. 3.
Problem The appliance does not drain the water. Possible cause Possible solution The filters in the water inlet hose is blocked . Clean the filters. Refer to 'Care and cleaning'. The water tap is blocked or is furred with limescale. Clean the water tap. The connection of the water inlet hose is not correct. Make sure that the connection is correct. The water pressure is too low. Contact your local water authority. The water drain hose is damaged.
Problem The appliance makes an unusual noise. Possible cause Possible solution Incorrect level of the appliance. Adjust the level of the appliance. Refer to 'Installation'. You did not remove the packaging and/or the transit bolts. Remove the packaging and/or the transit bolts. Refer to 'Installation'. The load is very small. Add more laundry in the drum. The appliance fills with water and drain immediately. The end of the drain hose is too low.
4. Remove the internal film. 7. Remove the polystyrene protection from the bottom. 1 5. Open the door. Remove the polystyrene piece from the door seal and all the items from the drum. 6. Put one of the polystyrene packaging elements on the floor behind the appliance. Carefully put down the appliance with the rear side on it. Make sure not to damage the hoses. 2 8. Pull up the appliance in vertical position. 9. Remove the power supply cable and the drain hose from the hose holders. 10.
x4 12. Put the plastic caps in the holes. You can find these caps in the user manual bag. • The appliance must be level and stable. Caution! Do not put cardboard, wood or equivalent materials below the appliance feet to adjust the level. The inlet hose • Connect the hose to the appliance. Turn the inlet hose only left or right. Loose the ring nut to set it in the correct position. Warning! Remove all the packaging and the transit bolts before you install the appliance.
Caution! Make sure that there are no leaks from the couplings. Make sure that the plastic guide cannot move when the appliance drains. Attach the guide to the water tap or the wall. • To a stand pipe with vent-hole. Do not use an extension hose if the inlet hose is too short. Contact the service centre for the replacement of the inlet hose. Water-stop device The inlet hose has a water stop device. This device prevents water leaks in the hose because of its natural ageing.
• Directly to a built-in drain pipe in the room wall and tighten it with a clip. You can extend the drain hose to maximum 400 cm. Contact the service centre for the other drain hose and the extension.
132930100-A-372011