
User Manual
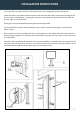
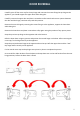
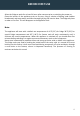
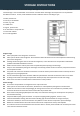


Table Of Contents
- Slide Number 1
- CONTENTS
- IMPORTANT NOTICES
- APPLIANCE COMPONENTS
- INSTALLATION AND OPERATING CONDITIONS OF THE APPLIANCE
- Slide Number 6
- Slide Number 7
- INSTALLATION INSTRUCTIONS
- Slide Number 9
- Slide Number 10
- Slide Number 11
- Slide Number 12
- BEFORE FIRST USE
- Slide Number 14
- Slide Number 15
- Slide Number 16
- DEFROSTING
- CARE AND CLEANING
- Slide Number 19

INSTALLATION INSTRUCTIONS
10
Ensure that there is a gap of 0.16in (3 to 4mm) between the non-hinged side and the cabinet wall.
Locate the slider in the bracket and fix the slider to the fascia door 0.8in (20 to 22mm) from the edge of the
fascia as shown in following pic., ensuring that the slider is positioned centrally and horizontally within the
bracket. Tighten securely by hand.
Fill the gap on the non-hinged side with the gasket/seal strip provided.
The finished look for the door sliders should be similar to those shown in following pics., which shows 2
sliders in place.
Once complete, and if you are happy with the fit of the appliance in the cabinet, bend and snap the parts of
the white spacers marked ‘S’ as shown by the dotted outline. Leave the rest of the spacer cover in place over
the metal plates.
Important: After completing the installation, check that the appliance is secured within the unit and that the
door(s) close and open properly. If there is no resistance from the door seals when opening the doors, then it
is probable that the appliance and/or decor doors are not fitted properly.