
Data Sheet


www.veear.eu
70 EasyVR 3 (Plus) User Manual (1.0.17)
Remote Connections (Advanced Topic)
The EasyVR Commander can also connect to remote systems, typically Linux PCs or Linux embedded
systems (such as BeagleBone, Raspberry Pi, etc.), that expose a remote EasyVR module through the
network.
To enable this feature (available since v3.12.0) you need to configure the remote system and manually
edit the EasyVR Commander settings.
On Linux based systems, you can use either “socat” or “ser2net” utilities to map the serial port where the
EasyVR module is physically connected to a TCP port of your choice.
Attention! The examples below have been tested with specific versions of the hardware and
the software; they might not work for your own combination.
Since modifications to the system configuration are required, this topic is recommended for
expert users only!
Configuring the Remote System
Example 1: BeagleBone Black (Rev C)
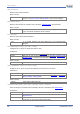
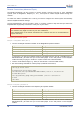
Connect the EasyVR 3 module to UART1 on the BeagleBone expansion headers:
EasyVR 3 Module
BeagleBone Black
GND
DGND (P9.1)
5V or 3V3 (depending on PWR jumper)
VDD_3V3 (P9.3)
TX
UART1_RXD (P9.26)
RX
UART1_TXD (P9.24)
In alternative, you may use an adapter board for mikroBUS interface, like the “mikroBUS Cape” by
MikroElektronika, just make sure you set the PWR jumper to the +3V3 position on the EasyVR 3
module and that you plug it in socket 2 or 3 (other sockets use a different UART).
Install a recent Debian image (e.g. Jessie) on the SD Card or internal e-MMC memory
Run the following commands on a shell prompt (comments start with #):
# install ser2net
sudo apt-get install ser2net
# permanently map TCP port 6666 to UART1
echo 6666:raw:0:/dev/ttyO1:9600 8DATABITS NONE 1STOPBIT | sudo tee -a /etc/ser2net.conf
# enable UART1 pin mux
echo cape_enable=bone_capemgr.enable_partno=BB-UART1 | sudo tee –a /boot/uEnv.txt
# reboot
sudo reboot
Example 2: Raspberry Pi Model B+
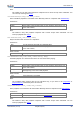
Connect the EasyVR 3 module to the Raspberry Pi expansion header:
EasyVR 3 Module
Raspberry Pi
GND
GND (Pin 9)
5V or 3V3 (depending on PWR jumper)
3.3V (Pin 1)
TX
UART_RX (Pin 10)
RX
UART_TX (Pin 8)
In alternative, you may use an adapter board for mikroBUS interface, like the “PI2 click Shield” by
MikroElektronika, just make sure you set the PWR jumper to the +3V3 position on the EasyVR 3
module.