
Incorporated User Manual switch FortiGate 4000
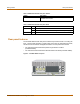


Getting started Installing hardware
FortiGate-4000 Installation and Configuration Guide 37
Installing hardware
This section describes how to install FortiGate-4000 hardware.
• Choosing a suitable environment
• Choosing a rack
• Attaching the mounting rail
• Installing FortiBlade-4010 modules
• FortiGate-4000P network connections
• FortiGate-4000S network connections
• Out of band management connections
• Console management connections
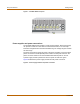
Choosing a suitable environment
Considering the following factors when selecting a suitable location for the
FortiGate-4000 unit:
• Install the FortiGate-4000 chassis on a flat, stable surface or in a suitable rack.
• Avoid a location that is exposed to strong vibration.
• Install the FortiGate-4000 chassis away from electromagnetic or radio frequency
interference.
• Avoid using or storing the FortiGate-4000 chassis where it can be exposed to
extreme temperatures. Do not leave the server in direct sunlight or near a heat
source for a long period. High temperature can damage the circuitry.
• Avoid exposing the FortiGate-4000 chassis to high or low humidity.
Choosing a rack
Install the FortiGate-4000 chassis in a rack or cabinet with a depth of more than
700 mm, excluding the front door depth. For better heat dissipation, the rear side of
the rack cabinet should be open.
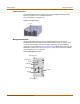
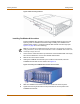
Attaching the mounting rail
You can attach a mounting rail to the FortiGate-4000 chassis so that you can slide the
chassis out from the rack for maintenance. There are 11 mounting holes on the
FortiGate-4000 chassis that match different manufacturer mounting rails. Figure 14
shows the mounting locations to install the FortiGate-4000 mounting rail. Use the
three screws included with the FortiGate-4000 mounting rail kit.