Installation Guide FortiGate 60 INTERNAL PWR STATUS 1 2 3 4 DMZ WAN1 WAN2 LINK 100 LINK 100 LINK 100 LINK 100 LINK 100 LINK 100 LINK 100 Version 2.
© Copyright 2005 Fortinet Inc. All rights reserved. No part of this publication including text, examples, diagrams or illustrations may be reproduced, transmitted, or translated in any form or by any means, electronic, mechanical, manual, optical or otherwise, for any purpose, without prior written permission of Fortinet Inc. FortiGate-60 Installation Guide Version 2.
Contents Table of Contents Introduction ............................................................................................................ 5 Secure installation, configuration, and management .......................................................... 5 Web-based manager ...................................................................................................... 6 Command line interface ..................................................................................................
Contents Using the command line interface..................................................................................... 30 Configuring the FortiGate unit to operate in NAT/Route mode ..................................... 30 Using the setup wizard...................................................................................................... 32 Starting the setup wizard ..............................................................................................
FortiGate-60 Installation Guide Version 2.80 MR8 Introduction FortiGate Antivirus Firewalls improve network security, reduce network misuse and abuse, and help you use communications resources more efficiently without compromising the performance of your network. FortiGate Antivirus Firewalls are ICSA-certified for firewall, IPSec, and antivirus services.
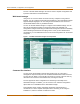
Secure installation, configuration, and management Introduction The CLI or the web-based manager can then be used to complete configuration and to perform maintenance and administration. Web-based manager Using HTTP or a secure HTTPS connection from any computer running Internet Explorer, you can configure and manage the FortiGate unit. The web-based manager supports multiple languages. You can configure the FortiGate unit for HTTP and HTTPS administration from any FortiGate interface.
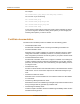
Introduction Document conventions Setup wizard The FortiGate setup wizard provides an easy way to configure the basic initial settings for the FortiGate unit. The wizard walks through the configuration of a new administrator password, FortiGate interfaces, DHCP server settings, internal servers (web, FTP, etc.), and basic antivirus settings. Document conventions This guide uses the following conventions to describe command syntax. • Angle brackets < > to indicate variables.
FortiGate documentation Introduction For example: set allowaccess {ping https ssh snmp http telnet} You can enter any of the following: set allowaccess ping set allowaccess ping https ssh set allowaccess https ping ssh set allowaccess snmp In most cases to make changes to lists that contain options separated by spaces, you need to retype the whole list including all the options you want to apply and excluding all the options you want to remove.
Introduction Related documentation • FortiGate IPS Guide Describes how to configure the FortiGate Intrusion Prevention System settings and how the FortiGate IPS deals with some common attacks. • FortiGate VPN Guide Explains how to configure VPNs using the web-based manager. Fortinet Knowledge Center The most recent Fortinet technical documentation is available from the Fortinet Knowledge Center.
Customer service and technical support Introduction FortiMail documentation • FortiMail Administration Guide Describes how to install, configure, and manage a FortiMail unit in gateway mode and server mode, including how to configure the unit; create profiles and policies; configure antispam and antivirus filters; create user accounts; and set up logging and reporting. • FortiMail online help Provides a searchable version of the Administration Guide in HTML format.
Introduction Customer service and technical support For information on Fortinet telephone support, see http://support.fortinet.com.
Customer service and technical support 12 Introduction 01-28008-0018-20050128 Fortinet Inc.
FortiGate-60 Installation Guide Version 2.80 MR8 Getting started This section describes unpacking, setting up, and powering on a FortiGate Antivirus Firewall unit.
Package contents Getting started Package contents The FortiGate-60 package contains the following items: • FortiGate-60 Antivirus Firewall • one orange crossover ethernet cable (Fortinet part number CC300248) • one gray regular ethernet cable (Fortinet part number CC300249) • one RS-232 null modem cable (Fortinet part number CC300247) • FortiGate-60 Quick Start Guide • CD containing the FortiGate user documentation • one power cable and AC adapter Figure 2: FortiGate-60 package contents Fro
Getting started Turning the FortiGate unit power on and off Power requirements • DC input voltage: 12 V • DC input current: 3 A Environmental specifications • Operating temperature: 32 to 104°F (0 to 40°C) • Storage temperature: -13 to 158°F (-25 to 70°C) • Humidity: 5 to 95% non-condensing Turning the FortiGate unit power on and off To power on the FortiGate unit 1 Connect the AC adapter to the power connection at the back of the FortiGate-60 unit.
Connecting to the web-based manager Getting started Connecting to the web-based manager Use the following procedure to connect to the web-based manager for the first time. Configuration changes made with the web-based manager are effective immediately without resetting the firewall or interrupting service. To connect to the web-based manager, you need: • a computer with an ethernet connection, • Internet Explorer version 6.0 or higher, • an ethernet cable.
Getting started Connecting to the command line interface (CLI) Connecting to the command line interface (CLI) As an alternative to the web-based manager, you can install and configure the FortiGate unit using the CLI. Configuration changes made with the CLI are effective immediately without resetting the firewall or interrupting service.
Quick installation using factory defaults Getting started Quick installation using factory defaults You can quickly set up your FortiGate unit for a home or small office using the webbased manager and the factory default FortiGate configuration. All you need to do is set your network computers to obtain an IP address automatically and to obtain DNS server IP addresses automatically (using DHCP), access the web-based manager, and configure the required settings for the FortiGate WAN1 interface.
Getting started Factory default FortiGate configuration settings 7 Select one of the following DNS settings • Obtain DNS server address automatically: select to get the DNS addresses from the ISP, select Apply • Use the following DNS server addresses: select and enter the DNS server addresses given to you by the ISP, select Apply 8 Go to Router > Static, edit route #1 and change Gateway to the default gateway IP address from the ISP and select OK. Network configuration is complete.
Factory default FortiGate configuration settings Getting started Table 2: FortiGate DHCP Server default configuration Name internal_dhcp_server Interface Internal Default Gateway 192.168.1.99 IP Range 192.168.1.110 – 192.168.1.210 Network Mask 255.255.255.0 Lease Duration 7 days DNS Server 1 192.168.1.
Getting started Factory default FortiGate configuration settings Table 3: Factory default NAT/Route mode network configuration (Continued) Network Settings Default Gateway (for default route) 192.168.100.1 Interface connected to external network (for default route) wan1 Default Route A default route consists of a default gateway and the name of the interface connected to the external network (usually the Internet).
Factory default FortiGate configuration settings Getting started Table 5: Default firewall configuration Configuration setting Name Description Firewall policy Internal -> Wan1 Source: All Destination: All Firewall address All Firewall address matches the source or destination address of any packet. Pre-defined service More than 50 predefined services Select from any of the 50 pre-defined services to control traffic through the FortiGate unit that uses that service.
Getting started Planning the FortiGate configuration Web To apply antivirus scanning and web content blocking to HTTP content traffic. You can add this protection profile to firewall policies that control HTTP traffic. Unfiltered To apply no scanning, blocking or IPS. Use if you do not want to apply content protection to content traffic. You can add this protection profile to firewall policies for connections between highly trusted or highly secure networks where content does not need to be protected.
Planning the FortiGate configuration Getting started You must configure routing to support the redundant WAN1 and WAN2 internet connections. Routing can be used to automatically redirect connections from an interface if its connection to the external network fails. You can add firewall policies to control whether communications through the FortiGate unit operate in NAT or Route mode. Firewall policies control the flow of traffic based on the source address, destination address, and service of each packet.
Getting started Planning the FortiGate configuration Otherwise, security policy configuration is similar to a NAT/Route mode configuration with a single Internet connection. You would create NAT mode firewall policies to control traffic flowing between the internal, private network and the external, public network (usually the Internet).
Next steps Getting started Configuration options Once you have selected Transparent or NAT/Route mode operation, you can complete the configuration plan and begin to configure the FortiGate unit. Choose among three different tools to configure the FortiGate unit. Web-based manager and setup wizard The FortiGate web-based manager is a full featured management tool. You can use the web-based manager to configure most FortiGate settings.
FortiGate-60 Installation Guide Version 2.80 MR8 NAT/Route mode installation This chapter describes how to install the FortiGate unit in NAT/Route mode. For information about installing a FortiGate unit in Transparent mode, see “Transparent mode installation” on page 39. For information about installing two or more FortiGate units in HA mode, see “High availability installation” on page 47.
Using the web-based manager NAT/Route mode installation Table 6: NAT/Route mode settings Administrator Password: Internal WAN1 WAN2 DMZ IP: _____._____._____._____ Netmask: _____._____._____._____ IP: _____._____._____._____ Netmask: _____._____._____._____ IP: _____._____._____._____ Netmask: _____._____._____._____ IP: _____._____._____._____ Netmask: _____._____._____._____ Default Gateway: _____._____._____.
NAT/Route mode installation Using the web-based manager Configuring basic settings After connecting to the web-based manager you can use the following procedures to complete the basic configuration of the FortiGate unit. To add/change the administrator password 1 Go to System > Admin > Administrators. 2 Select the Change Password icon for the admin administrator. 3 Enter the new password and enter it again to confirm. 4 Select OK. To configure interfaces 1 Go to System > Network > Interface.
Using the command line interface NAT/Route mode installation 1 Go to System > Router > Static. 2 If the Static Route table contains a default route (IP and Mask set to 0.0.0.0), select the Delete icon to delete this route. 3 Select Create New. 4 Set Destination IP to 0.0.0.0. 5 Set Mask to 0.0.0.0. 6 Set Gateway to the default gateway IP address. 7 Set Device to the interface connected to the external network. 8 Select OK.
NAT/Route mode installation Using the command line interface Example config system interface edit internal set mode static set ip <192.168.120.99> <255.255.255.0> end 3 Set the IP address and netmask of the WAN1 interface to the IP address and netmask that you recorded in Table 6 on page 28. To set the static IP address and netmask, enter: config system interface edit wan1 set mode static set ip end Example config system interface edit wan1 set mode static set ip 204.23.1.5 255.
Using the setup wizard NAT/Route mode installation To configure DNS server settings • Set the primary and secondary DNS server IP addresses. Enter config system dns set primary set secondary end Example config system dns set primary 293.44.75.21 set secondary 293.44.75.22 end To add a default route Add a default route to configure where the FortiGate unit sends traffic that should be sent to an external network (usually the Internet).
NAT/Route mode installation Using the setup wizard If you are configuring the FortiGate unit to operate in NAT/Route mode (the default), you can use the setup wizard to: • add the administration password • configure the internal interface address • choose either a manual (static) or a dynamic (DHCP or PPPoE) address for the external interface • add a default route for the external interface • add the DNS server IP addresses • add the DHCP server settings and IP addresses • add various interna
Connecting the FortiGate unit to the network(s) NAT/Route mode installation Table 8: Setup wizard settings Antivirus High Create a protection profile that enables virus scanning, file blocking, and blocking of oversize email for HTTP, FTP, IMAP, POP3, and SMTP. Add this protection profile to a default firewall policy. Medium Create a protection profile that enables virus scanning, for HTTP, FTP, IMAP, POP3, and SMTP (recommended). Add this protection profile to a default firewall policy.
NAT/Route mode installation Connecting the FortiGate unit to the network(s) • One DMZ port for connecting to a DMZ network. • Modem is the interface for connecting an external modem to the FortiGate-60. See “Configuring the Modem interface” on page 36 Note: You can also connect the WAN1 and WAN2 interfaces to different Internet connections to provide a redundant connection to the Internet.
Configuring the networks NAT/Route mode installation Configuring the networks If you are running the FortiGate unit in NAT/Route mode, your networks must be configured to route all Internet traffic to the IP address of the FortiGate interface to which they are connected. • For the internal network, change the default gateway address of all computers and routers connected directly to your internal network to the IP address of the FortiGate internal interface.
NAT/Route mode installation Next steps To set the date and time For effective scheduling and logging, the FortiGate system date and time must be accurate. You can either manually set the system date and time or configure the FortiGate unit to automatically keep its time correct by synchronizing with a Network Time Protocol (NTP) server. 1 Go to System > Config > Time. 2 Select Refresh to display the current FortiGate system date and time. 3 Select a Time Zone from the list.
Next steps NAT/Route mode installation 1 Go to System > Maintenance > Update Center. 2 Select Refresh to test the FortiGate unit connectivity with the FortiProtect Distribution Network (FDN). To be able to connect to the FDN the FortiGate unit default route must point to a network such as the Internet to which a connection to the FDN can be established. If FortiProtect Distribution Network changes to Available, then the FortiGate unit can connect to the FDN.
FortiGate-60 Installation Guide Version 2.80 MR8 Transparent mode installation This chapter describes how to install a FortiGate unit in Transparent mode. If you want to install the FortiGate unit in NAT/Route mode, see “NAT/Route mode installation” on page 27. If you want to install two or more FortiGate units in HA mode, see “High availability installation” on page 47. For more information about installing the FortiGate unit in Transparent mode, see “Planning the FortiGate configuration” on page 23.
Using the web-based manager Transparent mode installation Table 9: Transparent mode settings Administrator Password: Management IP IP: _____._____._____._____ Netmask: _____._____._____._____ Default Gateway: _____._____._____._____ The management IP address and netmask must be valid for the network from which you will manage the FortiGate unit. Add a default gateway if the FortiGate unit must connect to a router to reach the management computer. Primary DNS Server: DNS Settings _____._____.
Transparent mode installation Using the command line interface To configure DNS server settings 1 Go to System > Network > DNS. 2 Enter the IP address of the primary DNS server. 3 Enter the IP address of the secondary DNS server. 4 Select OK. To configure the default gateway 1 Go to System > Network > Management. 2 Set Default Gateway to the default gateway IP address that you recorded in Table 9 on page 40. 3 Select Apply.
Using the command line interface Transparent mode installation The CLI displays the status of the FortiGate unit including the following line of text: Operation mode: Transparent To configure the management IP address 1 Make sure that you are logged into the CLI. 2 Set the management IP address and netmask to the IP address and netmask that you recorded in Table 9 on page 40. Enter: config system manageip set ip end Example config system manageip set ip 10.10.10.2 255.255.255.
Transparent mode installation Using the setup wizard Example If the default gateway IP is 204.23.1.2 and this gateway is connected to port 2: config router static edit 1 set dst 0.0.0.0 0.0.0.0 set gateway 204.23.1.2 set device port2 end Using the setup wizard From the web-based manager, you can use the setup wizard to begin the initial configuration of the FortiGate unit. For information about connecting to the web-based manager, see “Connecting to the web-based manager” on page 16.
Connecting the FortiGate unit to your network Transparent mode installation Connecting the FortiGate unit to your network When you have completed the initial configuration, you can connect the FortiGate unit between your internal network and the Internet using the Internal and WAN1 interfaces. You can also connect networks to the DMZ interface and the WAN2 interface.
Transparent mode installation Next steps Next steps You can use the following information to configure FortiGate system time, to register the FortiGate unit, and to configure antivirus and attack definition updates. Refer to the FortiGate Administration Guide for complete information on configuring, monitoring, and maintaining your FortiGate unit. To set the date and time For effective scheduling and logging, the FortiGate system date and time must be accurate.
Next steps 46 Transparent mode installation 1 Go to System > Maintenance > Update Center. 2 Select Refresh to test the FortiGate unit connectivity with the FortiProtect Distribution Network (FDN). To be able to connect to the FDN the FortiGate unit default route must point to a network such as the Internet to which a connection to the FDN can be established. If FortiProtect Distribution Network changes to Available, then the FortiGate unit can connect to the FDN.
FortiGate-60 Installation Guide Version 2.80 MR8 High availability installation This chapter describes how to install two or more FortiGate units in an HA cluster. HA installation involves three basic steps: • Configuring FortiGate units for HA operation • Connecting the cluster to your networks • Installing and configuring the cluster For information about HA, see the FortiGate Administration Guide and the FortiOS High Availability technical note.
Configuring FortiGate units for HA operation High availability installation Table 10: High availability settings Active-Active Mode Load balancing and failover HA. Each FortiGate unit in the HA cluster actively processes connections and monitors the status of the other FortiGate units in the cluster. The primary FortiGate unit in the cluster controls load balancing. Active-Passive Failover HA. The primary FortiGate unit in the cluster processes all connections.
High availability installation Configuring FortiGate units for HA operation Table 10: High availability settings (Continued) The schedule controls load balancing among the FortiGate units in the active-active HA cluster. The schedule must be the same for all FortiGate units in the HA cluster. Schedule None No load balancing. Select None when the cluster interfaces are connected to load balancing switches. Hub Load balancing for hubs. Select Hub if the cluster interfaces are connected to a hub.
Configuring FortiGate units for HA operation High availability installation To configure a FortiGate unit for HA operation 1 Go to System > Config > HA. 2 Select High Availability. 3 Select the mode. 4 Select a Group ID for the HA cluster. 5 If required, change the Unit Priority. 6 If required, select Override master. 7 Enter and confirm a password for the HA cluster. 8 If you are configuring Active-Active HA, select a schedule. 9 Select Apply.
High availability installation Connecting the cluster to your networks To configure the FortiGate unit for HA operation 1 Configure HA settings.
Connecting the cluster to your networks High availability installation Inserting an HA cluster into your network temporarily interrupts communications on the network because new physical connections are being made to route traffic through the cluster. Also, starting the cluster interrupts network traffic until the individual FortiGate units in the cluster are functioning and the cluster completes negotiation. Cluster negotiation normally takes just a few seconds.
High availability installation 2 Installing and configuring the cluster Power on all the FortiGate units in the cluster. As the units start, they negotiate to choose the primary cluster unit and the subordinate units. This negotiation occurs with no user intervention and normally just takes a few seconds. Installing and configuring the cluster When negotiation is complete the you can configure the cluster as if it was a single FortiGate unit.
Installing and configuring the cluster 54 High availability installation 01-28008-0018-20050128 Fortinet Inc.
FortiGate-60 Installation Guide Version 2.80 MR8 Configuring the modem interface The FortiGate-60 includes the option of an external modem for use as either a redundant interface or a standalone interface in NAT/Route mode. • In redundant mode, the modem interface automatically takes over from a selected ethernet interface when that ethernet interface is unavailable. • In standalone mode, the modem interface is the connection from the FortiGate unit to the Internet.
Selecting a modem mode Configuring the modem interface For the FortiGate unit to switch from an ethernet interface to the modem you must select the name of the interface in the modem configuration and configure a ping server for that interface. You must also configure firewall policies for connections between the modem interface and other FortiGate interfaces. Note: Do not add policies for connections between the modem interface and the interface that the modem is backing up.
Configuring the modem interface Configuring modem settings 3 Configure other modem settings as required. See “Configuring modem settings” on page 57. Make sure there is correct information in one or more Dialup Accounts. 4 Configure firewall policies for connections to the modem interface. See “Adding firewall policies for modem connections” on page 60. 5 Select Dial Up. The FortiGate unit initiates dialing into each dialup account in turn until the modem connects to an ISP.
Connecting and disconnecting the modem in Standalone mode Configuring the modem interface Dial on demand (Standalone mode only) Select to dial the modem when packets are routed to the modem interface. The modem disconnects after the idle timeout period. You cannot select Dial on demand if Auto-dial is selected. Idle timeout (Standalone mode only) Enter the timeout duration in minutes. After this period of inactivity, the modem disconnects.
Configuring the modem interface 5 Defining a Ping Server Select Dial Now. The FortiGate unit initiates dialing into each dialup account in turn until the modem connects to an ISP. Modem status is one of the following: not active The modem interface is not connected to the ISP. active The modem interface is attempting to connect to the ISP, or is connected to the ISP. A green check mark indicates the active dialup account.
Adding firewall policies for modem connections Configuring the modem interface 3 For Fail-over Detection, type a number of times that the connection test fails before the FortiGate unit assumes that the gateway is no longer functioning. 4 Select Apply. Adding firewall policies for modem connections The modem interface requires firewall addresses and policies. You can add one or more addresses to the modem interface. For information about adding addresses, see the FortiGate Administration Guide.
FortiGate-60 Installation Guide Version 2.
Index S set time 37, 45 setup wizard 28, 32, 40, 43 starting 29, 34, 40, 43 standalone mode configuring 56 modem 55, 56 starting IP DHCP 20 synchronize with NTP server 37, 45 T technical support 10 62 time zone 37, 45 Transparent mode changing to 41 configuring the default gateway 42 management IP address 42 W web-based manager 6 connecting to 16 introduction 6 wizard setting up firewall 28, 32, 40, 43 starting 29, 34, 40, 43 01-28008-0018-20050128 Fortinet Inc.