
Network Router User Manual
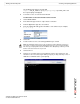
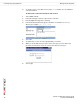
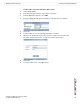
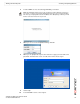


Table Of Contents
- Contents
- Introduction
- Configuring a FortiGate SSL VPN
- Comparison of SSL and IPSec VPN technology
- SSL VPN modes of operation
- Topology
- Configuration overview
- Configuring the SSL VPN client
- Configuring SSL VPN settings
- Enabling SSL VPN connections and editing SSL VPN settings
- Specifying a port number for web portal connections
- Specifying an IP address range for tunnel-mode clients
- Enabling strong authentication through security certificates
- Specifying the cipher suite for SSL negotiations
- Setting the idle timeout setting
- Setting the client authentication timeout setting
- Adding a custom caption to the web portal home page
- Adding WINS and DNS services for clients
- Redirecting a user group to a popup window
- Customizing the web portal login page
- Configuring user accounts and SSL VPN user groups
- Configuring firewall policies
- Configuring SSL VPN event-logging
- Monitoring active SSL VPN sessions
- Configuring SSL VPN bookmarks and bookmark groups
- SSL VPN host OS patch check
- Granting unique access permissions for SSL VPN tunnel user groups
- SSL VPN virtual interface (ssl.root)
- SSL VPN dropping connections
- Working with the web portal
- Index

FortiOS v3.0 MR7 SSL VPN User Guide
72 01-30007-0348-20080718
Launching web portal applications Working with the web portal
9 To end the session, select Disconnect (or type exit) and then close the TELNET
connection window.
To add an FTP connection and start an FTP session
1 Select Add Bookmark.
2 In the Title field, type a name to represent the connection.
3 From the Application Type list, select FTP.
4 In the Shared File Folder field, type the IP address of the FTP host as a root
directory (for example, //10.10.10.10/).
5 Select OK.
6 To start the ftp session, select the hyperlink that you created.
7 When you are prompted to log in to the remote host, type your user name and
password. You must have a user account on the remote host to log in.
8 Select Login.