
eFlex Disassembly Guide

eFlex 5.4 DISASSEMBLY AND CHARGING GUIDE
Contents
1 – INTRODUCTION ............................................................................................................................................................... 1
2 – eFlex DISASSEMBLY ...................................................................................................................................................... 1
3 – TRICKLE-CHARGING THE BATTERY ........................................................................................................................... 2
3A – CONNECTING THE LEADS AND CHARGING ......................................................................................................... 2
5 – FURTHER HELP .............................................................................................................................................................. 2
APPENDIX .............................................................................................................................................................................. 3
APPENDIX A ....................................................................................................................................................................... 3
APPENDIX B ....................................................................................................................................................................... 5
1 – INTRODUCTION
This guide will help with the troubleshooting of the eFlex battery. We will show how to bypass the BMS and
trickle charging an eFlex that is below the “danger zone” of ~46V. This guide is supplemental to the installation
manual—please make sure you understand the proper installation before attempting to open and troubleshoot
the eFlex. Always read the warning notices on the installation manual and take all necessary safety
precautions when dealing with 48V batteries.
2 – eFlex DISASSEMBLY
Please refer to the following steps when disassembling the eFlex:
1) Make sure both terminals are disconnected and both communication ports are empty
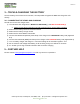
2) Remove the ten (10) screws that attach the front plastic cover (Appendix A-1)
3) There is a gasket on the interface between the black plastic cover and the aluminum body. The easiest
way to remove it is gently tapping a spackling knife along the perimeter of the cover (Appendix A-2)
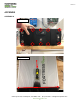
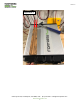
4) To remove the front plastic cover, use a 2x4” and gently hammer the cover off (Appendix A-3)
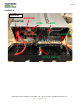
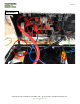
5) Pull open the cover, taking care not to over-extend the wires connected to the cover
6) You should now have access to the battery internals (Appendix B-1)