
SMA Sunny Island Integration Guide
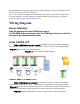
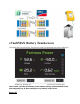
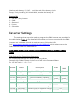
Table Of Contents
- Introduction, Contact info & Useful Links
- Introduction
- Unpack Batteries and Check Voltage
- 1. Unpack the batteries and turn each battery on by itself.
- 2. Note the voltage of each battery and serial number. The serial numbers are useful during warranty submittal.
- 3. The batteries must be within +/-0.5V of each other before commissioning. Groups of 4 batteries or more may require a narrower voltage range to commission properly.
- 4. Turn off the batteries and install them in parallel. Notes
- If the battery voltages are significantly different, one technique is to finish battery installation and only turn on the lowest voltage battery using the pushbutton. Charge the battery, and when the charging voltage is ~0.2V above the resting voltage...
- If the batteries are slightly more than +/-0.5V from each other, turning on the highest voltage batteries only will reduce their voltages, and turning on the lowest voltage batteries only will lower the highest voltage. Likewise, turning on the lowest...
- Use of the Fortress firmware update tool can help speed up commissioning times. Fortress installers should request a firmware update tool by filling out a support ticket at https://support.fortresspower.com
- Wiring Diagram
- Sunny Island(s):
- Plug the batteries into the COM Synch In port. Put the SMA canbus terminator into the COM Sync Out port on the last inverter in the communication chain. eFlex 5.4kWh LFP
- eVault Max 18.5kWh LFP
- eVaultMAX Battery Touchscreen
- Inverter Settings

Introduction, Contact info & Useful Links
Introduction
This integration guide will help set up the charge/discharge
parameters of Fortress Power batteries as they relate to SMA inverters.
Tech-Support Contact Information
• Phone: (877) 497-6937 ext. 2
• Email: techsupport@fortresspower.com
Useful Links
• Warranty Submittal: https://www.fortresspower.com/warranty/
• Support Tickets: https://www.fortresspower.com/support/
Unpack Batteries and Check Voltage
1. Unpack the batteries and turn each battery on by itself.
2. Note the voltage of each battery and serial number. The serial numbers are
useful during warranty submittal.
3. The batteries must be within +/-0.5V of each other before commissioning.
Groups of 4 batteries or more may require a narrower voltage range to commission
properly.
4. Turn off the batteries and install them in parallel.
Notes
If the battery voltages are significantly different, one technique is to finish battery
installation and only turn on the lowest voltage battery using the pushbutton.
Charge the battery, and when the charging voltage is ~0.2V above the resting
voltage of the next lowest battery, turn it on too. Proceed until all batteries are
turned on and at the same voltage level. If the batteries are below 51V, keep
charging amperages below 10A per battery.
If the batteries are slightly more than +/-0.5V from each other, turning on the
highest voltage batteries only will reduce their voltages, and turning on the lowest
voltage batteries only will lower the highest voltage. Likewise, turning on the lowest