
Schneider Electric Integration Guide


Rev 2.2 02-10-22
Fortress Power – Schneider XW Pro Inverter Guide
505 Keystone Rd, Southampton, PA 18966 . (877) 497 6937. sales@fortresspower.com . Fortresspower.com
7
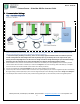
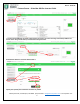
5. Place the communication cable on the Comm Parallel ports between each battery. The first and last battery in the
communication string need to have the termination set to 120 ohms, the other batteries termination is set off.
6. Turn on all batteries except master Battery 1. Batteries should have green run light on and red BMS light blinking.
7. Turn on Master Battery 1. Batteries should parallel within 5 minutes. To confirm that each battery is properly commissioned,
each battery’s status light must be solid green.
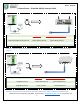
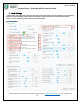
8. The batteries are ready to supply power to the inverter(s). For a single eVault Battery install the power on sequence is different
from multiple batteries. For a single evault the last step is to turn on the battery to take advantage of the pre-charge resistor. So
for a single battery install with the battery off make (turn on) the battery connection all the way to the inverter including the
inverter breaker then turn on the battery. For multiple batteries the last connection made is the inverter battery breaker.
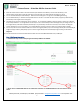
9. Cut and strip the end of the Format B cable and connect wire 3 (green/white) to port 9 of the Insight Home (18 on the Gateway &
Insight Facility) and wire 5 (blue/white) to port 11 of the Insight Home (20 on the Gateway & Insight Facility) as described in
Image 2.5.
10. Connect the other end of the Format B Ethernet Cable onto the eVault MAX Identified as ID 1, Rs485 port.
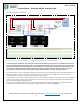
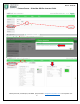
Step 2: Software Integration
***Follow these steps to successfully integrate the battery’s BMS to the XW PRO.
***Note: Choose a 19200 BAUD Rate for the eVault Max. Otherwise use a 9600 BAUD Rate for the eFlex and the eVault
Classic.