USE + INSTALLATION MANUAL Range Hoods FH3011 FH3611 FH3018 FH3618 FH3624
Welcome to the Forza family! Congratulations on your recent Forza purchase! Before you begin using your new Forza product, please take a moment to review the Use + Installation Manual. You will find the answers to all of your questions as well as some very important safety information.
Table of Contents 04 Dimensions and Specifications 10 Preparation for Installation 12 Installation 15 Installation Under Wall Cabinet with Cabling 16 Wall-Mounted Horizontal Vent 20 Cleaning and Maintenance 22 Technical Specifications 24 Warranty 3
Dimensions and Specifications Model Number Voltage Frequency Power Weight FH3011 120 V 60 Hz 233 W 35 lb / 15.
Model Number Voltage Frequency Power Weight FH3611 120 V 60 Hz 353 W 41.
Model Number Voltage Frequency Power Weight FH3018 120 V 60 Hz 353 W 43.6 lb / 19.
Model Number Voltage Frequency Power Weight FH3618 120 V 60 Hz 353 W 52.
Model Number Voltage Frequency Power Weight FH3624 120 V 60 Hz 706 W 68 lb / 30.
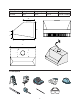
FH3011 - FH3611 FH3018 - FH3618 FH3624 Check the contents of the box before installing the product. If any items are missing or damaged contact the manufacturer. Remove the bag of component accessories from inside the body of the hood. Contents of bag according to model: No. 2 – 3.5 x 9.5 mm No. 4 – 4.5 x 40 mm No. 4 – Dowel Ø8 No. 6 – 4.5 x 15 mm No.
Preparation for Installation Remove the protective plastic film from the product before installing. It is advisable to wear personal protective equipment during installation. Before installing the product remove the indicated accessories from the body of the hood, as shown in the figures. These parts must be removed even if they are not used during installation. The screws provided are required during the installation of the component. 1. Remove the filters. 2. Remove the accessories.
IMPORTANT: The minimum hood installation height requirements indicated in the cooktop / range instructions take precedence over the requirements outlined in this manual. If missing from the cooktop manual, refer to the measures shown in figure (1).
Installation Horizontal Vent Option (PRE-CUT) FH3011 FH3611 - FH3018 - FH3618 (Positioning of motor for horizontal vent) FH3011 12
FH3611 - FH3018 - FH3618 13
Closing 14
Installation Under Wall Cabinet with Cabling Horizontal Vent Option (PRE-CUT) FH3011 FH3611 - FH3018 - FH3618 15
Wall-Mounted Horizontal Vent FH3011 FH3611 - FH3018 - FH3618 16
FH3011 Installation Measurements Wall Installation Measurements Reinforcement for Bottom of Wall Cabinet 17
Installation Under Wall Cabinet 18
Drywall Reinforcement Wall Installation 19
Cleaning and Maintenance Read and follow these instructions. This instruction booklet must be kept together with the appliance for future reference. If the appliance is sold or consigned to other parties, check that the booklet is supplied with it to ensure that the new user has the correct information on the operation of the range hood and is aware of the warnings. These warnings have been provided for your safety and the safety of others.
• Exhaust air must not be discharged into a flue which is used for exhausting fumes from appliances, burning gas or other fuels. • Ensure that all regulations concerning the discharge of exhaust air have been met before you use the appliance. Before performing any cleaning or maintenance operations, disconnect the appliance by unplugging it or using the main switch.
Technical Specifications The technical specifications of the appliance are shown on the rating plates located inside the range hood. Electrical Connection Before carrying out any work inside the hood, disconnect the appliance from the mains. Check that the wires inside the hood are not disconnected or cut; if they are, contact your service center. The electrical connections must be made by qualified personnel. The connections must be made in accordance with the legal regulations in force.
Electronic Control Of Buttons 1) 2) 3) 3) 4) Hood light on/off (the button light is on when the hood light is on). Hood extractor on/off (the button light is on when the extractor is on). (- Symbol) Reduces extractor speed (the button light is on when the function is activated). (+ Symbol) Increases extractor speed (the button light is on when the function is activated). Timer function, the extraction time at levels 1, 2 and 3 is 15 minutes and the hood turns off automatically.
Forza Warranty U.S.A. The warranties provided by Forza in this statement apply exclusively to Forza appliances and accessories sold as new products to the original owner by a Forza authorized distributor, retailer, dealer or service center and installed in the United States. The warranties provided in this statement are not transferable and have validity from the date of original purchase.
9) Defects, damage or missing parts on products not sold in the original factory packaging or from displays. 10) Service calls or repairs to correct the installation of the product and/or related accessories, calibrations and normal adjustments after installation and setup, including burner adjustments. 11) Service calls to connect, convert or otherwise repair electrical wiring and/or gas pipes to properly use the product. 12) Service calls to provide instructions on the use of a Forza product.