ENGLISH FRANÇAIS ESPAÑOL User's Manual Manuel de l'utilisateur Manual del Usuario Bedienungsanleitung Manuale d'uso DEUTSCH Wireless Video Baby Monitor ITALIANO 3.
Figures and Quick Guide / Figures et Guide d'utilisation rapide / Figuras y guía rápida / Abbildungen und Schnellanleitung / Figure e Guida rapida Product Layout / Description du produit / Esquema del producto / Produktübersicht / Struttura del prodotto Camera / Caméra / Cámara / Kamera / Telecamera 1 2 3 4 6 5 10 7 8 Fig. 1 9 Monitor / Moniteur 12 13 14 15 16 17 11 2 3 5 6 10 9 7 1 4 18 19 8 Fig.
Setup / Installation / Configuración / Einrichtung / Installazione 1 Camera Setup / Installation de la caméra / Configuración de la cámara / Kameraeinrichtung / Installazione della telecamera 1.1 Power Supply - Using AC Power Alimentation - Avec alimentation secteur Fuente de alimentación - Utilizar la alimentación de CA Stromversorgung – über Netzstrom Alimentazione - Uso dell'alimentazione CA Fig.
2 Monitor Setup / Installation du moniteur / Configuración del monitor / Monitoreinrichtung / Installazione del monitor 2.1 Power Supply / Alimentation / Fuente de alimentación / Stromversorgung / Alimentazione Loading the Battery / Installation de la batterie / Insertar las pilas / Akku einlegen / Inserimento delle batterie 3 11 2 Fig. 4 Using AC Power/Utilisation de l'alimentation secteur / Uso de la alimentación de CA / Netzstrom verwenden / Uso dell'alimentazione CA 3 1 2 Fig.
2.2 Monitor Remote Control Function Fonction télécommande du moniteur Función del mando a distancia del monitor Monitorfernbedienungsfunktion Funzioni del telecomando del monitor Tilt Pan Fig. 6 2.3 Zoom in Function / Fonction de zoom / Función de zoom de ampliación / Vergrößern-Funktion / Funzione ingrandimento Fig. 7 2.
2.5 Volume Setting / Réglage du volume / Configuración del volumen / Lautstärkeeinstellung / Impostazione del volume Fig. 9 2.6 Talkback Function / Fonction de réponse / Función de intercomunicador / Gegensprechfunktion / Funzione interfono Fig.
3 Menu Options / Options du menu / Opciones del menú / Menüoptionen / Opzioni del menu Fig. 11 3.1 Camera Selection / Sélection de la caméra / Selección de la cámara / Kameraauswahl / Selezione telecamera Fig. 12 3.2 Feed Timer Setting / Paramètre du minuteur d'alimentation / Configuración del temporizador de fuentes / Fütterungstimer-Einstellung / Impostazione timer alimentazione Fig.
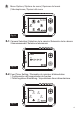
3.3 Temperature Setting / Réglage de la température / Configuración de la temperatura / Temperatureinstellung / Impostazione temperatura Fig. 14 3.4 Camera Setting / Paramètre caméra / Configuración de la cámara / Kameraeinstellung / Impostazione videocamera Fig. 15 3.5 Brightness Setting / Réglage de la luminosité / Configuración del brillo / Helligkeitseinstellung / Impostazione della luminosità Fig.
3.6 VOX Sensitivity / Sensibilité VOX / Sensibilidad de VOX / VOX-Empfindlichkeit / Sensibilità VOX Fig. 17 4 Status Information / Informations de statut / Información de estado / Statusinformationen / Informazioni di stato 1 2 3 4 5 6 7 8 Fig.
ENGLISH Package Contents One Camera One Monitor Two Power Adapters Battery for Monitor ( 3.7V 1100mAH Li-ion ) Two Cable Clips One Screw and One Wall Anchor This User's Manual Product Layout Camera (Fig. 1) 1. 2. 3. 4. 5. 6. 7. 8. 9. 10. Light sensor Microphone Lens Infrared LEDs Speaker Power adapter plug Power/Pairing button Antenna Temperature sensor Power indicator LED Monitor (Fig. 2) 1. 2. 3. 4. 5. 6. 7. 8. 9. 10. 11. 12. 13. 14. 15. 16. 17. 18. 19.
Setup 1 Camera Setup 1.1 Power Supply - Using AC Power 1. Plug one end of the provided power adapter into a wall outlet and the other end into the back of the camera. See Fig. 3. Note : Use the adapter labeled OUTPUT: 6V DC with the camera. 2. Press the POWER button and keep it around 3 seconds to turn on the monitor. The LED on the camera will light up (green light). See Fig. 3. Note : Press the POWER button and keep it around 3 seconds to turn off the monitor. 1.
Using AC Power 1. Plug one end of the provided power adapter into a wall outlet and the other end into the monitor. See Fig. 5. Note : Use the adapter labeled OUTPUT: 6V DC with the monitor. 2. Press the POWER button and keep it around 3 seconds to turn the monitor on. See Fig. 5. Note 1: When power on the monitor, "Power" LED will light up (green light). Note 2: "Out of Range" will be displayed on the LCD screen if the monitor exceeds the range (unlink).
3 Menu Options 1. Press the menu button on the monitor unit to display the main menu on the screen. See Fig. 11. 2. Use the left and right buttons to navigate through the menu. 3. Press the Zoom/OK button to confirm a setting. 4. The main menu contains 6 submenus. 3.1 Camera Selection ( Camera Select ) In this submenu you can switch between multiple cameras if the cameras have been paired. See Fig. 12. 3.
3.6 VOX Sensitivity ( VOX Sensitivity ) This submenu lets you choose the VOX (voice activation) sensitivity level. When the level set to high, the screen will turn on by lower sounds. See Fig. 17. 4 Status Information The status bar will be displayed on the top of the screen. See Fig. 18. 1. 2. 3. 4. 5. 6. 7. 8.
Troubleshooting You don't getting any signal at all Ÿ Make sure the camera and the monitor are turned on. Ÿ Make sure the power plugs are pushed all the way in. If the signal is poor, or there is interference Ÿ If there is a microwave oven in use in the path between the camera and monitor, remove the microwave oven or turn it off. Ÿ Make sure the camera and the monitor are within range of each other (range of approximately 500 feet; 150 meters in a clear line of sight).
FCC Statement This equipment has been tested and found to comply with the limits for a Class B digital device, pursuant to Part 15 of the FCC Rules. These limits are designed to provide reasonable protection against harmful interference in a residential installation. This equipment generates, uses and can radiate radio frequency energy and, if not installed and used in accordance with the instructions, may cause harmful interference to radio communications.
Following the safety tips To prevent deaths and injuries associated with baby monitor cords : Ÿ Make sure the baby unit and AC adapter cords are always out of reach of the baby at least 3 feet (1 meter) away. Note : It's important even if your baby is not yet standing or mobile. Ÿ Use a wireless baby monitor to avoid risk of strangulation. Ÿ Never use extension cords with AC adapters. Only use the AC adapters provided.
Contenus de la boîte FRANÇAIS Une caméra Un moniteur Deux adaptateurs de courant Batterie pour le moniteur (3,7V 1100mAH Li-ion) Deux clips de câble Une vis et un ancrage de mur Ce Manuel de l'utilisateur Description du produit Caméra (Fig. 1) 1. 2. 3. 4. 5. 6. 7. 8. 9. 10. Capteur de lumière Microphone Objectif DEL infrarouges Haut-parleur Prise de l'adaptateur de courant Bouton d'alimentation/appariement Antenne Capteur de température Voyant d'alimentation DEL Moniteur (Fig. 2) 1. 2. 3. 4. 5. 6. 7.
Installation 1 Installation de la caméra 1.1 Alimentation - Avec alimentation secteur 1. Branchez un coté de l’adaptateur d'alimentation fourni sur une prise de courant et l’autre coté sur la prise à l'arrière de la caméra. Voir Fig. 3. Remarque : Utilisez l'adaptateur indiqué SORTIE : 6V DC avec la caméra. 2. Appuyez sur le bouton ALIMENTATION sans arrêter pendant environ 3 secondes pour allumer le moniteur. Le DEL de la caméra s'allumera (couleur verte). Voir Fig. 3.
Utilisation du courant secteur 1. Branchez un coté de l’adaptateur d'alimentation fourni sur une prise de courant et l’autre coté sur la prise de la caméra. Voir Fig. 5. Remarque : Utilisez l'adaptateur indiqué SORTIE : 6V DC avec le moniteur. 2. Appuyez sur le bouton ALIMENTATION sans arrêter pendant environ 3 secondes pour allumer le moniteur. Voir Fig. 5. Remarque 1: Lors de l'allumage du moniteur, la DEL "Alimentation" s'allumera (en vert).
3 Options du menu 1. Appuyez sur le bouton menu de l'unité du moniteur pour afficher le menu sur l’écran. Voir Fig. 11. 2. Utilisez les boutons gauche et droite pour naviguer à travers le menu. 3. Appuyez sur le bouton Zoom/OK pour confirmer un paramètre. 4. Le menu principal est composé de 6 sous-menus. 3.1 Sélection de caméra (Choisir caméra) Dans ce sous-menu, vous pouvez basculer entre plusieurs caméras si les caméras ont été appariées.Voir Fig. 12. 3.
3.6 Sensibilité TCV ( Sensibilité TCV ) Ce sous-menu vous permet de choisir le niveau de sensibilité de la fonction TCV (activation vocale). Quand le niveau est défini sur élevé, l'écran s'allumera avec des sons plus faibles.Voir Fig. 17. 4 Informations de statut La barre de statut d'affichera au sommet de l'écran. Voir Fig. 18. 1. 2. 3. 4. 5. 6. 7. 8.
Guide de dépannage Vous ne recevez aucun signal. Ÿ Assurez-vous que la caméra et que le moniteur sont allumés. Ÿ Assurez-vous que les prises sont bien branchés jusqu'au fond. Si le signal est faible ou qu'il y a des interférences. Ÿ Si vous avez un four à micro-ondes dans le chemin entre la caméra et le moniteur, déplacez le four à micro-ondes ou éteignez-le.
Suivez les astuces suivantes de sécurité Pour protéger contre les blessures ou la mort à cause des cordons du moniteur de bébé : Ÿ Assurez-vous que l'unité de bébé et que le cordon de l'adaptateur secteur sont hors de la portée des bébés, par au moins 3 pieds (1 mètre). Remarque: Cela est important même si votre bébé ne peut pas encore marcher ou se déplacer.
Contenido del paquete Una cámara Un monitor Dos adaptadores de alimentación Pila para el monitor (3,7 V 1100 mAH, de iones de litio) Dos abrazaderas de cables Un tornillo y un taco para pared Este Manual del usuario Esquema del producto 1. 2. 3. 4. 5. 6. 7. 8. 9. 10. ESPAÑOL Cámara (Fig. 1) Sensor luminoso Micrófono Objetivo LED de infrarrojos Altavoz Enchufe del adaptador de alimentación Botón de encendido y asociación Antena Sensor de temperatura LED del indicador de alimentación Monitor (Fig. 2) 1.
Configuración 1 Configuración de la cámara 1.1 Fuente de alimentación - Utilizar la alimentación de CA 1. Enchufe un extremo del adaptador de alimentación suministrado en una toma de corriente de la pared y el otro extremo en la parte posterior de la cámara. Vea la Fig. 3. Nota : utilice el adaptador denominado SALIDA: 6 VCC con la cámara. 2. Presione el botón de encendido y manténgalo presionado durante 3 segundos aproximadamente para encender el monitor.
Uso de la alimentación de CA 1. Enchufe un extremo del adaptador de alimentación suministrado en una toma de corriente de la pared y el otro extremo en el monitor. Vea la Fig. 5. Nota : utilice el adaptador denominado SALIDA: 6 VCC con el monitor. 2. Presione el botón de encendido y manténgalo presionado durante 3 segundos aproximadamente para encender el monitor. Vea la Fig. 5. Nota 1: cuando el monitor se encienda, el LED "Alimentación" se iluminará (luz verde).
3 Opciones del menú 1. Presione el botón de menú de la unidad del monitor para mostrar el menú principal en la pantalla. Vea la Fig. 11. 2. Utilice los botones Izquierda y Derecha para desplazarse por los menús. 3. Presione el botón Zoom/Aceptar para confirmar una configuración. 4. El menú principal contiene 6 submenús. 3.1 Selección de cámara (seleccionar cámara) En este submenú puede cambiar entre varias cámaras si estas están asociadas. Vea la Fig. 12. 3.
3.6 Sensibilidad VOX (sensibilidad VOX) Este submenú permite elegir el nivel de sensibilidad de VOX (activación por voz).Cuando el nivel se establece en alto, la pantalla se encenderá con sonidos más bajos. Vea la Fig. 17. 4 Información de estado La barra de estado se mostrará en la parte superior de la pantalla. Vea la Fig. 18. 1. 2. 3. 4. 5. 6. 7. 8.
Resolución de problemas No recibe ninguna señal en absoluto Ÿ Asegúrese de que la cámara y el monitor están encendidos. Ÿ Asegúrese de que los enchufes de alimentación están insertados por completo. Si la señal es deficiente o hay interferencias Ÿ Si hay un microondas en uso entre la cámara y el monitor, retírelo o apáguelo. Ÿ Asegúrese de que la cámara y el monitor estén dentro del alcance uno del otro: alcance de aproximadamente 150 metros (500 pies) en una línea clara de visión.
Consejos de seguridad Para evitar la muerte y las lesiones asociadas con los cables del monitor para bebés: Ÿ Asegúrese de que la unidad del bebé y los cables del adaptador de CA siempre están fuera del alcance del bebé, al menos a 1 metro. Nota: es importante incluso si su bebé aún no se pone de pie o se mueve. 1 metro (3 pies) unidad del bebé cable del adaptador 1 metro (3 pies) Ÿ Utilice un monitor para bebés inalámbrico para evitar el riesgo de estrangulamiento.
Lieferumfang Eine Kamera Ein Monitor Zwei Netzteile Akku für Monitor (Lithium-Ionen-Akku, 3,7 V, 1100 mAh) Zwei Kabelklemmen Eine Schraube und ein Dübel Diese Bedienungsanleitung Produktübersicht Kamera (Abb. 1) Lichtsensor Mikrofon Objektiv Infrarot-LEDs Lautsprecher Netzteilstecker Ein/Aus-/Kopplungstaste Antenne Temperatursensor Betriebsanzeige-LED DEUTSCH 1. 2. 3. 4. 5. 6. 7. 8. 9. 10. Monitor (Abb. 2) 1. 2. 3. 4. 5. 6. 7. 8. 9. 10. 11. 12. 13. 14. 15. 16. 17. 18. 19.
Einrichtung 1 Kameraeinrichtung 1.1 Stromversorgung – über Netzstrom 1. Schließen Sie ein Ende des mitgelieferten Netzteils an eine Steckdose an, verbinden Sie das andere Ende mit dem Anschluss an der Rückseite der Kamera. Siehe Abb. 3. Hinweis: Verwenden Sie das mit OUTPUT: 6V DC gekennzeichnete Netzteil mit der Kamera. 2. Halten Sie die Ein-/Austaste zum Abschalten des Monitors etwa 3 Sekunden gedrückt. Die LED an der Kamera leuchtet auf (grünes Licht). Siehe Abb. 3.
Hinweis : Verwenden Sie das mit OUTPUT: 6V DC gekennzeichnete Netzteil mit dem Monitor. 2. Halten Sie die Ein-/Austaste zum Abschalten des Monitors etwa 3 Sekunden gedrückt. Siehe Abb. 5. Hinweis 1: Wenn der Monitor eingeschaltet wird, leuchtet die BetriebsanzeigeLED (grün). Hinweis 2: "Out of Range (Außer Reichweite)" wird am LCD-Bildschirm angezeigt, wenn der Monitor die Reichweite überschreitet (Verbindungstrennung).
3 Menüoptionen 1. Drücken Sie zur Einblendung des Hauptmenüs am Bildschirm die Menütaste . Siehe Abb. 11. 2. Navigieren Sie mit der Linksund Rechtstaste durch das Menü. 3. Drücken Sie zum Bestätigen einer Einstellung die Zoom/OK-Taste . 4. Das Hauptmenü enthält 6 Untermenüs. 3.1 Kameraauswahl In diesem Untermenü können Sie zwischen mehreren Kameras umschalten, falls die Kameras gekoppelt wurden. Siehe Abb. 12. 3.
3.6 VOX-Empfindlichkeit Über dieses Untermenü können Sie die Empfindlichkeit der VOX-Funktion (Geräuschaktivierung) wählen.Wenn der Wert hoch eingestellt ist, schaltet sich der Bildschirm bei leiseren Geräuschen ein. Siehe Abb. 17. 4 Statusinformationen Die Statusleiste wird im oberen Bereich des Bildschirms angezeigt. Siehe Abb. 18. 1. 2. 3. 4. 5. 6. 7. 8.
Problemlösung Sie empfangen keinerlei Signale Ÿ Stellen Sie sicher, dass Kamera und Monitor eingeschaltet sind. Ÿ Prüfen Sie, ob die Netzstecker vollständig eingesteckt sind. Bei schwachem Signal oder Signalstörungen Ÿ Falls sich eine Mikrowelle im Pfad zwischen Kamera und Monitor befindet, stellen Sie die Mikrowelle an einen anderen Ort bzw. schalten Sie sie aus. Ÿ Stellen Sie sicher, dass sich Kamera und Monitor innerhalb der unterstützten Reichweite zueinander befindet (ca.
Sicherheitstipps befolgen So vermeiden Sie (lebensgefährliche) Verletzungen in Verbindung mit den Kabeln des Babymonitors: Ÿ Achten Sie darauf, dass sich die Kabel von Babyeinheit und Netzteil immer außerhalb der Reichweite des Babys befinden (mindestens 1 Meter entfernt). Hinweis: Dies ist auch dann zu beachten, wenn Ihr Baby noch nicht stehen oder sich bewegen kann. 1 Meter Babyeinheit Netzteilkabel 1 Meter Ÿ Verwenden Sie zur Vermeidung von Strangulierungsgefahr einen kabellosen Babymonitor.
Contenuti della confezione Una telecamera Un monitor Due adattatori di corrente Batterie per il monitor (ioni di Litio, 3.7V, 1100mAH) Due fermacavo Una vite e una grappa Questo Manuale d'uso Layout del prodotto Videocamera (Fig. 1) 1. 2. 3. 4. 5. 6. 7. 8. 9. 10. Sensore luci Microfono Obiettivo LED a infrarossi Altoparlante Spina adattatore di corrente Tasto di alimentazione/associazione Antenna Sensore temperatura LED di alimentazione 1. 2. 3. 4. 5. 6. 7. 8. 9. 10. 11. 12. 13. 14. 15. 16. 17. 18. 19.
Installazione 1 Impostazione della videocamera 1.1 Alimentazione - Uso dell'alimentazione CA 1. Inserire un'estremità dell'adattatore di alimentazione in dotazione in una presa di corrente e l'altra estremità nella parte posteriore della videocamera. Vedere la Fig. 3. Nota : Con questa videocamera, usare l'adattatore con l'etichetta OUTPUT: 6V DC. 2. Premere il tasto POWER e tenerlo premuto per circa 3 secondi per accendere il monitor. Il LED della videocamera si accende (spia verde). Vedere la Fig. 3.
Uso di alimentazione CA 1. Inserire un'estremità dell'adattatore di alimentazione in dotazione in una presa di corrente e l'altra estremità nel monitor. Vedere la Fig. 5. Nota : Con questo monitor, usare l'adattatore con l'etichetta OUTPUT: 6V DC. 2. Premere il tasto POWER e tenerlo premuto per circa 3 secondi per accendere il monitor. Vedere la Fig. 5. Nota 1: Quando si accende il monitor, il LED di "alimentazione" si accende (spia verde).
3 Opzioni del menu 1. Premere il tasto menu del monitor per visualizzare il menu principale sullo schermo. Vedere la Fig. 11. 2. Usare i tasti sinistro e destro per navigare tra i menu. 3. Premere il tasto di zoom/OK per confermare un'impostazione. 4. Il menu principale contiene 6 menu secondari. 3.1 Selezione della videocamera (Selezione videocamera) In questo menu è possibile passare tra varie videocamere, se sono state associate. Vedere la Fig. 12. 3.
3.6 Sensibilità VOX (Sensibilità VOX) Questo menu secondario consente di selezionare il livello di sensibilità VOX (attivazione voce). Se il livello di impostazione è alto, lo schermo si accende abbassando I suoni. Vedere la Fig. 17. 4 Informazioni di stato Sulla parte superiore dello schermo viene visualizzata la barra di stato. Vedere la Fig. 18. 1. 2. 3. 4. 5. 6. 7. 8.
Risoluzione dei problemi Non si riceve alcun segnale Ÿ Assicurarsi che sia la fotocamera ed il monitor siano accesi. Ÿ Assicurarsi che le spine siano completamente inserite nelle prese. Se il segnale è scarso, o ci sono interferenze Ÿ Se nel percorso tra la telecamera ed il monitor c'è un forno a microonde in uso, rimuovere il forno a microonde o spegnerlo.
Osservare le istruzioni sulla sicurezza Per prevenire la morte e lesioni in associazione ai cavi del baby monitor: Ÿ Assicurarsi che i cavi dell'unità e dell'adattatore AC siano sempre fuori della portata del bambino, ad una distanza di almeno 3 piedi (1 metro). Nota: È importante, anche se il vostro bambino non è ancora in grado di stare in piedi o di muoversi autonomamente.
408-000726-00