V50.
Foscam Digital Technologies LLC FI8910W Quick Installation Guide Quick Installation Guide For Windows OS Package Contents IP Camera FI8910W x1 DC Power Adapter (5V-2.0A) x1 Network Cable x1 Wi-Fi Antenna .x 1 Mounting Bracket .x 1 Quick Installation Guide x1 CD-ROM with Setup Software .x 1 Security Warning Card x1 Quick Installation Diagram Hardware Installation Software Installation Login to the Camera Wireless Connection Setup Remote Access Setup Other Settings -1- P.
Foscam Digital Technologies LLC FI8910W Quick Installation Guide Security Warning Foscam cameras require good security practices to safeguard your privacy. You can help protect your camera by changing the default username and/or password. You should update your camera regularly at http://www.foscam.us/firmware.html. Make sure your camera has the latest firmware installed for your specific camera model. Start Installation 1. Hardware Installation 1) Open the package.
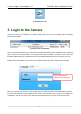
Foscam Digital Technologies LLC FI8910W Quick Installation Guide IP Camera Tool icon 3. Login to the Camera Once the IP camera tool software is installed, double click the icon on the desktop and the following screen should appear. IP Camera Tool for Windows The IP camera tool should find your camera’s IP address automatically (your IP address may be different) after you plug in the network cable.
Foscam Digital Technologies LLC FI8910W Quick Installation Guide Input the New username, New password and Confirm the password. If you use IE browser, select this login mode . If you use Firefox, Google Chrome, Safari, select this login mode . If you use Mobile phone, please select this login mode . Note There are three login methods. One is IE ActiveX Mode, the other is Server Push Mode for Safari, Firefox, Google Chrome, the third mode is Mobile Phone for mobile phone.
Foscam Digital Technologies LLC FI8910W Quick Installation Guide In the above screenshot, we see a grey screen for camera video and a red “X” in the top left corner. This indicates that our add-on controls are not configured properly. Usually in Internet Explorer versions 8 or later, you will see a pop up box at the bottom of the screen, which asks if you would like to allow the add-on control module to run for the camera. Click “Allow.” Once you login again, you should be able to see live camera video.
Foscam Digital Technologies LLC FI8910W Quick Installation Guide Congratulations! You have succeeded in accessing the camera by a wired connection. Be sure to leave all other menu options alone until finishing the rest of the installation. Note The default user name is admin with no password. If you are unable to see a live video, please make sure to allow ActiveX to run when prompted.
Foscam Digital Technologies LLC FI8910W Quick Installation Guide Step 2: Click the SSID (name of your router) in the list, the corresponding information related to your network, such as the name and the encryption, will be filled into the relevant fields automatically. NOTE: Sometimes the information filled in may differ from your true network settings.
Foscam Digital Technologies LLC FI8910W Quick Installation Guide If you fail to make a wireless connection, please refer to your seller or contact us directly for assistance. 4.2 WPS (Wi-Fi Protected Set-up) WPS allows you to set up wireless connectivity automatically if you have a WPS-compatible router. The WPS button on the Foscam camera is shared with the reset button. Use the small end of a paperclip or a toothpick to press and hold the RESET button for four seconds and let go.
Foscam Digital Technologies LLC FI8910W Quick Installation Guide We have to set up Remote Access via Port Forwarding before we can access the camera outside of our own local area network. What is the HTTP Port ? The HTTP Port is used to access the camera remotely. All cameras have the default HTTP port of 80. For example, if the LAN IP address of the camera is http://192.168.1.103, this means that the camera’s HTTP port is 80. Since port 80 is set by default, if you input the IP address at http://192.
Foscam Digital Technologies LLC FI8910W Quick Installation Guide Modify the HTTP Port to a four digit number other than 80. Enter the Username and Password, and then click OK. Changing the port in IP Camera Tool Enter the username and password of the Administrator , and click “OK” to apply changes. Wait around 10 seconds or wait for the camera to reboot; you’ll see that the camera’s LAN IP address has changed. In our example it was changed to 2000, so we see http://192.168.1.103:2000 in IP Camera Tool.
Foscam Digital Technologies LLC FI8910W Quick Installation Guide 5.1 Static IP Addresses Users who have static IP addresses do not need to set DDNS service settings for remote access. When you have finished connecting the camera using the LAN IP address and port forwarding, you can access the camera directly from the Internet using the WAN IP address and port number. How to Obtain the WAN IP address from a public website ? To obtain your WAN IP address, you can go to Google at www.google.
Foscam Digital Technologies LLC FI8910W Quick Installation Guide certain port (you can think of it as a gateway) into your router. You set this port to a specific device, in our case an IP Camera, so it can be accessed from anywhere in the world. Click this link to learn more about port forwarding: http://portforward.com/help/portforwarding.htm How do we configure Port Forwarding? For this section, we will be using an example: Let’s say the camera’s LAN IP address is http://192.168.8.
Foscam Digital Technologies LLC FI8910W Quick Installation Guide Enable FOSCAM DDNS. DDNS Settings page So for example, once port forwarding is set up correctly and you have a DDNS (optional) you can use the three following methods to access the camera remotely: Foscam’s DDNS: http://Domain:HTTP Port– For example: http://ad6016.myfoscam.org:2000 Using Third Party DDNS (No-IP, DynDNS) – For example:: http://foscamusa1.no-ip.org:2000 Using External IP: http://IP Address:HTTP Port - For example: http://12.
Foscam Digital Technologies LLC FI8910W Quick Installation Guide 6. Other Settings Security At your first time logging in the camera, please go to “Users Settings” panel and reset the username or password to prevent intruders connect your device. The default username is admin with a blank password. Congratulations! You have finished the quick installation guide of the camera for PC.
Foscam Digital Technologies LLC FI8910W Quick Installation Guide Quick Installation Guide For Mac OS Package Contents IP Camera FI8910W x1 DC Power Adapter (5V-2.0A) x1 Network Cable x1 Wi-Fi Antenna .x 1 Mounting Bracket .x 1 Quick Installation Guide x1 CD-ROM with Setup Software .
Foscam Digital Technologies LLC FI8910W Quick Installation Guide Security Warning Foscam cameras require good security practices to safeguard your privacy. You can help protect your camera by changing the default username and/or password. You should update your camera regularly at http://www.foscam.us/firmware.html. Make sure your camera has the latest firmware installed for your specific camera model. Start Installation 1. Hardware Installation 1) Open the package.
Foscam Digital Technologies LLC FI8910W Quick Installation Guide 2. Software Installation Insert the CD into the CD drive of your Mac and find the folder “For MAC OS”. Copy the IP camera tool to your MAC and start the program. IP Camera Tool Icon for Mac 3. Login to the Camera Double click the IP Camera Tool icon and the following screen should appear. IP Camera Tool for Mac The IP camera tool should find the camera’s IP address automatically after you plug in the network cable.
Foscam Digital Technologies LLC FI8910W Quick Installation Guide Default Username is admin with no password. When you log in for the first time, it will request that you modify the default username and/or password . Input the New username, New password and Confirm the password, click Modify to complete the modification. You will now use the new username and password to log in to the camera in the future. Input the New username, New password and Confirm the password.
Foscam Digital Technologies LLC FI8910W Quick Installation Guide Since add-on mode is not compatible on Mac, you will always click the Server Push Mode option to access the camera, whether you are on Safari, Chrome, or Firefox. Once you click on Server Push Mode, you should be taken to the live video screen immediately. The Live Video Page 4.
Foscam Digital Technologies LLC FI8910W Quick Installation Guide Step 2: Click the SSID (name of your router) in the list, the corresponding information related to your network, such as the name and the encryption, will be filled into the relevant fields automatically. NOTE: Sometimes the information filled in may differ from your actual network settings.
Foscam Digital Technologies LLC FI8910W Quick Installation Guide Step 3: Click on the Submit button after all settings have been entered. The camera will restart after 30 seconds. Once the countdown ends, take the network cable out of the camera. Never shut down the power of the camera until the IP camera is able to connect to the wireless network. The LAN IP address will disappear on the window of IP Camera Tool when the camera is configuring a wireless connection.
Foscam Digital Technologies LLC FI8910W Quick Installation Guide 5. Remote Access Setup We have been able to access the camera within the LAN network, and have set up a wireless connection, but how do we access the camera via WAN or from outside networks through the internet to view from anywhere in the world or on our smart phones? We have to set up Remote Access via Port Forwarding before we can access the camera outside of our own local area network.
Foscam Digital Technologies LLC FI8910W Quick Installation Guide Modify the HTTP port. Enter the Username and password, click OK. Changing the port in IP Camera Tool Enter the username and password of the Administrator (default username is admin with a blank password), and click “OK” to apply changes. Wait around 10 seconds or wait for the camera to reboot; you’ll see that the camera’s LAN IP address has changed. In our example it was changed to 2000, so we see http://192.168.8.
Foscam Digital Technologies LLC FI8910W Quick Installation Guide If your ISP provides a Static WAN IP Address, continue reading below. If your ISP provides Dynamic WAN IP Address please go to Chapter 5.2 directly. 5.1 Static IP Addresses Users who have static IP addresses do not need to set DDNS service settings for remote access.
Foscam Digital Technologies LLC FI8910W Quick Installation Guide What is Port Forwarding? If you have never done port forwarding before, you can open and view the following link to understand the basic concept. Port forwarding allows for outside connections to access a specific device on your network from anywhere in the world. Every router automatically blocks any incoming connections for safety purposes.
Foscam Digital Technologies LLC FI8910W Quick Installation Guide For Apple Routers: Open Airport Utility as shown above, then click on your Apple router, and click “Edit” - 26 -
Foscam Digital Technologies LLC FI8910W Quick Installation Guide Click on the “Network” tab at the top, we will be editing the “Port Settings” section of the Network page which is where port forwarding is done. Click the + symbol which will add a port forwarding rule. As you can see, we are inputting the port forwarding information such as the port, IP address, and the name of the port forwarding rule.
Foscam Digital Technologies LLC FI8910W Quick Installation Guide Once the port forwarding rule has been created, you will see it in the list where the Port Settings section is. This confirms that you have successfully added a port forwarding rule. Next, click Update. You will be prompted if you would like to continue, the router will most likely update its settings for a few seconds and come back online. Once it comes back online your port forwarding settings will be confirmed.
Foscam Digital Technologies LLC FI8910W Quick Installation Guide USE THIS QR CODE WITH YOUR PHONE TO SEE OUR VIDEO SETUP GUIDES FOR MAC ON BASIC SETUP, WIRELESS SETUP, PORT FORWARDING, AND MORE! 6. Other Settings Security At your first time logging in the camera, please go to “Users Settings” panel and reset the username or password to prevent intruders connect your device. The default username is admin with a blank password. Congratulations! You have finished the quick installation guide of the camera.