
Installation Guide


Foscam Digital Technologies LLC FI8910W Quick Installation Guide
- 12 -
certain port (you can think of it as a gateway) into your router. You set this port to a specific device, in our
case an IP Camera, so it can be accessed from anywhere in the world.
Click this link to learn more about port forwarding: http://portforward.com/help/portforwarding.htm
How do we configure Port Forwarding?
For this section, we will be using an example:
Let’s say the camera’s LAN IP address is http://192.168.8.100:2000
Login to the router, and go to your router’s port forwarding or port triggering menu. Sometimes this is
also under the name of Virtual Server or NAT.
Using the Linksys brand router as an example, we would log into the router, and go
to the Applications & Gaming menu. We would then click on the “Single Port
Forwarding” sub-menu.
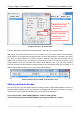
Create a new column using the LAN IP address & HTTP Port of the camera within the router as shown
below, and then push OK or Submit to save your settings:
Port forwarding in a Linksys Router
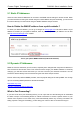
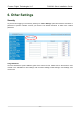
Using the embedded DDNS to access the camera via the Internet
Some Foscam cameras have an embedded unique DDNS domain name, the format of this domain
name is xxxxxx.myfoscam.org. On the bottom of the camera, you can see the domain name sticker with
this information on it, or it should appear on the DDNS Settings page in your camera.
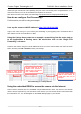
Fill the HTTP Port of the
camera in the columns of
External Port and Internal
Port. Example: 2000
Fill in this section with the
LAN IP of the camera; we
would enter “100” for our
example.
Assign a name for the
port forward setting here