
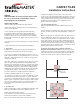
Installation Guide

ENGLISH:
HELPFUL HINT: To ensure best possible results,
be sure to vacuum the existing floor surface
thoroughly prior to installation.
SAFETY PRECAUTIONS
*Before installing, please read the following carefully:
• Wear safety glasses at all times and use cut-resistant gloves
when using a utility knife.
• Each carpet tile has a removable peel-off backing strip
protecting the adhesive side of the carpet tile. During the
installation process, dispose of the peel-off backing strips in
a waste container once you remove them from the carpet tile.
Backing strips tend to be very slippery and may cause someone
to slip or fall.
• Cut away from yourself on a cutting mat or scrap board for any
trimming.
• Keep children from work area away during installation.
1. Preparation
1) Make sure your existing floor is dry and clean and the air
temperature is at least 50°F. Vacuum oor thoroughly.
2) If your oor is painted and bonded well to the oor, you can
apply carpet tiles directly on the painted surface. If you’re unsure
the paint is well bonded to the oor, conduct a very quick and
simple test to nd out:
TEST: First, take a piece of aggressive sticky tape, such as duct
tape, and press the tape down rmly on the painted surface,
keeping one end of the piece of tape in your hand. Then, pull the
tape up quickly. If the paint comes off with the tape, the paint is
not well bonded and your oor will need to be stripped before
applying tiles. If the paint doesn’t lift off with the tape, the paint
is well bonded to the oor. Test several areas of the oor to
ensure the entire oor is suitable to install the carpet tiles.
3) Although installing carpet tiles is very simple, we
recommend you use a few tools to make your experience easier
and your nished product more precise. To cut the carpet tile,
use a utility or carpet knife and be sure to have a supply of sharp
blades. A 24-inch carpenter’s square can help, as well as a tape
measure and a chalk line to align your carpet tiles. Please be
sure to follow tool manufacturer’s directions and safety
instructions.
2. Tools Needed
Utility or Carpet Knife, Supply of Sharp Blades, Chalk Line, Tape
Measure, Cutting Mat, Eye Protection, Waste Container
Carpet Tiles Unique Pattern Features:
Each carpet tile comes with a tear sheet on the back and a
directional arrow sticker on top to aid in installation.
Once you know the desired position of the tile, remove the
backing sheet and press tile into place on oor. The arrow
sticker on top of the carpet tile indicates the direction of the nap
in the carpet. Carpet tile will appear to be different in color from
each other when arrows are not run in the same direction of the
desired design. Be sure arrow on the carpet tile faces the
direction of the desired pattern.
3. How To Apply Carpet Tiles
Remove peel-off backing and slide carpet tile into position on
the floor.
Press down rmly in desired location. This will lock the tile in that
position. Continue to place tiles in desired pattern, rotating 1/4
turn.
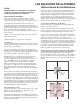
Begin to lay the rst four carpet tiles down at the intersection of
the two chalked lines, which is the center of the room. You will
create a square with the rst four carpet tiles as shown, starting
in the center of the room (Fig. A). Start by taking the rst tile (1),
peel the backing strip off, and place down so the right edge of
the tile is on the line. Press rmly down. Take the second tile (2),
peel the backing strip off, and place down on surface next to the
rst tile, making sure the seams are snug.
IMPORTANT NOTE: Every other carpet tile should be ¼
turned for best installation results. Be sure the arrows on the
stickers face the direction of the desired pattern. Take the third
and fourth tiles (3), (4), peel off backing strip and place down on
surface. Press rmly down on all four carpet tiles. (Fig. B)
CARPET TILES
Installation Instructions
1
2
3
4
Fig. B
Fig. A
1
2
3
This is your
starting point.