USER'S MANUAL FOR BUILT-IN OVEN cod. 9606801 Multifunction S4000, cod. 7133 043 Foster spa via M.S. Ottone, 18/20 42041 Brescello (RE) - Italy tel. +39.0522.687425 - tel. Servizio Assistenza +39.0522.684450 fax +39.0522.686019 - fax Servizio Ricambi +39.0522.962166 e-mail: service@fosterspa.com www.fosterspa.
EN The symbol on the product or on its packaging indicates that this product may not be treated as household waste. Instead it shall be handed over to the applicable collection point for the recycling of electrical and electronic equipment. By ensuring this product is disposed of correctly, you will help prevent potential negative consequences for the environment and human health, which could otherwise be caused by inappropriate waste handling of this product.
1.
2. a) b) ! " ## # $ % # $ & # ' ( % # # * + , - .
User instructions Thank you for choosing one of our products. We hope you will get the very best performance from this appliance. Therefore we would ask you to carefully comply with the the suggestions and instructions in this manual for proper use of our products. The manufacturer shall not be held liable for damage to persons and property which is due to poor or incorrect installation of the appliance. The manufacturer reserves the right to modify its products as deemed fit without prior notice.
DECLARATION OF CE COMPLIANCE This appliance is in compliance with the following European Directives: 93/68 : General regulations 2006/95/CE : Concerning low tensions 89/336/CEE : Electromagnetic compatibility CE Regulation n° 1935/2004 : this appliance is suitable to come in contact with food products. INSTRUCTIONS FOR THE USER This manual is an integral part of the appliance.
Improper repair work can cause serious accidents, damage the appliance and equipment as well as impair proper operation. Appliances repaired in technical service centres must undergo routine tests, especially a continuity test of the earth circuit. THIS PRODUCT WAS DESIGNED FOR HOME USE. THE MANUFACTURER WILL NOT BE HELD LIABLE FOR DAMAGE TO PERSONS OR PROPERTY CAUSED BY IMPROPER INSTALLATION, OR BY IMPROPER, WRONG OR SENSELESS USE.
All work on the appliances must be carried out by qualified personnel. For maintenance, moving, installation and cleaning of the appliance use suitable prevention and protection equipment (gloves, etc.). Lifting and moving of appliances weighing more than 25 kg must be carried out using proper equipment, or by two persons, in order to avoid risks or injuries. The oven is equipped with a cooling fan that comes on when the cooking cycle is selected.
Before using the oven for the first time After unpacking the oven, installing it in the furniture unit and removing the accessories (drip pan and racks), it is advisable to run it at the highest temperature for about 20 minutes to remove any oily residues left from the manufacturing process which may cause unpleasant odours during cooking. Aerate the room while doing this. Wash the drip pan and racks with washing up liquid.
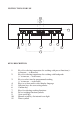
INSTRUCTIONS FOR USE 5 _____ _____ __________ 3 8 7 _________ _________ ____ 2 ______ __ _______ ______ __ 10 _____________ 1 6 11 4 9 KEYS DESCRIPTION 1 2 3 4 5 6 7 8 9 10 11 32 Keys for selecting temperature for cooking with pre-set functions( + to increase, - to decrease) Keys for selecting temperature for cooking with food probe ( + to increase, - to decrease) Keys to select time for programmed cooking ( + to increase, - to decrease) Keys to set time and to select display language S
Switching on for the first time selection of language and time setting To turn the oven on, press the ON/OFF key (9) and release it after 1 second. The display will light up and it will show the message WAIT . Do not touch any key until the language selection menu appears. Choose the desired language using the keys + - (4) , and confirm with the Enter key (6) or wait a few seconds and confirmation will take place automatically. Then set the time using the keys + - (4).
Time-controlled cooking First of all, select a cooking function using the selection keys (7). The temperature can be modified using the keys (1). You can set a cooking duration time using the keys + - (3) to increase or decrease the desired time. Confirm your selection with the key (6). The message will then show a request for preheating the oven. Select YES/NO with the keys (4). If confirmed, the time used for preheating will be detracted from the set cooking time.
Your new oven lets you memorize the programmes and cooking modes you have tried and found to be best suited to your needs. As illustrated, for each cooking mode you can change the temperature, set a duration or a time for end of cooking. These settings can be memorized and recalled any time you like. With the keys or (5), recall the menu and scroll through the various options until you select cooking cycle memorization. Then match a number to the memorized cycle. You can memorize up to 10 programmes.
Cooking with the food probe You can cook your favourite dishes using the probe. The probe is inserted in the appropriate hole inside the oven, on the wall at upper left. The temperature sensor is instead inserted in the food you are going to cook.. It must be completely inserted, if possible in the middle of the food. The sensor detects the internal temperature of the food during cooking.
Use the keys (5) to select the menu followed by Settings. The display will show a further selection menu, which includes the following: language: lets you modify the set language clock setting: includes 3 options. - possibility to show clock on display (YES/NO selection) - adjustment of time - night mode: the display is lit at low intensity from 10:00 pm until 7:00 am. lock keypad: can be automatic or manual. With automatic lock, it is activated after the keypad is inactive for 1 minute.
Cooking functions Traditional cooking It is recommended that the oven is pre-heated before introducing the food. Traditional cooking with fan Cooking mode suited to bake bread, pizzas and lasagne. It is recommended that the oven be pre-heated. Keep the oven door closed during this function. Bottom element only Suitable for very slow cooking and warming up of food. Bottom element with fan This type of cooking is specially slow and delicate.
Fan cooking This type of cooking allows even heat distribution to all parts of the oven. It is possible to cook two different types of food (e.g. meat and fish) while using their different respective cooking times. Pizza function This kind of cooking is ideal for pizza and vegetable dishes. With this function, all the heating elements and the fan work together. Defrosting Only the fan works, so there is no transmission of heat. The oven door must be closed.
Table of cooking suggestions Type of dish Bread and biscuits Pizza Bread Bread with filling White bread Biscuits Pie and pastry Focaccia Sponge cake Chocolate cake Fruit pie Vol-au-vent Doughnut Angel cake Souffle Meringue Meats Veal stew (1/1,5Kg) Roast veal (1/1,5Kg) Meat loaf(1/1,5Kg) Lamb (leg or chop) Beef (leg or chop) Pork (loin or leg) Game Temp.
Foods to be grilled Cooking time in minutes Over Under 6 4 8 5 15 12 12 10 5 2 Cuts of thin meat Cuts of normal meat Fish (e.g. trout, salmon) Sausages Toast Depending on the type of food (e.g. meats, fish, poultry, etc.), you will need to turn the food to expose both sides to the infrared rays. The data provided above is approximate. Cooking times vary based on the experience of the person using the oven and the amount and quality of the foods. The cooking times do not include pre-heating.
CLEANING AND MAINTENANCE OF THE OVEN Important: Before performing any maintenance, you must either unplug the oven or disconnect the power supply via the omni-polar switch of the electrical system. Cleaning the oven: Let the oven cool after each use and clean it to keep burnt on residues from being repeatedly heated. For tough dirt, use a product specifically for oven cleaning. Follow the instructions on the container of the product. Clean the outside with a sponge dampened in lukewarm water.
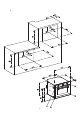
How to remove the oven door (fig. 4) To make it easier to clean the oven, it is possible to remove the door from the hinges as follows: The hinges A are equipped with 2 mobile U-bolts B. When the U-bolts B are lifted, the hinges are disconnected from their housing. After this, lift the door up and pull it outwards, holding the door on both sides near the hinges. To re-install the door: Slide the hinges into the grooves and open the door all the way.
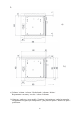
Cleaning the side rails - Fig. 5 The side rails are to be hooked onto the wall of the oven. Slide the racks and tray provided into the side rails. To remove the side rails press on part A as shown . Fig. 5 Replacement of oven lamp (fig. 6) Disconnect the oven from the electrical power supply. Use a screwdriver to remove the light cover. Replace the lamp Put the light cover back Restore the power supply N.B. : use only lamps that are 25W 230V, type E -14, T 300°C, available from our technical service. Fig.