8588 086 000 (449478) MR-8HD/CD Supplementary manual How to use the CD-R/RW drive This manual is supplement of the MR-8HD/CD owner's manual. It describes how to use the CD-R/RW drive built in the MR-8HD/CD, as well as an external CD-R/RW drive connected to the [USB HOST] port of the MR-8HD/CD. Before you use a CD-R/RW drive, read this supplementary manual together with the MR-8HD/CD owner's manual. For using the internal CD-R/RW drive, this supplementary manual explains the following four items.
MR-8HD/CD Supplementary manual Table of contents Please read before using ..........................................................................................3 Usable discs .....................................................................................................3 Handling of discs ............................................................................................3 Track data for creating an audio CD ...........................................................
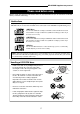
MR-8HD/CD Supplementary manual Please read before using Before using the internal CD-R/RW drive of the MR-8HD/CD (or an external CD-R/RW drive), read the following. Usable discs Only discs with any of the following logos can be used with the internal CD-R/RW drive of the MR-8HD/CD (or an external CD-R/RW drive connected to the MR-8HD/CD [USB HOST] port).
MR-8HD/CD Supplementary manual Track data which can be recorded to a CD-R/RW disc You can record a stereo WAV file converted from two mono files on tracks 7 and 8 (final mixed-down files) to a CD-R/RW disc in the CD-DA format. Mixed-down files on tracks 7 and 8 can be created by in either of the following track bouncing methods. (1) Bouncing tracks 1 through 6 to tracks 7/8 of the same song. (2) Bouncing tracks 1 through 8 to tracks 7/8 of the new song.
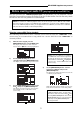
MR-8HD/CD Supplementary manual Before creating an audio CD (playing back a stereo WAV file) The unit provides the "2 MIX file playback mode". In this mode, you can playback a stereo WAV file converted for creating an audio CD in the CD-DA format. You can not only check the file but also set CUE points for track division. : To activate the "2 MIX file playback mode", the current song has a stereo WAV file in the "2 MIX folder".
MR-8HD/CD Supplementary manual Playing back a stereo WAV file While the Home screen of the "2 MIX file playback mode" is shown, pressing the [PLAY] key plays back the stereo WAV file. The L and R channels of the stereo WAV file are assigned to tracks 1 and 2 respectively. The L and R playback levels of the stereo WAV file are controlled by the faders for tracks 1 and 2.
MR-8HD/CD Supplementary manual : If you select a desired CUE point in the CUE list and press the [LOCATE A/IN] or [LOCATE B/OUT] key, the recorder quickly locates to the CUE point. Entering a CUE label You can enter a CUE label by the following procedure. It is assumed that the Home screen of the "2 MIX file playback mode" is shown. 1) : The distance between two adjacent 4) While the unit is stopped, press the [STORE] key. The display now shows the CUE list screen.
MR-8HD/CD Supplementary manual Use the alphanumeric keys to enter the desired CUE label. When you press a different alphanumeric key, the cursor automatically moves right. Editing a CUE position You can edit a CUE position (time) by following the procedure below, which is similar to the procedure for entering a CUE label as described above. The following assumes that the CUE list screen is shown.
MR-8HD/CD Supplementary manual Creating an audio CD using the internal CD-R/RW drive Using the internal CD-R/RW drive, you can burn a stereo WAV file in the "2 MIX folder" to a CD-R/RW disc for creating an audio CD in the CD-DA format. By finalizing a burned disc, you can play it back by a common CD player.
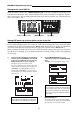
MR-8HD/CD Supplementary manual About "Track at once" and "Disk at once" The MR-8HD/CD provides two burning modes for creating an audio CD in the CD-DA format. "Track at once" The unit burns a stereo WAV file to a CD-R/RW disc as a track. You can burn an additional track at a later time until the disc is finalized. Each time you burn a file, a TOC is created. Approximately two-second silence is automatically inserted between tracks.
MR-8HD/CD Supplementary manual When writing is completed, "Completed!" is shown and the disc access stops. : When more than one stereo WAV file is stored in the "2 MIX folder" (as shown in the example below), you can use the [MENU/ENTER] knob to select a desired file for "CD Burn" (The maximum number of displayed files in the list is ten). Now writing in the Track at once mode is completed 6) Use the [MENU/ENTER] knob to select the desired WAV file and press the [MENU/ENTER] knob.
MR-8HD/CD Supplementary manual 11) Press the [STOP] key to exit the MENU mode. You can also exit the MENU mode by selecting " Back" and pressing the [MENU/ENTER] knob repeatedly. The following shows how audio CD data is written to a CD-R/RW disc in the "Track at once" or "Disk at once" mode. • Writing a single stereo WAV file in the "Track at once" mode: Track 1 9) Use the [MENU/ENTER] knob to select “[EXECUTE]” and press the [MENU/ENTER] knob. • The display now shows the status of finalizing.
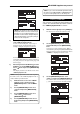
MR-8HD/CD Supplementary manual Viewing the TOC information You can view the TOC information of a burned disc both before finalizing and after finalizing (for a disc burned by "Disk at once", you can view the TOC only after finalizing, of course). It is recommended to check the remaining time (the recordable time left) from the TOC information whenever you write an additional stereo WAV file in the "Track at once" mode. : TOC stands for Table of Contents.
MR-8HD/CD Supplementary manual Viewing the TOC information after finalizing The following assumes that a disc automatically finalized after "Disk at once" writing or a disc finalized after "Track at once" writing is ejected from the internal CD-R/RW drive, while the display shows the CD-RW menu screen where "CD Finalize " is highlighted. 1) Close the ejected disc tray of the CD-R/RW drive.
MR-8HD/CD Supplementary manual Importing track data on a CD-DA disc You can import (copy) track data on a CD-DA (audio CD) disc (including a commercially available audio CD) to a stereo track pair (1/2, 3/4, 5/6 or 7/8) of the currently loaded song. When importing track data, data is converted to a pair of mono WAV files. In the following description, it is assumed that a CD-DA disc is set to the internal CD-R/ RW drive and the song of the import destination is loaded.
MR-8HD/CD Supplementary manual 4) Use the [MENU/ENTER] knob to select "Source CD TNO=**" and press the [MENU/ENTER] knob. You can now select the desired track number of the CD-DA disc. Flasjing 5) Use the [MENU/ENTER] knob to select the desired track number and press the [MENU/ENTER] knob. 9) The display returns to the CD-RW menu screen, where "CD-DA Import " is highlighted. The display now highlights "Source CD TNO=**". 6) Press the [MENU/ENTER] knob. Use the [MENU/ENTER] knob to select "Dest.
MR-8HD/CD Supplementary manual Exporting song data to a CD-R/RW disc You can convert song data (tracks 1 through 8) of the currently loaded song to mono WAV files and export (copy) them to a CD-R/RW disc. Not only for data backup, the copied mono WAV files on a CD-R/RW disc also can be exported to a personal computer for use in the multitrack recording application.
MR-8HD/CD Supplementary manual 3) Use the [MENU/ENTER] knob to select "Song Export " and press the [MENU/ENTER] knob. 5) The display now shows the screen for setting the start time, end time and exported tracks. The display now highlights “[EXECUTE]”. After editing the start time, press the [MENU/ENTER] knob. "Start Time: *m **s ***" is now highlighted. 6) Use the [MENU/ENTER] knob to select "End Time" and press the [MENU/ENTER] knob. You can now edit the end time of the exported file(s).
MR-8HD/CD Supplementary manual 10) Use the [MENU/ENTER] knob to select "[EXECUTE]" and press the [MENU/ENTER] knob. The unit starts exporting track data to the CDR/RW disc. When completed, "Completed" is shown on the display and the disc is automatically ejected. If you want to cancel exporting, select to "[CANCEL]" and press the [MENU/ENTER] knob. 11) Press the [MENU/ENTER] knob. The display now shows the CD-RW menu screen, where "Song Export " is highlighted.
MR-8HD/CD Supplementary manual : If you import a WAV file to a recorded song, the imported file overwrites the existing track data. Note that if the time length of the imported file is shorter than the length of the existing track data, the imported file only overwrites the overlapping part. The rest part of the original data still remains. Also note that you cannot undo the import operation. If you do not satisfy with the result, press the [UNDO/REDO] key to undo the import operation.
MR-8HD/CD Supplementary manual The following procedure shows how to set a file to be imported to "TR06". To set a file to "TR07" or "TR08", follow the similar procedure. 1) To start importing files, select "[YES]". To cancel importing files, select "[NO]". 6) Use the [MENU/ENTER] knob to select "TR06" and press the [MENU/ENTER] knob. The display now shows the screen for selecting a file to be imported.
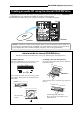
MR-8HD/CD Supplementary manual Creating an audio CD using an external CD-R/RW drive You can create an audio CD using an external CD-R/RW drive. Connect an external CD-R/ RW drive to the [USB HOST] port on the rear panel of the MR-8HD/CD using a USB cable as show below (a USB cable is not supplied with the MR-8HD/CD). INPUT A SEL CD-R/RW drive GTR CLEAN MIC/LINE GTR DIST AC-IN USB [USB HOST] port USB 1.
MR-8HD/CD Supplementary manual 1) 2) Connect the MR-8HD/CD to the CD-R/RW drive using a USB cable. : If "Not Mounted" is shown when you select "USB HOST " using the [MENU/ENTER] knob in step 3) above, an external CD-R/RW drive is not connected to the MR-8HD/CD correctly. While the MR-8HD/CD is stopped, press the [MENU/ENTER] knob to enter the MENU mode. The display now shows the first page of the menu selection screen.
MR-8HD/CD Supplementary manual 6) Use the [MENU/ENTER] knob to select the desired WAV file and press the [MENU/ENTER] knob. The unit starts writing the file to the CD-R/RW disc. Depending on the selected burning mode, either of the following screens is shown. Now writing in the Disk at once mode is completed While the unit is writing data to the disc, "Writing..." is popped up and " ACC " is flashing on the screen. 7) Also the ACCESS indicator of the CD-R/RW drive is flashing.
MR-8HD/CD Supplementary manual 9) Use the [MENU/ENTER] knob to select "[EXECUTE]" and press the [MENU/ENTER] knob. The following shows how audio CD data is written to a CD-R/RW disc in the "Track at once" or "Disk at once" mode. The display now shows the status of finalizing. When finalizing is completed, "Completed" is shown and the disc is automatically ejected from the CD-R/RW drive.
MR-8HD/CD Supplementary manual Viewing the TOC information You can view the TOC information of a burned disc both before finalizing and after finalizing (for a disc burned by "Disk at once", you can view the TOC only after finalizing, of course). It is recommended to check the remaining time (the recordable time left) from the TOC information whenever you write an additional stereo WAV file in the "Track at once" mode. : TOC stands for Table of Contents.
MR-8HD/CD Supplementary manual Viewing the TOC information after finalizing The following assumes that a disc automatically finalized after "Disk at once" writing or a disc finalized after "Track at once" writing is ejected from an external CD-R/RW drive, while the display shows the CD-RW menu screen where "CD Finalize " is highlighted. 1) Close the ejected disc tray of the CD-R/RW drive.
MR-8HD/CD Supplementary manual FOSTEX CO. 3-2-35 Musashino, Akishima-shi, Tokyo, Japan 196-0021 FOSTEX AMERICA 13701 Cimarron Avenue, Gardena, CA 90249 U.S.A.