
Digital Multitracker Owner's Manual VF08
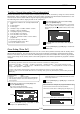
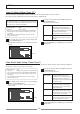
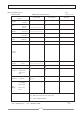
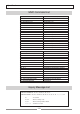
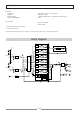
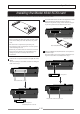
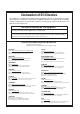


Table Of Contents
- SAFETY INSTRUCTIONS
- Contents
- Basic Features of VF08
- Names and Functions
- About the hard disk storage device
- Basic Recording and Playback
- Mixer Functions
- Recorder Functions
- Advanced Operation
- Save/Load of song data
- SETUP mode
- To enter the SETUP mode
- Time signature setting
- Setting a tempo
- Setting the Metronome function
- Setting MIDI sync output signal
- Setting an MTC frame rate
- Setting an MTC offset value
- Setting MTC Offset mode
- Setting the Slave mode
- Setting the Slave Type
- Setting the Record Protect function
- Setting Digital Input
- Setting BAR/BEAT Resolution mode
- Setting the MIDI device number
- Checking the number of track events
- The Drive Format Information
- Drive Setting
- Fader Fix Mode Setting
- Fader Recall Mode Setting
- Others

115
Specifications
Installing the Model 8340 SCSI card
Follow the procedure below to install the Model 8340 SCSI card in the VF08.
<Notes>
• Before installing the Model 8340 SCSI card in the VF08,
turn off the VF08 power and disconnect the power
cord.
• The SCSI card is comprised of precision parts.
Be careful not to give a strong shock or excess of power
when installing the card.
• Follow the procedure below to install the card in the
VF08. Note that Fostex is not responsible for any
damage of products caused by the incorrect
installation.
Remove the cover panel located on the right side of the
VF08.
The two retaining screws will be used later for fixing the
SCSI card in step 3.
Unfasten the two screws.
Remove the panel.
The blank panel is not used.
Insert the SCSI card as shown in the figure below until
the board meshes with the internal connector.
With the component side up, insert the SCSI card gen-
tly. Do not push the board with excessive force.
component side up
SCSI card (Model 8340)
After inserting the board, fix back the cover panel re-
moved in step 1.
Place the panel to the correct position, and fasten it us-
ing the screws which are unfastened in step 1.
cover panel
Fasten the screws not to loosen.
1
2
3