
Digital Multitracker Owner's Manual VF08
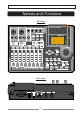
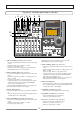
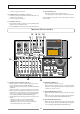
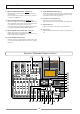
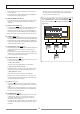

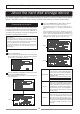
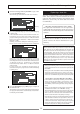
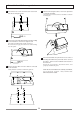
Table Of Contents
- SAFETY INSTRUCTIONS
- Contents
- Basic Features of VF08
- Names and Functions
- About the hard disk storage device
- Basic Recording and Playback
- Mixer Functions
- Recorder Functions
- Advanced Operation
- Save/Load of song data
- SETUP mode
- To enter the SETUP mode
- Time signature setting
- Setting a tempo
- Setting the Metronome function
- Setting MIDI sync output signal
- Setting an MTC frame rate
- Setting an MTC offset value
- Setting MTC Offset mode
- Setting the Slave mode
- Setting the Slave Type
- Setting the Record Protect function
- Setting Digital Input
- Setting BAR/BEAT Resolution mode
- Setting the MIDI device number
- Checking the number of track events
- The Drive Format Information
- Drive Setting
- Fader Fix Mode Setting
- Fader Recall Mode Setting
- Others

20
About the hard disk storage device
1
2
3
4
1
2
4
3
Unscrew the four screws from the bottom of the main
unit that are fixing the panel.
Turn over the panel that the hard disk is fixed according
to the instructions shown in the figure below.
Note that hard disk cables will be connected.
Be careful not to apply excessive force when turning
over the panel.
Remove the two cable connectors that are connected
to the hard disk.
Gently hold the connector and slowly pull out.
After disconnecting the cables, remove the panel that
is fixing the hard disk.
Unscrew the four screws with a screwdriver, as shown
in the Figure.
Fix a new hard disk to the panel in the reverse order of
removing the hard disk as performed earlier. Connect
the cables. Then house the hard disk at the bottom of
the main unit.
Follow the <Precautions> described earlier, and
properly assemble the parts.
When the new hard disk is successfully assembled,
go to the next section. Now, format the
unformatted hard disk.
1
2
3
4
5