
Installation & Assembly

IT·
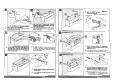
Eseguire
i fori
08
mm.
nei
punti
~enlemenle
segnati
. Fissore
la
s1allo
di
ancoroggio
©
UK•
Drill
the
08
mm.
holes
to
the
,,.eoint,
previously
marked
.
Secure
the
broclcet
to
the
woll(!;)
II
IT·
La
regolcmone
delo attaccoglia @ owiene =
sule
due
viii
fronloli
.
la
vile superior,,
regola
1•-n1o
del
rnoba.
mentre
quelo
inleri«e l'aoicino,nenlo
olo
parele.
Terminate
le
'!9olazioni
coprire
l'attaccoglio
con
l'opposito
coppuccio
©
El
IT·
Dopo
-
l,1-
i
tau.Ii
fomiti
@,
pn,cedere
ol'oggcmcio
cWo
bo,e
.....
tromiee
..
due
ollaaogli.
posle
nel
Niro
cW
mobile@
UK
•
After
having
fixed
/he
two
KrtlW
onchms@
provided,
oHoch
the
wosl,..bos
in
bout
uni
t
by
means
of
the
lwo
hooks
on
the
back@
UK•
To
adjust the position
of
base
uni/
uu,
the
two
,crew, ffi
on
/he
brodclll
.
The
upper
screw
aligns
1"e
unit
o,;;r
the
lower
m
ov"'
it
.
In
the
end, cover
the
bracket
with
its
c
op®
IT·
Fissore
la
base._.,,,
mediont.le,quadrwlle
,ifuoleJUI
retro
cW
mobile
@
UK
- F
ix
the
wo,IH>a,in
base
unit
using
the
brocl.m
on
lbe
rear
of
the
unit@
II
II
SOTTOl'IANO
/
Under
shelf
II
SBMHCASSO/S«n
i-fin./
IT·
lnserire
le
sloffe®
nel
'oppos
ito
olloggiomen
to
ol
'
intemo
della
base
porloloYobo.
UK•
Ploce
the
broclcets@ in
the
ir special h
ous
ing i
ns
ide
the
bo,e
unit.
IT
•
Avvitore
le
quottro
viii
lino o
for
congiungere
ii
lovan<:"w.o
ol
top
e sucassiwimenle instolore a
sifone
delo
sc.orico.
(Port.
P)
UK
-
Screw
the
lou
r
screws
vnl
il
the
washbas
in
and
the
lo
p
/ouch
each
othe
r.
Now
ins/a
ll
the
dra
in
lrop
. (Ref.
P/
IT
•
Dopa
over siliconoto
ed
oppoggiolo U top,
inserite
ii
"-,dino
nell
'opposito olloggiomenlo,
amtore
ii
bullone
contra ii top fino o
foilo
oderire (l'ort
.QJ
UK
- After having applied sy/icane and placed
the
lop,
place
the
washbasin in i
ls
hous
ing,
tighten
the
boll
unt
il it adheres
firmly
to
the
lop
(Ref
.
QJ