
Assembly Instructions

Page 1/3
ASSEMBLY INSTRUCTIONS
Important Safety Instructions:
We recommend you contact a professional electrician to install any hardwired lighting. Incorrect
installation can lead to fires.
These instructions are provided for your safety. It is very important that they are read carefully and completely
before assembling fixture..
This fixture has been rated for up to (6) 40-watt maximum TYPE B bulbs (no included) or (6) 9-watt compact
fluorescent light bulbs (not included). To avoid the risk of fire, do not exceed the recommended wattage.
Pre-assembly:
Do not discard any contents until after assembly is complete to avoid accidentally discarding small parts or
hardware.
Remove all parts and hardware from box along with any plastic protective packaging.
Parts Enclosed: Hardware Included:
To install you will need: Screwdriver/Electrical tape
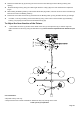
To Adjust the Suspension Length of the Fixture:
Do not use the electric cord only, without Steel Wire (D) to support the weight of the lighting fixture. The
adjustment or shortening the fixture’s suspension length is only needed if the factory set Steel Wire (D)
length is not appropriate for your installation.
Loosen the two Allen Set Screws (e) from the Binding Collar (f) using the Allen Wrench (d) by turning the wrench
counter-clockwise.
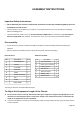
Item
Description
QTY
a
b
c
d
e
f
h
2
3
2
1
5
1
18
mounting screws
plastic wire connectors
canopy screws
allen wrench
allen set screws
binding collar
thumb screws
Item
Description
QTY
A
B
C
D
E
F
G
H
1
1
1
6
3
6
6
1
1
I
mounting plate
canopy
cord collar
steel wire
fixture
socket metal cap
arm
socket
glass shade