
Installation Manual


Page 46
© 2015 Sensata Technologies
Troubleshooting
Symptom Possible Cause Recommended Solution
No output power.
Inverter LED is OFF.
Inverter is switched OFF. Switch the inverter ON.
Battery voltage is too low. The battery
voltage level has dropped below the Low
Battery Cut Out (LBCO) set-point for
more than one minute.
Check fuses/circuit-breakers and cable connections.
Check battery voltage at the inverter’s terminals.
Batteries may need to be charged. This fault
condition automatically clears when the battery
voltage is > LBCI voltage.
The battery voltage is too high. The
inverter automatically resets and
resumes operation when the battery
voltage drops to the HBCI voltage or
lower.
This condition usually only occurs when an
additional charging source (alternator, solar panels,
or other external charging sources) is used to
charge the battery bank. Reduce or turn off any
other charger to the inverter batteries to allow the
voltage level to drop.
Over-temperature condition: The internal
temperature of the inverter has risen
above acceptable limits; caused by loads
too great for the inverter to operate
continuously, or by lack of ventilation to
the inverter. When the unit has cooled,
it automatically resets and resumes
operation.
Reduce the number of electrical loads that you
are operating, this will avoid a repeat Overtemp
shutdown if the cause was too many loads for the
ambient conditions.
Check ventilation around the inverter, ensure
cool air is available to pass-thru the inverter (see
ventilation requirements in Section 2.1.3).
AC overload condition: The inverter has
turned off because the connected loads
are larger than the inverter’s output
capacity, or the output wires are shorted.
Reduce the AC loads connected to the inverter,
or remove all AC output wiring and restart the
inverter.
Internal fault: This fault occurs when an
internal fault is detected.
An inverter reset is required to clear fault. Remove
DC power to the inverter, or press and hold down
the inverter’s power switch for ~10 seconds (until
green Status LED lights). If fault does not clear, the
unit needs to be serviced.
No output power.
Green LED is
fl ashing.
Unit is in Search mode, which means
load is too small for search mode circuit
detection.
Turn on load greater than 5 watts to bring inverter
to full output power or turn off search with remote.
Low output or surge
power. Green LED is
fl ashing.
Loose or corroded battery cables. Clean and tighten all cables.
Low batteries. Recharge or replace batteries.
Loose AC output connections. Tighten AC output connections.
Battery cables are wrong length or
gauge.
Verify recommended cable lengths and gauges per
manual. Replace cables as needed.
Low charging rate
when connected to
shore power.
Charge rate set too low. Adjust Charge Rate or SHORE settings.
Low AC voltage (<85 VAC). Check AC input wiring.
Low charging rate
when using a
generator.
Generator output is too low to power
both load and charger.
Reduce the load, increase the generator’s RPMs.
Check SHORE settings (if remote connected).
Charger doesn’t
charge.
Loose or corroded battery cables. Clean and tighten battery cables.
Defective batteries. Replace batteries.
Wrong charger settings. Adjust the charger settings, ensure the unit is not
in charger standby.
Wrong AC input voltage. Verify proper AC input voltage and frequency.
While charging, the
DC charge voltage
is higher or lower
than expected.
If the Battery Temperature Sensor
(BTS) is installed, the DC voltage will
increase or decrease depending on the
temperature around the BTS.
This is normal; see Section 3.3 (Battery
Temperature Sensor Operation) for more
information.
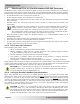
6.0 Troubleshooting
The MS-PAE Series inverter/charger is a fairly simple device to troubleshoot. The following chart
is designed to help you quickly pinpoint the most common inverter or charger failures.
Table 6-1, Troubleshooting Guide