
User Manual


30
EN
ASSEMBLY OF THE SAWBLADE
WARNING
Do not start the bandsaw before fastening the machine, assembling and adjusting the workbench,
checking belt tension and safety devices. Only after performing these tasks you can connect the saw to
the power supply. Otherwise the bandsaw could start suddenly and cause personal injuries.
I. Fix bandsaw’s base
II. Assemble the workbench
III. Assemble the fence’s rail
IV. Assemble the fence
V. Connect the dust collection device
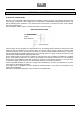
I. Bandsaw fastening
1. Assemble the 4 legs to bandsaw’s blade with 8 screws and the corresponding nuts and washers.
2. Assemble the 4 bars with the screws and the washers.
3. Straighten up the bandsaw.
4. Firmly tighten all the screws.
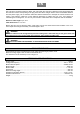
II. Workbench assembly FIG.2
A. Side adjustment of the workbench
Loosen the 4 locking screws (35) of the workbench’s support.
Place the workbench in order that the saw blade is in the middle of bench inlay’s groove.
Tighten the locking screws (35).
III. Assembly of fence’s rail FIG.3
Fix fence’s rail (40) on the workbench with 4 wing screws and with washers.
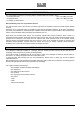
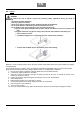
IV. Assembly of the rip fence FIG.4
The rip fence can be assembled on the left and on the right of the saw blade. You can lock the guide by lowering
the lever (A).
V. Connection of the dust collection device
DANGER!
The dust of certain kind of wood, as for example oak, beech or ash-tree has been proved to be
especially dangerous for human health. We recommend you to work outdoors, to use an efficient dust
collection device and personal safety devices as for example dust masks.
In the bandasaw there is a coupling to which you can connect the pipe of an external dust collector to extract the
dust and wood shavings.
We recommend you to always connect a dust collector when processing wood and to use a dust mask.
If you do not have a dust collector, we recommend you to work outdoods, with a dust mask and for short periods of
time.
You must periodically remove wood shavings piling up inside the bandsaw and in the pulley’s compartments.
.