
User`s manual


5
81
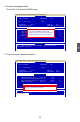
8. You can see in the previous example, about 40GB of Channel 1 and 2 hard disks were
allocated. Select the remaining spaces from them for RAID 0 again.
LD No LD Name RAID Mode Drv
LD 2 Logical Drive 1 RAID 0 2
Stripe Block: 64 KB Fast Init: ON
Gigabyte Boundary: ON Cache Mode: WriteThru
Port :ID Drive Model Compatibilities Capacity(GB) Assignment
1 :Mas HDS728090PLA380 SATA 3G 42.34 Y
2 :Mas WDC WD1200JD-98HBB0 SATA 1.5G 80.03 Y
3 :Mas Hitachi HDT725025VLA3 SATA 3G 250.05 N
4 :Mas ST3320620AS SATA 1.5G 320.07 N
[↑] Up [↓] Down [PaUp/PaDn] Switch Page [Space] Change Option
[Ctrl+Y] Save [ESC] Exit
[ Dene LD Menu ]
Option ROM Utility (c) 2008 Advanced Micro Devices, Inc.
[ Keys Available ]
[ Dene LD Menu ]
[ Drives Assignment ]
Y
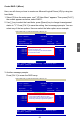
9. Press [Ctrl-Y] to save the setting. And a message prompts. You can select any of
the two options. Here we select the latter option as an example.
LD No LD Name RAID Mode Drv
LD 2 Logical Drive 2 RAID 0 2
Stripe Block: 64 KB Fast Init: ON
Gigabyte Boundary: ON Cache Mode: WriteThru
Port :ID Drive Model Compatibilities Capacity(GB) Assignment
1 :Mas HDS728090PLA380 SATA 3G 82.34 Y
2 :Mas WDC WD1200JD-98HBB0 SATA 1.5G 120.03 Y
3 :Mas Hitachi HDT725025VLA3 SATA 3G 250.05 N
4 :Mas ST3320620AS SATA 1.5G 320.07 N
[↑] Up [↓] Down [PaUp/PaDn] Switch Page [Space] Change Option
[Ctrl+Y] Save [ESC] Exit
[ Dene LD Menu ]
[ Dene LD Menu ]
[ Drives Assignment ]
Option ROM Utility (c) 2008 Advanced Micro Devices, Inc.
Please press Ctrl-Y key to input the LD name
or press any key to exit.
If you do not input any LD name,the default
LD name will be used.
[ Keys Available ]