
User's Manual


11
6-1 Obtaining New Sounds
You can access the FOXPRO website at any time to purchase new sounds for your Inferno. The website is
located at: http://www.gofoxpro.com. From the site, access the “FOXPRO Sounds” menu option from the
main menu and click on one of the sound pack options. You can purchase 4 sounds of your choice, 8 sounds
of your choice, and 16 sounds of your choice. The Inferno is also capable of playing MP3 and uncompressed
WAV files obtained from other sources. The maximum number of sounds that your Inferno can hold at one
time is 200.
6-2 Programming the Inferno
The first step is to download and install the FOXPRO Sound Programming Utility. The installer for the
FOXPRO Sound Programming Utility can be downloaded directly from our website at any time by visiting:
http://www.gofoxpro.com/programmer (Mac users: see the note at the bottom of the page). Follow the
provided instructions on that page to install the software and become familiar with it.
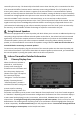
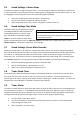
Connecting your Inferno to your Computer
The USB port is located inside the back access
compartment (see Figure 4 to the right) of the
Inferno. After connecting the Inferno to your
computer, launch the utility. The utility should
recognize the device and display "Connected to..."
followed by the device name. The "Caller Sound
Files" column will become active and display the
sounds currently installed.
File Locations / Sound Library
When you initially launch the Sound Programming
Utility, it creates a folder called “FOXPRO” in your
documents folder. The Sound Programming Utility
expects to find new sound files in the Documents
-> FOXPRO -> Sounds folder. If you have your new sounds stored somewhere else, use the “Browse Library”
button to locate the sounds.
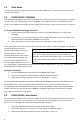
Brief Overview on Programming New Sounds:
1. Connect the Inferno to your computer.
2. Launch the programming utility.
3. If you do not see your new sounds under the "Source Sound Files" column, use the "Browse
Library" button to navigate to the correct location. When the appropriate files are found,
double-click on any of the sounds to automatically load all files from that location.
4. Select one, multiple, or all sound files in the "Source Sound Files" column. Click on the position
you wish to load the sounds into on the “Caller Sound Files” column and click "Insert.”
5. When complete, Windows users must click on the "Update Caller" button to save your changes.
Mac users will not have an “Update Caller” button as the sounds are inserted in real time.
6. Use the utility to configure your categories by clicking on the “Edit Categories” button on the
main interface. You will need to add the new sounds into the desired categories if your
transmitter is configured for category view. If you are using sound list view, you will not need to
worry about the category assignments. Note: the Inferno can have up to 15 categories, each with
75 sounds.
7. Exit the utility and update your transmitter playlist.
Figure 3: Inferno USB Port