
User Manual


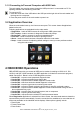
Table Of Contents
- One-Year Limited Warranty
- Safety Information
- 1 Using This Manual
- 2 Introduction
- 3 Getting Started
- 4 OBDII/EOBD Operations
- 5. DTC Lookup
- 6 Review Data
- 7 System Setup
- 8 Tool Information
- 9 NT Wonder Introduction

NT301 OBDII/EOBD Code Reader User’s Guide_English Version_V1.00
10
3.1.2 Connecting to Personal Computer with USB Cable
The code reader also receives power through the USB port when it is connected to a PC for
updating software and transferring saved files.
To connect to PC:
1. Insert the small end of the USB cable to the USB port at the right side of the code reader and
the large end to a computer.
2. Press the power switch of the code reader to power it on.
3.2 Application Overview
When the code reader boots up, the Home screen opens. This screen shows all applications
loaded on the unit.
Following applications are preloaded into the code reader:
● Diagnostics – leads to OBDII screens for all 9 generic OBD system tests.
● DTC Lookup – leads to screens for diagnostic trouble code lookup.
● Review Data – leads to screens for access to tested data files.
● Print Data – leads to screens for access to printing function
● About – leads to screen that shows information about the code reader.
● Setup – leads to screens for adjusting default settings to meet your own preference when
using the code reader.
Figure 3.1 Sample Home Screen
4 OBDII/EOBD Operations
OBD-II/EOBD menu lets you access all OBD service modes. According to ISO 9141-2, ISO
14230-4, and SAE J1850 standards, the OBD application is divided into several sub programs,
called ‘Service $xx’. Below is a list of OBD diagnostic services:
● Service $01 - request current powertrain diagnostic data
● Service $02 - request powertrain freeze frame data
● Service $03 - request emission-related diagnostic trouble codes
● Service $04 - clear/reset emission-related diagnostic information
● Service $05 - request oxygen sensor monitoring test results
● Service $06 - request on-board monitoring test results for specific monitored systems
● Service $07 - request emission-related diagnostic trouble codes detected during current or
last completed driving cycle
● Service $08 - request control of on-board system, test or component
● Service $09 - request Vehicle Information
● Service $0A - request Emission related DTCs with permanent status
When Diagnostics application is selected from Home screen, the code reader starts to detect the
communication protocol automatically. Once the connection has established, a menu that lists all
of the tests available on the identified vehicle displays. Menu options typically include:
● Read Codes
● Freeze Frame Data
● Erase Codes