EN INSTRUCTION MANUAL
GENERAL OPERATING RULES Carefully read the instruction manual and warranty limitations The machine must be connected to a grounded power outlet. The machine must be kept clean by frequently washing the grid, the driptray, the capsule holder, the tank, the steam knob EXTREMELY IMPORTANT: never immerse the machine in water or put it in the dishwasher. The water contained in the tank must be replaced regularly.
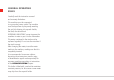
EN table of contents MACHINE PARTS . . . . . . . . . . . . . . . . . . . . . . . . . . . . . . . . . . . . . . . . . . . . . . . . . . . . . . . . . . . . . . . . . . . . . . . . . . . . . . . 30 IMPORTANT SAFEGUARDS . . . . . . . . . . . . . . . . . . . . . . . . . . . . . . . . . . . . . . . . . . . . . . . . . . . . . . . . . . . . . . . . . . . . . 32 USING THE ESPRESSO MACHINE . . . . . . . . . . . . . . . . . . . . . . . . . . . . . . . . . . . . . . . . . . . . . . . . . . . . . . . . . . . . . . .
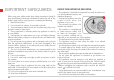
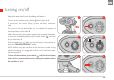
machine parts A ON/OFF SWITCH (lights up when the machine is on) B COFFEE SWITCH ON/OFF A (lights up when temperature is ok) C STEAM SWITCH (lights up if activated) D TEMPERATURE DISPLAY coffee ok steam ok - water tank empty E "METODO IPERESPRESSO" CAPSULE HOLDER F G H I L M 30 BREWING UNIT 60 B 40 20 D F STEAM ARM 80 C L G H STEAM TIP DRIPTRAY FULL INDICATOR I STEAM KNOB E DRIP TRAY M
EN N R O N O P Q R CUP HOLDER WATER TANK POWER CORD DATA PLATE (below) ALARM if active indicates machine is on or there is an irregular functioning P Q 31
IMPORTANT SAFEGUARDS When using your coffee maker, basic safety precautions should always be followed, including the followed to reduce the risk of fire, electric shock, and/or injury to persons including the following: 1 Read all instructions 2. Do not touch hot surfaces. Use handles or knobs 3. To protect against electric shock, do not place cord, plug, or appliance in water or other liquid 4. Close supervision is necessary when any appliance is used by or near children 5.
EN INSTALLATION OF THE ESPRESSO MACHINE IN CASE OF MALFUNCTIONING - Read the instructions carefully - Do not install the machine in an area where the temperature may reach or be lower than 0°C/30°F (if water freezes, the appliance may be damaged) and higher than 40°C/140°F - Check that electric voltage corresponds to the requirements indicated in the data plate on the machine.
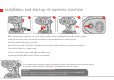
installation and start-up of espresso machine 2 1 3 Before connecting the appliance to a power supply, carefully read the safeguards listed in the previous chapter Check that the steam knob is closed and the machine is disconnected from the power supply 1 Twist the capsule holder firmly in place 2 Remove the tank, wash it, fill it with cold water and put it back in place making sure it positioned correctly 3 Connect the machine to a power socket To turn on the machine press switch until it lights up 4
EN turning on/off Adjust the water level in tank by adding cold water 1 To turn on the machine press switch 1 2 3 4 5 6 until it lights up 2 If necessary the boiler filling system activates automatically The icons in the top display light up to indicate the increase of the temperature in the boiler 3 After a few minutes the machine signals that operating temperature has been reached by lighting up the coffee switch and emitting a short beep 4 If the triangular icon lights up and the beep is intermi
making coffee 1 2 3 4 The X7 machine is designed to function exclusively with “Metodo Iperespresso” capsules 1 Dosing is performed automatically by the machine To change the quantity of coffee in the cup and set a new value, press the coffee switch 5 until you have obtained the desired quantity, then release the switch It is possible to eliminate the automatic dosage function, following the instructions above, keeping the delivery button pressed until the machine itself blocks the delivery, then release
EN 5 Press the coffee switch 6 to start making coffee 5 Coffee dispensing will stop automatically once the set quantity is obtained, to stop dispensing before the set quantity is obtained press the coffee switch 6 again Remove the capsule from the capsule holder and repeat the steps above for each cup The brewing cycle consists of a first phase called "pre-infusion" (short injection of water in the capsule followed by a pause) lasting about 3 seconds and a second phase for brewing WARNING: - For safet
making cappuccino 1 2 3 4 The machine is fitted with a steam arm to froth milk and prepare one or more cappuccinos Prepare one or more coffees following the steps outlined below Froth the milk as follows: Remove the capsule from the unit 1 Press the steam switch Wait for the steam switch 2; the steam icon located on the central display lights up to indicate the machine is warming up to light up 3 (machine ready) followed by a short beep Take fresh milk from the refrigerator and pour it in a pitcher (p
EN 5 6 A Immerse the steam arm in the milk 5, turn the steam knob counterclockwise and wait for the milk to froth Close the steam knob by turning it clockwise Pour the froth and the milk in the cups containing coffee Clean the steam arm with care to remove milk residue with a cloth and turn knob to open, releasing some steam to remove milk residue from the inside of the steam arm 6 WARNING: - Contact with steam and the steam arm A may cause serious scalding - Do not turn on the steam knob when the machi
making hot water 1 2 3 The steam arm fitted to the machine can also heat up water 4 5 Remove the capsule from the unit 1 and any milk residue from the steam arm 2 Press the steam switch is heating up 3 Wait for the steam switch ; the steam icon on the front display lights up to indicate that the machine to light up (machine ready) followed by a short beep 4 Fill a metal pitcher with the desired quantity of water to be heated Immerse the steam arm in the water and open the steam knob by turning it co
EN preparing coffee after generating steam It is very important to avoid preparing an espresso immediately after generating steam because the water heated by the boiler is too hot and may compromise the taste of coffee 1 2 For this reason the coffee switch is inactive when the temperature inside the boiler is too high (coffee switch 1 off) To return to coffee making, press the coffee switch and wait for the switch to light up 2; during the cooling phase (approx.
decalcification The machine keeps track of its overall use and based on the quantity of coffee or steam delivered may require a decalcifying cycle, signaled by the flashing of the triangular icon (1 flash every 2 seconds) A B A The machine is equipped with an automatic program for optimum cleaning and removal of calcium residue from the inside of the machine To perform the cleaning program it is advisable to use the decalcifying agent supplied with the machine B Starting the procedure: Fill the tank with
EN 5 7 6 max Press the coffee switch to start the decalcification cycle the coffee switch 8 1litro 1litre 9 turns off 5 The machine automatically starts performing washing cycles at set intervals At the end of the automatic decalcification cycle, lasting approx.
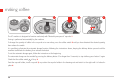
cleaning and maintenance To ensure correct functioning and a high quality standard, it is advisable to clean the machine regularly and with care Operations to be performed when the machine is cold and disconnected from the power supply: 60 O cleaning the water tank 20 O G cleaning the steam arm and removing milk residue from the arm E 80 40 cleaning the capsule holder G M cleaning the grid S cleaning the driptray M S WARNING: - Do not clean the machine with aggressive detergents (methanol, meth
EN technical data recommendations Casing: polycarbonate To enjoy a high quality espresso, remember to: Internal boiler: brass - Change the water in the tank and empty the driptray at least once a week Tank: 1.
PROBLEM SOLUTION The machine is on but switch does not light up A - Check that the machine is connected to a power supply; check the safety switches of your home power supply system No coffee comes out - I turn the knob but the machine does not generate Fill the tank, make sure it is securely inserted Make sure the steam knob is completely closed Remove the capsule holder from the unit Wait until coffee switch is lit (machine is ready to make coffee) Put a cup under the brewing unit and press coffee
IF PROBLEM PERSISTS PROBLEM SOLUTION The water tank leaks after it has been filled - Empty the water tank, press the transparent rubber washer of the connection valve inside the tank firmly into place After having pressed the steam button, - The machine needs to cool down after a prolonged delivery of steam; wait a few minutes and the machine will begin working again the machine does not light up the steam icon situated on the circular crown which shows the preparation phase, but the coffee icon flashe
warranty limitations The warranty does not cover damage caused by: - Damage caused by calcium or by a lack of periodical decalcification - Damage caused by operation with a voltage that differs from the one indicated on the plate - Damage caused by improper use or use that is not compliant with the instructions - Damage caused by internal modifications Furthermore the warranty does not cover repair costs on machines previously handled by non authorised assistance centers, which will be entirely charged to t
EN The WEEE symbol used on this product means that it can not be disposed of with other domestic waste and must be collected separately. Consumers now have the opportunity to hand-in their used appliance free of charge on a 1:1 basis when they purchase a new product. For further information regarding the used appliance collection points, please contact the town of residence, the local waste disposal service or nearest retailer.