
Instructions / Assembly


In this instruction booklet we will walk you through the
installation of your new shower door.
DO NOT REMOVE your old shower door until you
check your new shower door kit for all the proper
parts. Make sure that you have all the proper tools
required to assemble your new shower door.
Use this check list.
• Phillips Screwdriver
• Level
• Electric Drill
• 1/8” Drill Bit (for fiberglass stall)
• 3/16” Masonry Drill Bit (for tile stall)
• 7/64” Drill Bit
• 7/16” Open End Wrench
• Pliers
• Pencil
• Hammer
• Tin Snips
• Caulking Gun and one Tube of Clear Silicone
• Tape Measure
• Safety Glasses
CAUTION: Wear safety glasses whenever drilling or
cutting. Handle the Door panel carefully. The corners
of the panel can damage tile and floor covering.
Tempered glass cannot be cut.
STEP 1
Checking Contents of
Shower Door Package
DO NOT use a razor blade to cut open the paper wrapping
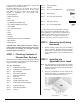
as you may scratch the contents. Use the IPB Drawing to
help you locate the following parts:
No. Qty. Description
(#1) 1 Adjustable Pivot Jamb
(#2) 2 Adjustable Pivot Jamb Bracket
(#3) 1 Slip Jamb Male
(#4) 1 Slip Jamb Female with
Magnetic Jamb Seal
(#8) 1 Dam Strip
(#9) 1 Handle Outside
(#10) 1 Handle Inside (with Holes)
(#11) 1 Plastic Water Diverter & Gasket
(#13) 1 Pivot Bushing (Top)
(#14) 1 Pivot Bushing (Bottom)
(#15) 2 Pivot Pin
(#16) 2 Spanner Washer
(#17) 2 Kep Nut
(#18) 6 #8 x 1 1/2” PH SMS Screw
(#19) 6 Screw Anchor
(#20) 3 #6 x 3/8” “B”-Point Screws
(#22) 2 M5 x 35mm Screw
(#24) 6 #8 x 1/2” FH SMS Screw
STEP 2 Removing the Existing
Enclosure
A. Remove existing shower door and all existing
parts to that door assembly. Remove all screw
anchors from the wall. Remove silicone sealant
or tub caulking and any other contaminants from
shower.
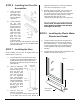
STEP 3 Installing the
Adjustable Pivot Jamb
NOTE: The wall opposite the shower head and controls
will be the pivot side. Some situations may require
the door to pivot on the same side as the shower
head and controls.
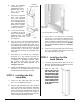
A. Using the Tape Measure, find the center of the
shower dam. Make a mark where the center is
on both ends of the dam. (S
ee Figure 1).
Dam Centerline
Figure 1
Dam Centerline
4
If you find that any parts are damaged or missing,
refer to the parts list and IPB Drawing and contact
Liberty Hardware's Customer Service Department at
1-800-345-3358. NOTE: Views and directions given
in these instructions – left, right, front, back, etc. –
are from outside the enclosure, facing the shower.