
Instructions / Assembly


7
C. Make sure that the top surface of the shower
dam is completely clean of oil, dust, debris or
other contaminants. Apply a small 1/4" to 3/8"
bead of 100% silicone to the underside of the
Dam Strip (#8). Wipe away excess silicone
immediately. Follow sealant manufacturer for
proper use and clean-up recommendations.
STEP 11 Silicone Sealing the
Enclosure
A.
NOTE:
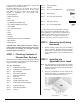
STEP 9 Installing the Handles
A. Locate the Handle Outside (#9), Handle Inside
(with Holes) (#10).
B. Use the M5 x 35mm Screws (#22) to
attach the Handles to the Pivot Strike Rail (#5).
Screw heads should be inside the shower.
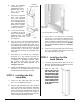
STEP 10 Installing the Dam Strip
A. Locate the Dam Strip (#8). Notice that one end
has been pre-cut to fit the shape of the Adjustable
Pivot Jamb Bracket (#2).
B. From the outside of the shower enclosure insert
the Dam Strip (#8) to meet the Adjustable Pivot
Jamb Bracket (#2). Cut the other end of the Dam
Strip (#8) straight to fit up against the Slip Jamb
Female (#4) (See Figure 7).
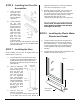
Figure 7
Outside Shower
Dam Strip
Straight cut
Notched end abuts
Jamb Bracket
Using clear Silicone, seal all edges, both interior
and exterior where the Adjustable Pivot Jamb (#1),
Adjustable Pivot Brackets (#2), Slip Jamb Female
(#4) and Dam Strip (#8) meet and where they meet
the tile or fiberglass.
Silicone sealant must cure for 24 hours before you
use your new enclosure. Silicones may vary. Please
follow manufacturer's instructions for safety, cleaning
and disposal recommendations.