BDS-6100 ™ User’s Guide 1
1. Getting Started 1.1 Charging the Battery 1.2 Switching On and Off 1.3 Setting the Message Language 1.4 Using the Backlight 1.5 Using the Main Menu 1.6 Key Guide 1.7 Browsing in the Device 2. Quick Guide to Product Features 2.1 Dictionaries and Searching 2.2 Basic Features 2.3 Other Useful Features 3. BOOKS Menu 3.1 Using Global Search 3.2 Using the Dictionaries 3.3 Searching Idioms, Usage Examples and Collocations 3.4 Misspelling Words 3.5 Uncertain Spellings 3.6 Inflections/Conjugations 3.
6.6 Using Memo 6.7 Using Voice Memo 6.8 Metric Converter 6.9 Currency Converter 6.10 Using Countdown Timer 6.11 Organizer Password 7. SETTINGS Menu 7.1 Display Settings 7.2 Volume Control 7.3 Language Settings 7.4 Power Management 7.5 Disk Management 7.6 Host Information 7.7 Default Settings 8. General Controls 8.1 Headphone Jack 8.2 USB Port 8.3 Inserting microSD Card 8.4 Adjusting Sound Volume 8.5 Changing Size of Screen Type 8.6 Help is Always at Hand 8.7 Resetting Your Device 9. PC Connections 9.
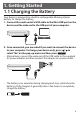
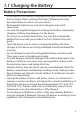
1. Getting Started 1.1 Charging the Battery Your device is powered by a built-in rechargeable lithium polymer battery. To charge the battery, 1. Connect the small end of a USB cable to the Mini-USB port on the device and the wide end to the USB port of your computer. 2. Once connected, you are asked if you want to connect the device to your computer. To charge your device only, press / to select “No” on the pop-up menu and then press eingabe .
1.1 Charging the Battery Battery Precautions • If the device is not used for a long period of time, the battery may lose its charge. Please recharge the battery following the steps described above in order to use your device. • Rechargeable batteries are only to be charged under adult supervision. • Use only the supplied chargers to recharge the battery. Improperly charging a battery may damage it or the device. • Do not use an unauthorized battery.
1.2 Switching On and Off Press to switch on or off the device. 1.3 Setting the Message Language The first time you use this device (or following a product reset), you will be promoted to set the message language used for on-screen prompts and menu items. 1. Press / to select the language you want. • You may also press the letter key for the language you want. 2. Press eingabe . • You can change the message language at any time in the Settings menu. See 7.3 Language Settings. 1.
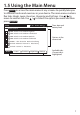
1.5 Using the Main Menu Press menü to access the main menu at any screens to quickly take you to different books and exercises in your device. The main menu contains five tabs: Books, Learn, Exercises, Organizer and Settings. Use / to move to another tab. Use / to select the option you want and then press eingabe . Menu 10:10 01.02.
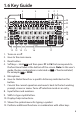
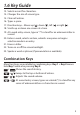
1.6 Key Guide 5 4 3 2 1 6 7 23 22 8 21 9 20 19 10 11 18 12 1. 2. 3. 4. 5. 6. 7. 8. 9. 10. 11. 12. 13 14 15 16 17 Turns on or off. Goes to the main menu. Reset button Soft keys – Hold FN and then press F1 to F6 that corresponds to the functional label at the bottom of the screen. Note: In this user’s guide, the key combination is indicated as FN + ‘functional label’, for example: FN + SAVE. Microphone Goes to Global Search or a specific dictionary indicated on the button.
1.6 Key Guide 13. 14. 15. 16. 17. 18. 19. 20. 21. 22. 23. Selects accent for characters. Changes the size of screen type. Clears all entries. Types a space. Direction keys – Moves up ( ), down ( ), left ( ) or right ( ). Scrolls up or down one screen at a time. At a word entry screen, types a “?” to stand for an unknown letter in a word. Enters a word, selects an item, submits a response or begins selection mode in an entry. Erases a letter. Turns on or off the screen backlight.
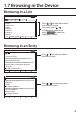
1.7 Browsing in the Device Browsing in a List E-D PONS Englisch - Deutsch Word Idiom Example Colloca. translate translate translation translation table - Deutsch E-D PONS Englisch E-D PONS Englisch - Deutsch translator translate Word Idiom Example Colloca. translate Word Idiom Example Colloca.
den Film adaptieren 4. (make a reality) to ~ sth etw umsetzen 1.7 Browsing in the Device F1 List F2 Preview F4 Conj PONS Englisch - Deutsch F6 EX. E-D 1. (change words) übersetzen to translate from Hungarian into Russian aus dem Ungarischen ins Russische übersetzen to translate easily/only with difficulty sich akk einfach/schwierig übersetzen lassen to translate simultaneously simultan dolmetschen 2.
2. Quick Guide to Product Features 2.1 Dictionaries and Searching The table shows the possible ways for searching with each dictionary in the device. For details, refer to the sections in this user’s guide indicated in the table (for example, 3.1 means referring to section 3.1 Using Global Search).
2.1 Dictionaries and Searching Other Dictionary Features Features Sections Spelling corrections 3.4 Looking up inflections or conjugations 3.6 Looking up words in a dictionary entry 3.9 Viewing confusables of a word 3.7 Viewing usage examples of a word 3.8 Saving words for further study or review 3.10, 4.4 Viewing search history 4.6 Accessing a downloaded dictionary 3.13 2.2 Basic Features Features Sections Charging battery 1.1 Adjusting sound levels 8.4 Using display backlight 1.
2.3 Other Useful Features Features Sections Creating your own dictionaries 4.5 Finding translations of useful phrases 4.2 Making references to grammar guides 4.3 Improving your knowledge in business English and learning the business customs in various countries 4.1 Improving your knowledge in foreign languages through exercises 5 Playing mp3 music files 6.1 Making voice memos 6.7 Connecting this device to your PC 9.1 Using the dictionaries of this device on your PC 9.
3. BOOKS Menu 3.1 Using Global Search Global Search allows searching for all words, examples and phrases saved in the dictionaries. You can use multiple words for searching. 1. To access Global Search, press / to select Global Search in the Books menu and then press eingabe . • Or press Globale Suche on the top row of the keyboard for direct access. 2. Type a word. • See 3.12 Hints on Inputting Words.
D-S PONS German-Spanish Dictionary E-D PONS English-German Dictionary OxT Oxford Learner’s Thesaurus OxD Oxford Advanced Learner’s Dictionary F-D PONS French-German Dictionary I-D PONS Italian-German Dictionary S-D PONS Spanish-German Dictionary • Press FN + PREVIEW to preview the entries while you are browsing the word list. Repeat this step to cancel this function. ALL-ALL Global Search Word Idiom Example Colloca.
3.2 Using the Dictionaries The following instructions apply to the dictionaries in the Books menu. Note: The functions described below may not be available to all dictionaries or at all times. 1. To access a dictionary, press / to select the dictionary you want in the Books menu and then press eingabe . ALL-ALL Global Search • Or press a corresponding key on the top row of the keyboard for direct access. 2. Type a word. • See 3.12 Hints on Inputting Words.
3.2 Using the Dictionaries Using Soft Keys Soft key functions are represented by the labels displayed along the bottom of the screen. These labels change to reflect the various functions available in different features of the device. Press FN + F1 to F6 that corresponds to the label. Soft Keys Features CLOSE Closes the current screen. CONF Views the confusables. See 3.7 Confusable Words. CONJ Shows inflections/conjugations. See 3.6 Inflections/ Conjugations.
3.2 Using the Dictionaries RANGE Refines searches by multiple words. Press / to select an option from the menu and then press eingabe . All = Look for entries with the search words, whenever they appear. Items following specified order = Look for entries with the search words, in the order as you typed. Input words are in successions = Look for entries with the search words, in the word successions as you typed. THES Goes to the Oxford Learner’s Thesaurus.
3.3 Searching Idioms, Usage Examples and Collocations ALL-ALL Global Search Word Idiom Example Colloca. Input a word first! You may refine your searches to show only entries containing idioms, usage examples or collocations in Global Search and dictionaries. 1. In Global Search or dictionaries, press FN + / to select ‘Idiom’, ‘Example’ or ‘Collocation’ (if available). F1 List F2 Preview F3 F4 Konj E-D PONS Englisch - Deutsch Word • 2. • • Idiom Example Colloca.
3.4 Misspelling Words If the letters you type do not find a match in the list, your word is misspelled or not in the dictionaries. A list of possible spelling corrections is displayed. Press / to select the entry you want and then press eingabe . 3.5 Uncertain Spellings If you are uncertain about how to spell a word, type the portion of the word you do know, and type a question mark (?) in place of each unknown letter.
3.6 Inflections/Conjugations Inflected Form Searching The device is equipped with a smart system to retrieve results from an inflected word. For example, when you type “ate”, the device will retrieve results from the word “eat”. For a word with multiple parts of speech (e.g. the word “record” is both a noun and a verb), both definitions will show. Looking Up Inflections To look up inflections in the dictionaries, press FN + CONJ (when inflections are available to a word).
3.7 Confusable Words Confusables are homonyms, homophones and spelling variants that are easy to confuse. When the word you looked up has confusables, the function label CONF appears. Press FN + CONF to view the confusables. 3.8 Usage Examples Many entries in the dictionaries contain also usage examples. When usage examples are available, EX appears. 1. Press FN + EX to highlight EX . • The usage examples show immediately in the lower pane of the screen as a preview.
3.9 Highlighting Words Another way to look up words in the dictionaries is by highlighting them in an entry. Note: this feature may not be available on all screens. 1. At a text screen supporting word selection, press eingabe . • If the first word on the screen is highlighted, this feature is supported. 2. Use direction keys to select an available word you want to E-D PONSthe Wörterbuch SuS Englisch translate and press eingabe . learn AM trn’s-] I. vt 1.
3.10 Adding Words to My Word List As you explore new words, save them in My Word List for further study or review. 1. In a dictionary, type a word you want to look up and add to the ALL-ALL Globale Suche word list. Wort Idiom Beisp. Colloca. Erst ein Wort eingeben! FN + LIST. 2. Press • A pop-up menu appears. Add “xxx” to word list? Go to My Word List Cancel F1 3. Press / to select an option, and then press eingabe . • Add xxx to word list? : Adds the current word to My Word List.
3.11 K-Rules in DUDEN - Die deutsche Rechtschreibung Dictionary The DUDEN dictionary in the device contains further explanations on the spelling rules (K-rules). When a K-rule is available in an entry, you will see something like K 72 (72 stands for the rule number). To view the rule: 1. Press eingabe . • The first word on the screen is highlighted. 2. Use the direction keys to highlight the K-rule symbol. • In the above example, highlight K 72 . 3. Press eingabe to view the content. • See 1.
3.12 Hints on Inputting Words The following instructions apply to all entry screens where word input is allowed. Note: Some entry screens may allow only certain types of character inputs. Inputs Methods Capital letters (e.g. A, E) Hold Accents (e.g. é, î) Type a letter (e.g., e) and then press accent you want appears (e.g., é). Numbers (e.g. 1, 2) Press FN + a number key (the numbers are printed at the top right corner of the keys Q-P).
3.13 Viewing Downloaded Dictionaries Your device is not limited to the dictionaries it comes with. Additional dictionaries can be downloaded from Franklin’s website and installed in the device. Select this option in the Books menu to access the downloaded dictionaries. If multiple dictionaries are available, press / to select the one you want and then press eingabe to use it. Use the supplied WordBytes 2.0 software to install or remove downloaded dictionaries.
4. LEARN Menu 4.1 PONS Business Englisch The guide contains a large collection of essential English guides for business. It is divided into three sections: Businessprachführer Englisch, Überlebenswortschatz und Business Knigge and Business Englisch Wörterbuch. Accessing the Guide 1. In the Learn menu, press / to select PONS Business Englisch and then press eingabe . • Or press PONS Business on the top row of the keyboard for direct access. 2. Press / to select a section and then press eingabe .
4.1 PONS Business Englisch Using Businessprachführer Englisch 1. In Businessprachführer Englisch, press topic and then press eingabe . G Businessprachführer Englisch A Ratschläge für Reisende B C Das Wichtigste in Kürze Telefonieren D E E-Kommunikation Reisevorbereitungen F Unterwegs G H Unterkunft Gastronomie I In der Stadt F1 Main / to select a main E-D F6 Exit 2. Press / to select a sub-topic.
G Businessprachführer Englisch E-D 4.1 PONS Business Englisch A Ratschläge für Reisende B C Das Wichtigste in Kürze Telefonieren D E E-Kommunikation Reisevorbereitungen F Unterwegs G H Unterkunft Gastronomie I In der Stadt Using Überlebenswortschatz und Business Knigge 1. InMain Überlebenswortschatz und Exit Business Knigge, press select a country and then press eingabe .
4.1 PONS Business Englisch Using Business Englisch Wörterbuch 1. • 2. • In the Wörterbuch, press / to select a word. Alternatively, type in the search box to look for a word. Press FN + DICT to view definition of the selected word. To change the language of the headwords, press FN + TOGGLE. Playing Games in Wörterbuch 1. In Wörterbuch, press FN + GAME. 2. Press / to choose an option from the pop-up menu. • D > E: Selects German as the source language of the game.
4.2 Phrasebook 1. In the Learn menu, press / to select Phrasebook and then press eingabe . • The phrases are grouped into several categories in your selected message language. 2. Press / to select a category. • The phrases in your selected category show on the right of the screen. • If you want to show the phrases in another language, press FN + SOURCE to select the language you want. 3. Press once and then press / to select the phrase you want to translate.
4.2 Phrasebook Searching for a Phrase Instead of browsing through the phrases, you can directly type a keyword to start searching and to yield phrase(s) with the keyword. If your search returns no matches, try other forms of the word, including the root word, if you have typed the inflected form. Accents must be typed to deliver matches. To view the words you have used for searching, press FN + LOG.
4.3 Grammar Guides Your device includes essential grammar lessons with quizzes. 1. In the Learn menu, press / to select Grammar Guide and then press eingabe . 2. Press / to select a version and then press eingabe . 3. Press / to select the topic you want to study and then press eingabe . • Repeat this step if there are sub-topics until you read the content. 4. Press FN + PREVIOUS / NEXT to view the previous or next topic. • Press FN + MAIN to return to the main menu of the grammar guide.
4.4 My Word List As you explore new words, save them in My Word List for further study or review. Adding Words to My Word List 1. In the Learn menu, press / to select My Word List and then press eingabe . 2. Press FN + ADD. • You are promoted to Global Search of the device. 3. In Global Search, type a word to search for the word you want to add in My Word List. • See 3.1 Using Global Search. 4. Press FN + LIST. 5.
4.4 My Word List Grouping Entries In My Word List, you can add words to selected groups for efficient lookup or study. 1. In My Word List, press / to select an entry. 2. Press FN + GROUP. 3. Press / to select ‘Add xxx to Group’ and then press eingabe . ‘xxx’ stands for the current word. 4. A list of groups shows on the screen. Press / to select a group. 5. Press eingabe . The word is added to the selected group. Viewing Entries in Groups 1. 2. 3. 4. 5. In My Word List, press FN + GROUP.
4.4 My Word List • To cancel the selection, repeat the step and press FN + UNPICK. • To select all words, press FN + PICK ALL. To deselect all words, press FN + UNPICK ALL. 7. Press FN + CONFIRM when done. • Or press FN + CANCEL to cancel adding words to the group. To add entries in a group: 1. In My Word List, press FN + GROUP. 2. Press / to select ‘Jump to Group’ and then press eingabe . 3. Press / to select a group and then press eingabe . 4. Press FN + ADD. 5.
4.4 My Word List 4. Press FN + DELETE. • You are asked to confirm the deletion, press so or ‘No’ to cancel. To remove all groups: 1. In My Word List, press FN + GROUP. 2. Press FN + CLEAR. • You are asked to confirm the deletion, press so or ‘No’ to cancel. / to select ‘Yes’ to do / to select ‘Yes’ to do To remove entries in a group: 1. In My Word List, press FN + GROUP. 2. Press / to select ‘Jump to Group’ and then press eingabe . 3. Press / to select a group and then press eingabe . 4.
4.5 Personal Dictionary Use the Personal Dictionary to create your own dictionaries on the device. You can copy them to your PC for further editing. Creating Dictionaries on the Device 1. In the Learn menu, press / to select Personal Dictionary and then press eingabe . 2. Press FN + NEW to create a new personal dictionary. 3. Create a name for the dictionary and then press eingabe . 4. Press / to select the dictionary you have just created and then press eingabe . 5. Press FN + ADD. 6.
4.5 Personal Dictionary Viewing Personal Dictionaries 1. In the Learn menu, press / to select Personal Dictionary and then press eingabe . 2. Press / in the dictionary selection screen to select the one you want and then press eingabe . 3. Press / to select the entry you want to view and press eingabe . • You can also type to look for a word. Editing Personal Dictionaries Use the following soft keys. To execute the soft keys, hold FN and press the corresponding F1 to F6 keys on the top row of the keyboard.
4.6 Search History The device stores the most recently browsed entries in the dictionaries. Viewing History 1. In the Learn menu, press / to select History and then press eingabe . • Or, press FN + for direct access. 2. Press / to select an entry and then press eingabe . Editing History Use the following soft keys. To execute the soft keys, hold FN and press the corresponding F1 to F6 keys on the top row of the keyboard. • DELETE: Deletes the selected entry. • CLEAR: Clears the entire history.
5. EXERCISES Menu 5.1 Creating User Names A user name must be created before starting the exercises. Maximum 10 user names can be created. The user names are common for use in all exercises. 1. In the Exercises menu, press / to select an exercise (e.g. Audio Dictation) and then press eingabe .
5.2 Audio Dictation In Audio Dictation, a word is read out in the language you have selected. You have to spell the word. 1. In Audio Dictation, press / to select a user name and then press eingabe . • See 5.1 Creating User Names. • For a new user to the exercise, see Changing the Settings at the end of this section. 2. A word is read out. Type the word in the space provided.
5.2 Audio Dictation Changing the Settings To change the settings of the exercise, press FN + SETTING. For a new user to the exercise, the settings menu will show automatically before the exercise starts. 1. In the setting menu, press / to select an option and then press . Press / to change the settings in the pop-up menu and then press eingabe to confirm. • Mode: Selects exercise or test mode. In test mode, there is a time limit for each question.
5.3 Phrase Builder In Phrase Builder, you have to arrange the words of a sentence in the correct order. 1. In Phrase Builder, press / to select a user name and then press eingabe . • See 5.1 Creating User Names. • For a new user to the exercise, see Changing the Settings at the end of this section. 2. Press / to select a word in the word field and then press eingabe to build a sentence in the phrase field. Phrase Builder/Exercise Level: Beginner Tips: 05 F1 Question: 10/20 Score: 10/17 sind Belgien.
5.3 Phrase Builder • Press FN + REVIEW to show all words in the exercise. In the review, press FN + DETAILS to show the sentences. Press FN + SCORE to return to the score sheet. • Press FN + EXIT to quit the exercise. Changing the Settings To change the setting of the exercise, press FN + SETTING. For a new user to the exercise, the settings menu will show automatically before the exercise starts. 1. In the setting menu, press / to select an option and then press .
5.4 Picture Card Game In Picture Card Game, you match words with pictures. 1. In Picture Card Game, press / to select a user name and then press eingabe . • See 5.1 Creating User Names. • For a new user to the exercise, see Changing the Settings at the end of this section. 2. Press / or / (when applicable) to select a word or a picture that matches with the question.
5.4 Picture Card Game Changing the Settings To change the setting of the exercise, press FN + SETTING. For a new user to the exercise, the settings menu will show automatically before the exercise starts. 1. In the setting menu, press / to select an option and then press . Press / to change the settings in the pop-up menu and then press eingabe to confirm. • Mode: Selects exercise or test mode. In test mode, there is time a limit for each question.
5.5 Pronunciation Trainer In Pronunciation Trainer, you learn rules in English pronunciations and practise your own skills by comparing with native voices. There are five modules: • Sounds of English: Learn basic pronunciation rules. • Stress and Rhythm: Learn rules in stress and rhythm. • Mischief Makers: Learn more hints and exceptions in pronunciations. • Let’s Talk!: Speak words and compare with native voices. • Pronunciation Practice: Select a word for pronunciation practice.
5.5 Pronunciation Trainer Using Let’s Talk! 1. In Pronunciation Trainer, press / to select Let’s Talk! and then press eingabe . 2. In Let’s Talk!, press / to select a user name and then press eingabe . • See 5.1 Creating User Names. • For a new user to the exercise, see Changing the Settings at the end of this section. 3. A word is shown and pronounced. You have to repeat the word and record your own pronunciation.
5.5 Pronunciation Trainer Using Pronunciation Practice 1. In Pronunciation Trainer, press / to select Pronunciation Practice and then press eingabe . 2. Press / to select a word for practice. • Alternatively, type to look for a word in the word list. 3. Press FN + LISTEN or to hear the word pronounced. 4. You can record your own pronunciation to compare with the native voice. Press FN + REC ON to record your own pronunciation. 5. Press FN + REC OFF to finish recording. 6.
5.6 Reading Comprehension In Reading Comprehension, you fill in the missing words while reading an English passage. 1. In Reading Comprehension, press / to select a user name and then press eingabe . • See 5.1 Creating User Names. • For a new user to the exercise, see Changing the Settings at the end of this section. 2. Press / to scroll while reading the passage. The missing words are replaced with numbers corresponding to the questions (word choices) in the lower pane of the screen.
5.6 Reading Comprehension Changing the Settings To change the setting of the exercise, press FN + SETTING. For a new user to the exercise, the settings menu will show automatically before the exercise starts. 1. In the setting menu, press / to select an option and then press . Press / to change the settings in the pop-up menu and then press eingabe to confirm. • Mode: Selects exercise or test mode. In test mode, there is time limit for each question.
5.7 Exercise Review In Exercise Review, you can check the latest scores and current skill levels in all exercises. 1. In the Exercises menu, press / to select Exercise Review and then press eingabe . 2. Press FN + USER to select a user and review his/her scores and skill levels. • Press / and then eingabe to select a user. 3. Press FN + EXERCISE or TEST to review scores and skill levels in exercise or test mode.
6. ORGANIZER Menu 6.1 Music Player This device can play mp3 files stored in the device or on a microSD card (if inserted). Music Player 00:15 Q W A E S R T Progress bar Volume level Z D F 1. Song 1.mp3 2. Song 2.mp3 3. Song 3.mp3 G 3:14 2:59 4:30 Playlist Adding Files to the Playlist 1. In the Organizer menu, press / to select Music Player and then press eingabe . 2. Press A (+). 3.
6.1 Music Player • Press E ( ) / R ( ) to skip to the previous or next file. • Press T ( ) / Z ( ) to scan backward or forward within a file. Press Q ( ) to resume normal playback. 3. Press W ( ) to stop the playback. Editing Playlist • Press A (+) to add new files to the playlist. See Adding Files to the Playlist. • Press S (X) to remove the highlighted file from the playlist. • Press D ( ) to remove all files from the playlist. Playback mode 1. 2. • • • • • 3.
6.2 Using the Calendar The Calendar lets you check months and days and use as a scheduler. Viewing the Calendar 1. In the Organizer menu, press / to select Calendar and then press eingabe . 2. To change day within a month, use the direction keys. • To change month, press D (SHIFT) until the current month is highlighted. Press / to select a month. • To change year, press D (SHIFT) until the current year is highlighted. Press / to select a year. Adding Schedules from the Calendar 1.
6.2 Using the Calendar Adding Schedules from the Schedule List 1. 2. 3. • • • • 4. • • In the Calendar, press S (LIST). Press A (NEW) in the schedule list. Input appropriate information in the available fields. Press / to shift between fields. Press when required to open a pop-up menu. This includes selecting the type of event and the time of the event. Use the direction keys to set the time or select your settings and then press eingabe . To change the input language, press FN + LANG. See 3.
6.2 Using the Calendar • EDIT: Edits the current schedule. Make necessary changes and then press FN + SAVE. Using a Password You can use a password to prevent unauthorized access. See 6.11 Organizer Password for details. Time Setting In the Calendar, press A (SET TIME). Note: By time setting in the calendar, you are actually setting the Clock in the Organizer. See 6.4 Using the Clock. Not all settings (e.g. World City) will show in the Calendar.
6.3 Using the Calculator 1. In the Organizer menu, press / to select Calculator and then press eingabe . 2. Type a number. • You can type up to 14 digits. To type a decimal, press G (.). To change the sign of a number, press Y (+/-). 3. Press a math function key. 4. Type another number. 5. Press eingabe for the result. 6. Press N (AC) to start over again at 0. Using the Calculator Memory To demonstrate the calculator memory, try the following equation: (32 x 12) – (8 x 8) = 320. 1.
6.4 Using the Clock 1. In the Organizer menu, press / to select Clock and then press eingabe . • The clock shows the times and dates of both local and world cities. Setting the Clock 1. In the Clock, press A (SET TIME). 2. Press / to move between fields. • Date / Time: Press once and then press / to change values. Press / to move between fields. • Home City / World City: Press once. Press / to select a city and then press eingabe . You can also type a letter to jump to that part of the list.
6.5 Using the Alarm You can have five alarm settings. Setting the alarm 1. In the Organizer menu, press / to select Alarm and then press eingabe . • The current alarm settings (Alarm 1-5) show on the screen. 2. Press / to select one of the settings and then press eingabe (or press A (SET)). 3. Press / to move between fields in order to set the alarm. • Status: Press repeatedly to set alarm on or off. • Time: Press once and then press / to change values. Press / to move between fields.
6.6 Using Memo Adding Entries 1. In the Organizer menu, press / to select Memo and then press eingabe . 2. Press / to select a category and then press eingabe . • The memos are grouped under categories. Four default categories are available. • To add a new category, press FN + ADD. Create a name for the new category and then press eingabe . 3. In the selected category, press FN + ADD. 4. Input appropriate information in the available fields. • Press / to shift between fields.
6.7 Using Voice Memo Making Recordings 1. In the Organizer menu, press / to select Voice Memo and then press eingabe . 2. Press A (RECORD) to start recording. • To pause recording, press A (PAUSE). Press A (GO ON) to resume. 3. Press S (STOP) when done. Listening to Recordings 1. In Voice Memo, press / to select a recording and then press eingabe . 2. Press D (PLAY) to start the playback. • To pause playback, press D (PAUSE). Press D (GO ON) to resume. • To adjust the volume, press (–) / (+) . 3.
6.8 Metric Converter 1. In the Organizer menu, press / to select Conversions and then press eingabe . 2. Press / to select Metric Converter and then press eingabe . 3. Press / to select a conversion category and then press eingabe . 4. In the selected category, press / to select a measurement unit. 5. Input numbers for conversion. • Press G (.) for a decimal. As you type the numbers, the equivalent value in other units shows automatically. 6. Press clear to start a new conversion.
6.9 Currency Converter 1. In the Organizer menu, press / to select Conversions and then press eingabe . 2. Press / to select Currency Converter and then press eingabe . 3. Press / to select a currency. 4. Input numbers for conversion. • Press G (.) for a decimal. As you type the numbers, the equivalent value in other currencies shows automatically. 5. Press clear to start a new conversion. Adjusting Exchange Rates 1. 2. 3. 4. • 5. • In the currency converter, press A (SETUP).
6.10 Using Countdown Timer 1. In the Organizer menu, press / to select Countdown Timer and then press eingabe . 2. Input values with the number keys. • Press / to shift between fields. 3. Press D (MUSIC). • You are prompted to select a sound file as the alarm tone. Use the direction and A (SAVE) keys for selection. 4. Press A (START). • To pause the timer, press S (PAUSE). Press S (CONT) to resume. • To stop the timer, press A (STOP). • To reset the timer, press S (RESET).
6.11 Organizer Password The password is applicable to Calendar and Voice Memo to prevent unauthorized access. Creating a password 1. In the Organizer menu, press / to select Organizer Password and then press eingabe . • You are asked to proceed to password setting. Press / to select ‘Yes’ and then press eingabe . 2. Create a password of up to eight characters and then press eingabe . 3. Re-enter the same password and press eingabe or FN + CONFIRM.
7. SETTINGS Menu 7.1 Display Settings 1. In the Settings menu, press / to select Display Settings and then press eingabe . 2. Press / to shift between settings. • Font size: Determines the size of screen type. • Dotted line: Determines if dotted lines show on the screen. 3. Press / to select the option you want and then press eingabe . • Or press FN + OK when done. To exit without saving, press FN + CANCEL. 7.2 Volume Control 1.
7.4 Power Management 1. In the Settings menu, press / to select Power Management and then press eingabe . 2. Press / to shift between settings. • Unit shutoff: Determines how long your device stays on if no key is pressed. • Backlight shutoff: Determines how long the backlight stays on once activated. 3. Press / to adjust the time and then press eingabe when done. • Or press FN + OK when done. To exit without saving, press FN + CANCEL. 7.
7.6 Host Information This menu shows the host ID, program version and data version. 1. In the Settings menu, press / to select Host Information and then press eingabe . 2. Press esc to exit. 7.7 Default Settings This menu lets you perform soft or hard reset of the device. 1. In the Settings menu, press / to select Default Settings and then press eingabe . 2. Press / to select between soft and hard resets. 3. Press FN + OK to perform the reset. • Press FN + CANCEL to exit without reset.
8. General Controls 8.1 Headphone Jack The headphone jack is located on the left of the device for 3.5 mm, 35 ohm impedance stereo headphones. Caution: Monophonic headphones will not work with this unit. 8.2 USB Port The USB port is located on the right of the device for a mini-USB 2.0 compatible connection. See 9.1 Connecting to a PC. 8.3 Inserting microSD Card Insert a microSD card to expand the unit’s memory space.
8.4 Adjusting Sound Volume Press FN + / to show the volume control menu. Press / to adjust the volume. When done, press / to select ‘OK’ and then press eingabe . Volume 1 OK Cancel 8.5 Changing Size of Screen Type Press repeatedly to change the size of the screen type. 8.6 Help is Always at Hand You can view a help message at any screen by pressing help, press esc . hilfe . To exit 8.
9. PC Connections 9.1 Connecting to a PC Your device has a built-in USB port and can be connected to your desktop or laptop PC with a USB cable. 1. Turn on your device. 2. Connect the wide end of a USB cable to a USB port on your PC and the smaller end to the USB port on your device. 3. You are asked if you want to connect the device to your PC. Press / to select “Yes” and then press eingabe .
9.2 Using WordBytes 2.0 The WordBytes 2.0 software (provided) lets you use certain features of this device on your PC.
9.3 Copying Files to Your Device You can transfer data to the device from your PC or save copies of your data to another location on your PC to backup important information. 1. Make sure your device is connected to your PC. • See 9.1 Connecting to a PC for more information. 2. On your PC, use Windows Explorer to find the drive labeled ‘Removable Disk’ or ‘Franklin’ and double-click it to open it. 3. Right-click the file you want to copy from your PC to your device and then click ‘Copy’ from the pop-up menu.
9.4 About Your Device Folders When you connect your device to your PC, you can see an assortment of folders for storing various types of data. Remember, ‘PersonalDict’ is always the location to save any .txt formatted personal dictionaries so they appear on your device. ‘Record’ is always the location to save voice memos. ‘Media’ and ‘Music’ are recommended for storing your music files. Any other available folders will contain the saved materials from other features. 9.
10. Additional Information 10.1 Specifications Model: BDS-6100 Language Learning Library Battery: Built-in rechargeable lithium polymer • Voltage: 3.7V • Capacity: 700mAh • Type: Li-Polymer • Model no.: PL-304360 Size: 140 x 83 x 18 mm Weight: 202 g ISBN: 978-1-59074-645-5 ©2002-2011 Franklin Electronic Publishers, Inc. Burlington, N.J. 08016-4907 U.S.A. All rights reserved. © PONS GmbH, Stuttgart, 2010; © Oxford Advanced Learner’s Dictionary © Oxford University Press 2010.
10.2 Product Care Your device is designed to be light, compact, and durable. However, it is an electronic device and must be treated carefully. Putting unnecessary pressure on it or striking the device against other objects can cause damage. In order to avoid damage to your device, please: • Keep the lid closed when you are not using it. This will protect the screen from being broken, scratched or marred in any way. • Do not drop, crush, bend, or apply excessive force to the device.
10.3 Recycling and Disposal Device Disposal This device should be disposed through your local electronic product recycling system - do not throw in the trash bin. Packaging Disposal Please save this User’s Guide and all packing materials, as they contain important information. In case of disposal, please refer to your local recycling system. Battery Disposal Do not dispose of batteries with normal household waste. Please obey your local regulations when disposing of used batteries. Please visit www.
10.4 FCC Notice (U.S. only) This device complies with Part 15 of the FCC Rules. Operation is subject to the following two conditions: (1) This device may not cause harmful interference, and (2) This device must accept any interference received, including interference that may cause undesired operation. Warning: Changes or modifications to this unit not expressly approved by the party responsible for compliance could void the user’s authority to operate the equipment.
10.5 License Agreement (U.S.) READ THIS LICENSE AGREEMENT BEFORE USING THE PRODUCT. YOUR USE OF THE PRODUCT DEEMS THAT YOU ACCEPT THE TERMS OF THIS LICENSE. IF YOU DO NOT AGREE WITH THESE TERMS, YOU MAY RETURN THIS PACKAGE WITH PURCHASE RECEIPT TO THE DEALER FROM WHICH YOU PURCHASED THE PRODUCT AND YOUR PURCHASE PRICE WILL BE REFUNDED. PRODUCT means the software product and documentation found in this package and FRANKLIN means Franklin Electronic Publishers, Inc.
11. Warranty Information 11.1 Disclaimer of Warranties Except as specifically provided herein, Franklin makes no warranty of any kind, express or implied, with respect to this product. 11.2 Limited Warranty (U.S. only) LIMITED WARRANTY, DISCLAIMER OF WARRANTIES, AND LIMITED REMEDY FRANKLIN WARRANTS TO THE ORIGINAL PURCHASER THAT THIS PRODUCT WILL BE FREE FROM DEFECTS IN MATERIALS AND WORKMANSHIP FOR A PERIOD OF ONE (1) YEAR FROM THE ORIGINAL DATE OF PURCHASE AS EVIDENCED BY A COPY OF THE SALES RECEIPT.
If you return a Franklin product, please include your name, address, telephone number, a brief description of the defect and a copy of your sales receipt as proof of your original date of purchase. You must also write the RMA prominently on the package if you return the product; otherwise there may be a lengthy delay in the processing of your return. Franklin strongly recommends using a trackable form of deliver to Franklin for your return. 11.
www.franklin.