
User's Manual


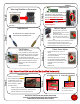

Exhibit 9
US7,420,471; US8,169,335; US8,232,888; US5,939,986;
US6,810,353; AU2005289704; ZA2007/02919; ZA2008/02673;
ZA2010/06816, ZA2010/09068 Patent Pending
2.8.1 Retro-fitted CAM Installation (By Qualified Dealer only)
*With a 5/32” hex driver, unscrew the bolts from
the label side of the generator. Keep the bolts
and lock washers to use on the new cover.
Step 5
Warning Module to Generator
Connect Warning Module (male) to Generator
(female).
Warning Module Cable
Step 8
Volume Adjust
• The clear plastic cover on the
Warning Module can be turned to
reduce the sound.
• Remove the bottom cover of the
generator with a 5/32” hex bit.
• Turn on the truck and activate the
PAD.
• Adjust the “VOL” pot with a 3/32” slotted screwdriver.
Increase volume-clockwise, decrease volume-
counterclockwise. Do NOT turn beyond the “STOP”.
• Return the bottom cover if Field Size is correct.
Step 10
Silent Zone Adjust
• Factory set to max. of ~22 in. or
56cm.
• To decrease the size, unscrew the cap
from the Cab Silencer.
• Activate a PAD and turn on truck.
• Using a 3/32” slotted screwdriver,
turn the Pot counterclockwise until
the PAD silences at the desired
location.
• Replace cap.
In order to avoid battery drain while
the vehicle is off, connect Cab
Silencer to a switched and fused (5A)
circuit. Place within 21” of the
Operator’s PAD AND 4ft away from
the generator. The Cab Silencer will
blind the CAM if installed on the
overhead guard.
Step 6
Cab Silencer
Step 7
Adjustments
All adjustments in Steps 8-10 need
to be done by a professional.
Step 9
Field Adjust
• Remove cover-see step 8
• Have a Pedestrian with a PAD at the
desired Danger Zone limit (~34’ max.
or 10.3m), slowly adjust the “PWM”
pot (clockwise-increase field,
counterclockwise-decrease field with a
3/32” slotted screwdriver until the
danger zone alerts at the desired
distance.
• Return bottom cover.
Step
1
Remove Cover
*Make sure there is a yellow
dot to indicate the generator
is CAM ready. If there is no
sticker, the generator may
not be ready for a CAM.
Contact HIT-NOT.
Step
2
Installation Kit & Materials Needed
-8mm crescent wrench
-Small Phillips head screwdriver
are needed for installation
Items in CAM Kit
9